Whitepapers
Deploying a Galera Cluster for MySQL on Amazon VPC
This tutorial shows you how to deploy a multi-master synchronous Galera Cluster for MySQL with Amazon’s Virtual Private Cloud (Amazon VPC) service.
What we’ll cover in this white paper
- Introduction
- What is memcached?
- Scaling applications using MySQL and memcached
- memcached driver for NDB
- Integrating memcached with ClusterControl
- Resources
In the next following posts we’ll deploy a multi-master synchronous MySQL Galera Cluster with Amazon’s VPC service. We’re going to create a public facing subnet for app/web servers and a private subnet for our database cluster.
The deployment will look similar to the below diagram.
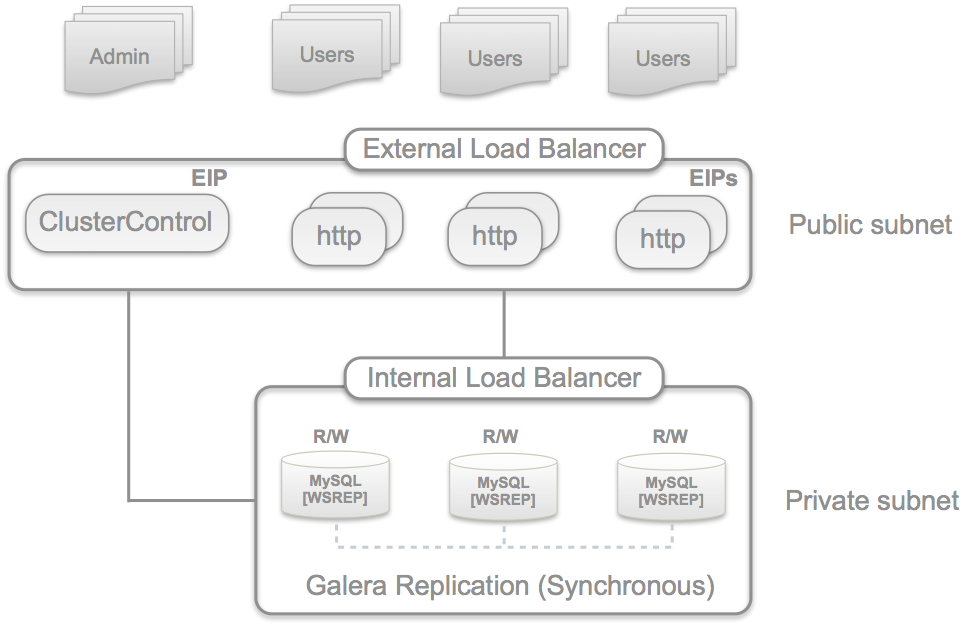
Amazon’s VPC provides a secure environment where you can chose to isolate parts of your servers by having complete control of how to deploy your virtual networking infrastructure much like your own datacenter.
The steps that we’ll go through are as following:
- Create a VPC with Public and Private subnets
- Define Security Groups (add rules later)
- Launch one instance for ClusterControl
- Launch three EBS optimized instances for the Galera/database nodes
- Format and mount an EBS volume (or RAID set) for each Galera nodes
- Create a Galera Configuration with Severalnines Galera Configurator
- Deploy and bootstrap Galera Cluster
- Add an internal load balancer
- Add a MySQL user for the internal load balancer
- Add web server instances
- Add an external load balancer
- Test the VPC database cluster setup
At the end we have the following instances available on the public subnet (Note your IP addresses would be different):
- 1 Elastic External Load Balancer, Elastic IP 54.249.29.89
- 2 Web servers: IP 10.0.0.28, Elastic IP 54.249.30.195 and IP 10.0.0.38, Elastic IP 54.249.30.136
- 1 ClusterControl server: IP 10.0.0.53, Elastic IP 54.249.30.164
and on the private subnet:
- 1 Elastic Internal Load Balancer, IP 10.0.1.17
- Galera Node 1, IP 10.0.1.13
- Galera Node 2, IP 10.0.1.16
- Galera Node 3, IP 10.0.1.26
In this example going forward, we only deploy one private subnet however if you require a more fault-tolerant setup you can, for example, create two private subnets for the database cluster one in each Availability Zone (AZ) which can protect you from single location failures within a single Amazon region.
There are a number of issues that need to be handled properly with a Galera cluster across two regions and/or AZs (which practically are two data centers). This will be addressed in a future post.
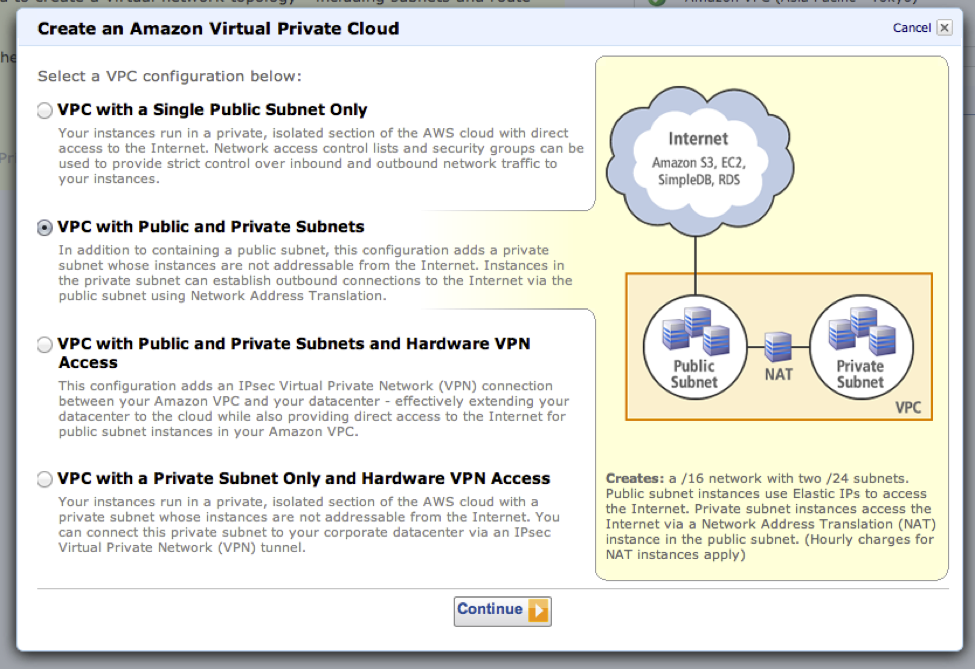
1. Create a VPC with Public and Private subnets
We’ll use Amazon’s VPC wizard to create our VPC that has a public and private subnet. Go into the Amazon VPC console dashboard, verify the region that your want your VPC to be created in and click on the ‘Get started creating a VPC’ button.
You will be prompted to select from a list of VPC templates and for this exercise, we’ll choose ‘VPC with Public and Private Subnets’.
The final confirmation dialog shows you the VPC configuration that will be deployed. Using defaults your VPC will allow up to 65,531 IPs with the public and private subnet allocating up to 251 slots each. You can create the VPC with defaults or configure ranges and the subnets to your preference.
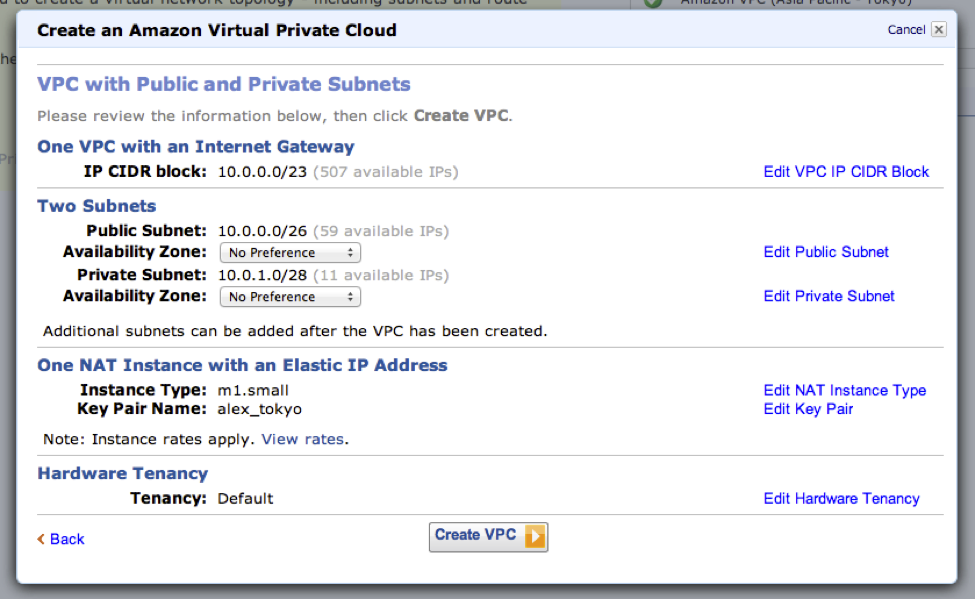
There will be also one NAT instance created which allows your EC2 instances on the private subnet to access the internet by routing traffic through that instance. Instances created on the public subnet will route traffic through the internet gateway.
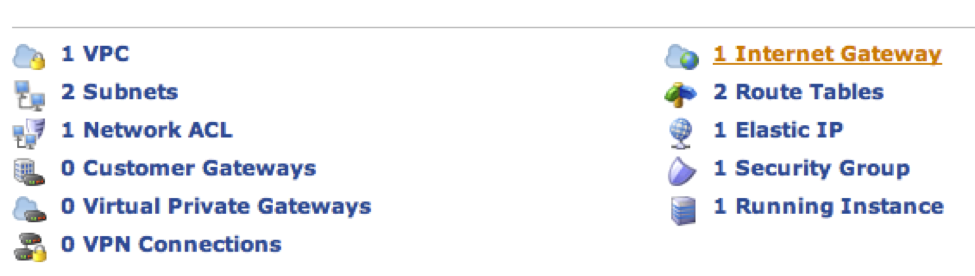
Click on ‘Create VPC’ and shortly after you should have 1 VPC, 2 subnets, 1 network ACL, 1 internet gateway, and route tables all set up.
2. Create Security Groups
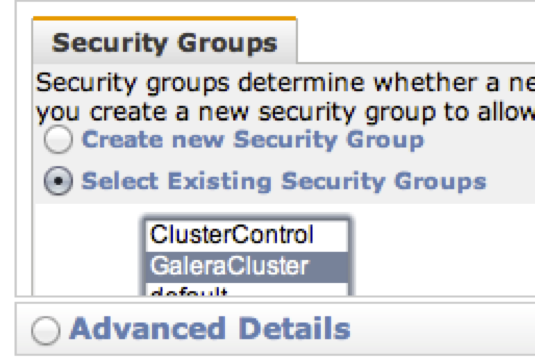
Before continuing lets define some security groups to be used for our different EC2 instances.
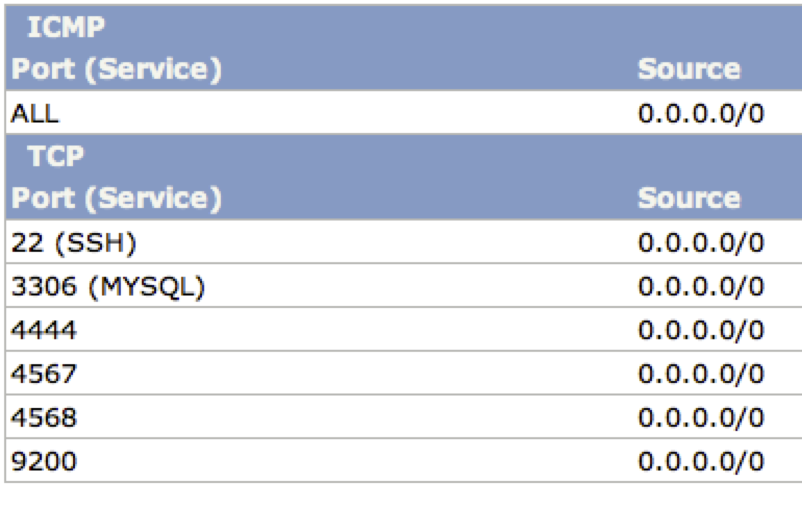
- GaleraCluster
This group is for the Galera database cluster which resides on the private subnet.
TCP: 4567 (Group comm), 4568 (IST), 4444 (rsync), 3306 (MySQL)
TCP: 9200 (HTTP health check ping port) xinetd invoked shell script
TCP: 22 (ssh) ClusterControl passwordless ssh
ICMP: Echo Request/Reply. Being able to ping the host is a requirement for the deployment/bootstrap scripts
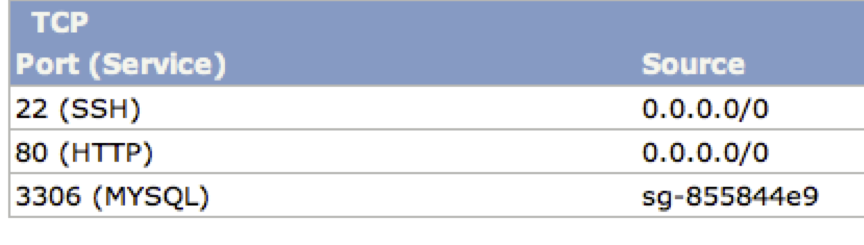
- ClusterControl
The ClusterControl instance is our monitoring and administration access point to the database cluster and resides on the public subnet. It is also serving as our staging server from where we deploy and bootstrap the MySQL Galera cluster.
TCP port 22 (ssh) SSH access to our VPC
TCP port 80 (HTTP) ClusterControl web application
TCP port 3306 (MySQL) The ClusterControl’s MySQL database and below we’ve also only allowed the source to be other instances with the GaleraCluster security group. This is important since the ClusterControl agent that is installed on the Galera nodes needs access to this port.
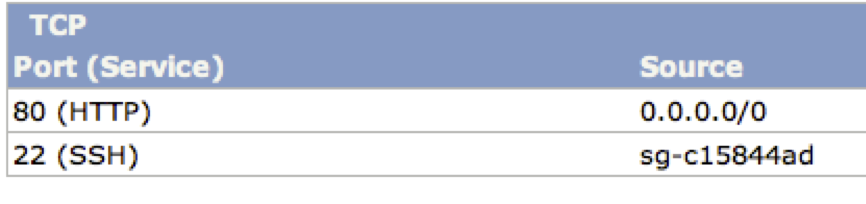
- Web
These are public-facing instances and in our example, we’ll create a couple of web servers.
TCP port 22 (ssh) Source only allows ssh connections from the ClusterControl.
3. Create EC2 instances
We are later going to use Severalnines’s Galera configurator to quickly deploy our MySQL Galera Cluster. The number of instances needed are 1+3, one instance will be dedicated for the ClusterControl package and the rest for the Galera database nodes.
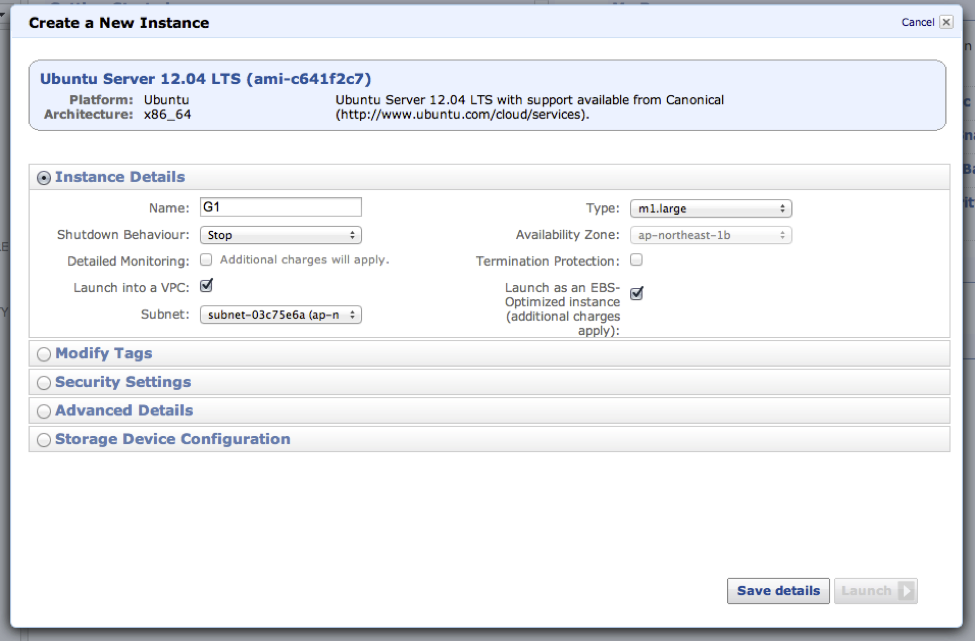
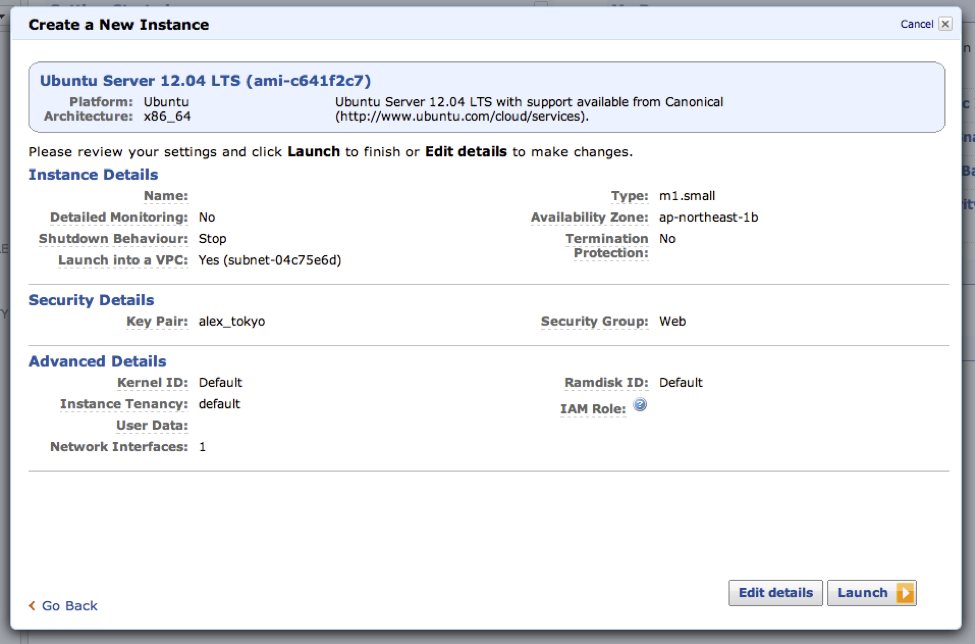
Use Amazon’s Quick Launch wizard and select one of the supported OSs for Galera (http://support.severalnines.com/entries/21589522-verified-and-supported-operating-systems).
I’m going to use a Ubuntu Server 12.04 LTS image and create 1 small instance for the ClusterControl and 3 large EBS optimized instances for the Galera Nodes.

In order to launch the instance in a VPC subnet you need to edit the details and make sure to enable ‘Launch into a VPC’. Select the private subnet for the Galera instances and the public subnet for the ClusterControl instance.
ClusterControl Instance
Select the public subnet.

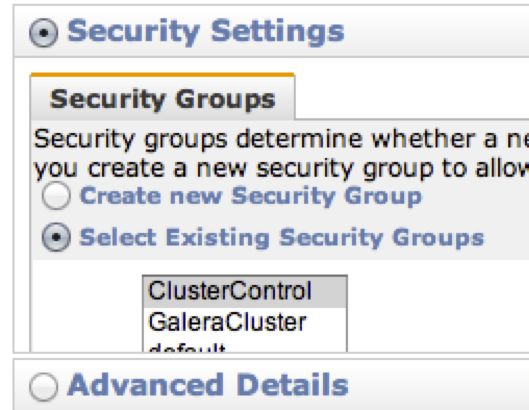
Select the ‘ClusterControl’ security group.
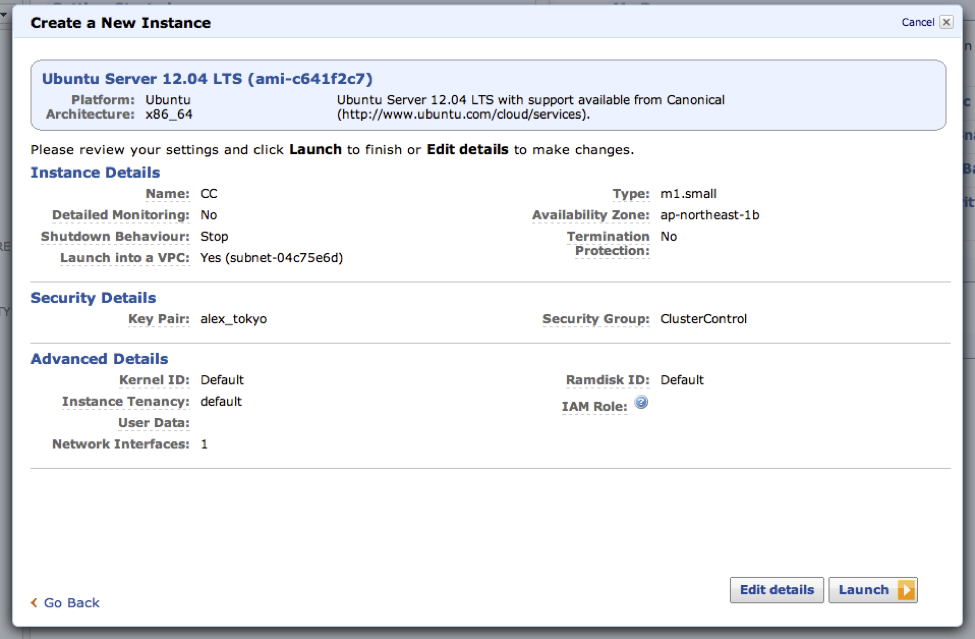
Save the changed details.
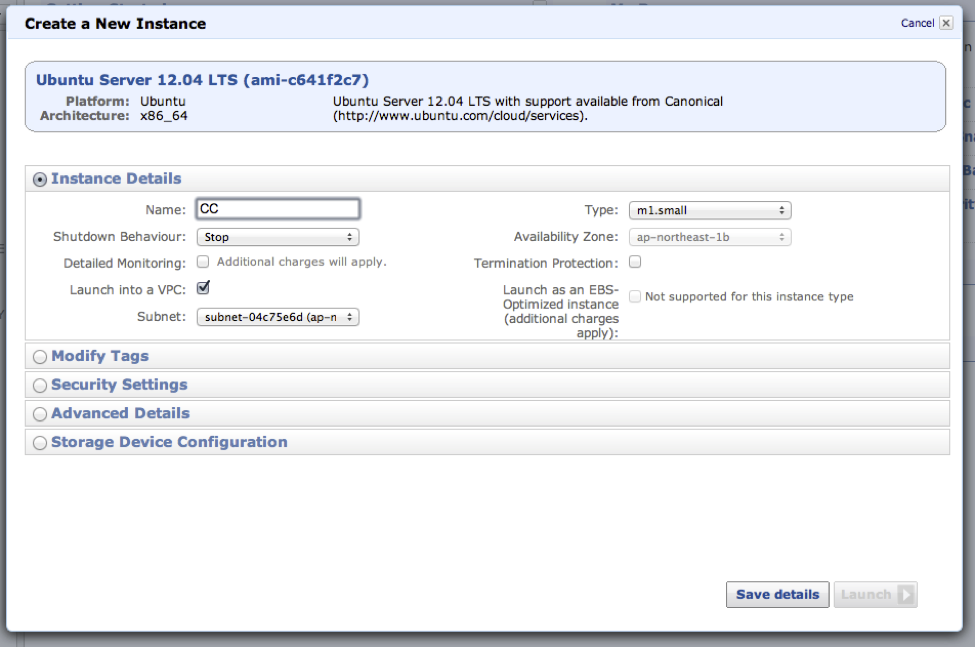
Naming your instances makes is easier to identify it later on.
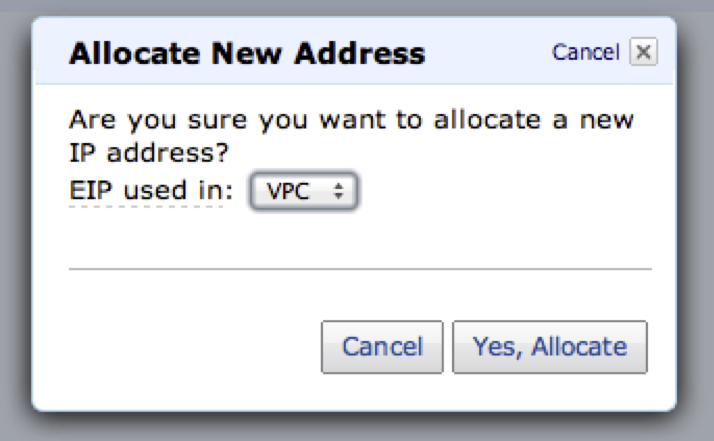
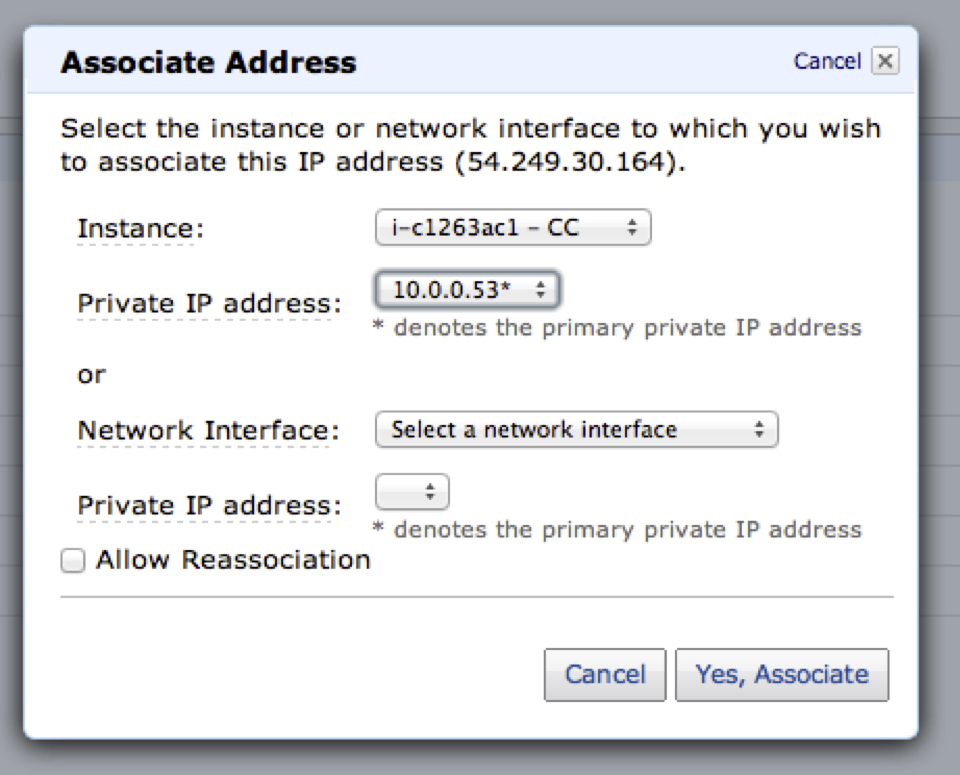
Next allocate an elastic IP. Instances in the public subnet that do not have an elastic IP are not able to access the internet.
Allocate an elastic IP and associate it to the ClusterControl instance
Go to the ‘Elastic IPs’ in the EC2 dashboard and click on the ‘Allocate New Address’. Make sure that the selected ‘EIP used in’ says VPC and not EC2.
Associate the IP with the ClusterControl instance.
You should now be able to log on to your ClusterControl instance using ssh. You should now be able to log on to your ClusterControl instance using ssh.
$ ssh -i <your aws pem> [email protected]Galera Instances
Next launch 3 large instances for the Galera nodes and also make sure to launch it as an “EBS optimized instance” (500 Mbps bandwidth for large instance types) and create an EBS volume to store the database files in order to survive instance reboots. A separate EBS volume is great for taking backups/snapshots etc.
Using an EBS optimized instance should give you an increase in throughput and a more consistent level of IOPS and latency between the EC2 instance and the EBS volume.
AWS quote: “Provisioned IOPS volumes are designed to deliver within 10% of your provisioned IOPS 99.9% of the time. So for a volume provisioned with 500 IOPS, it volume should deliver at least 450 IOPS 99.9% of the time.”
Select the GaleraCluster security group.
Then add a provisioned IOPS EBS volume with the number of IOPS that you want.

Only a maximum ratio of 10:1 between the IOPS and volume is allowed so for example 10GB volume <=100 IOPS or 200GB <= 200 IOPS
If your database workload is very write intensive and/or if your “hot” data does not fit entirely into your InnoDB buffer pool then you can opt to create a RAID array with a bunch of EBS volumes to increase the throughput for disk-bound workloads.
Since AWS charge per GB used and the number of provisioned IOPS not volumes you could easily create for example 6 EBS volumes and setup a RAID 1+0 stripe.

Save and launch the instance. Repeat for the next two Galera instances.
4. “Pre-flight check” ClusterControl and Galera instances
Before deploying and bootstrapping the Galera Cluster there are a few pre-requisites that we need to do.
- Copy your AWS key to the ClusterControl instance
$ scp <your aws pem file> [email protected]:~/.ssh/id_rsa
$ ssh -i <your aws pem file> [email protected] chmod 400 ~/.ssh/id_rsa
$ ssh -i <your aws pem file> 54.249.30.164
The location of the aws key will be needed later in the Galera Configurator section. Verify that you can use ssh to connect to your Galera instances
$ ssh 10.0.1.13 ls /etc
$ ssh 10.0.1.16 ls /etc
$ ssh 10.0.1.26 ls /etc
If you don’t feel comfortable using the AWS key you easily generate your own passwordless ssh key instead to be used for the database cluster.
$ ssh-keygen -t rsa -N "" -f ~/.ssh/id_rsa- Ping Galera hosts from the ClusterControl instance
This should work if you have set up the GaleraCluster security group properly allowing ICMP echo request/reply. The deployment script requires that you can ping the Galera nodes.
From your ClusterControl instance ping your Galera instances.
$ ping 10.0.1.13
$ ping 10.0.1.16
$ ping 10.0.1.26- hostname -i needs to resolve properly on all instances/hosts
If you get “hostname: Name or service not known” then the most painless way to fix this issue is to add the hostname to the /etc/hosts file (another way is to edit the Galera deployment scripts). Currently the deployment script does not use ‘hostname –all-ip-addresses’ as default. - Doing ‘ssh 10.0.1.26 sudo ls’ should not give you “sudo: unable to resolve host ip-10-0-1-26”
Once again the most painless way to resolve this is to add the hostname to the /etc/hosts file on each instance.On 10.0.1.26
$ echo “10.0.1.26 ip-10-0-1-26” | sudo tee -a /etc/hostsMake sure that 1. and 2. passes on all Galera instances
5. Format and mount EBS volume(s) on the Galera instances
On each Galera instance format a new ext4 (or use xfs) volume that we are going to use for our database files. If you created volumes to be used for a RAID setup then follow instructions further down.
Look for your EBS volume
$ sudo fdisk -l (or cat /proc/partitions)
...
Disk /dev/xvdf: 10.7 GB, 10737418240 bytes
255 heads, 63 sectors/track, 1305 cylinders, total 20971520 sectors
Units = sectors of 1 * 512 = 512 bytes
Sector size (logical/physical): 512 bytes / 512 bytes
I/O size (minimum/optimal): 512 bytes / 512 bytes
Disk identifier: 0x00000000
...
Format the volume with an ext4 filesystem
$ sudo mkfs -t ext4 /dev/xvdfCreate the mount point, this is where we’ll store the MySQL data files
$ sudo mkdir /dataAdd the volume to the /etc/fstab so that it survives instance reboots.
$ echo "/dev/xvdf /data auto defaults,nobootwait,noatime,data=writeback,barrier=0,nobh 0 0" | sudo tee -a /etc/fstabMount the new volume
$ sudo mount -a
$ df -h
Filesystem	Size	        Used	Avail	Use%	Mounted on
/dev/xvda1	8.0G	867M	6.8G	12%	        /
udev	        3.7G	12K	        3.7G	1%	       /dev
tmpfs	        1.5G	168K	1.5G	1%	       /run
none	        5.0M	0	        5.0M	0%	       /run/lock
none	        3.7G	0	        3.7G	0%	       /run/shm
/dev/xvdb	414G	199M	393G	1%	       /mnt
/dev/xvdf	        10G	        280M	9.2G	3%	       /data
Recommended optimized mount options for ext4:
http://blog.smartlogicsolutions.com/2009/06/04/mount-options-to-improve-ext4-file-system-performance/
If you for example created a few EBS volumes then you can create a RAID 1+0 setup in a few steps.
6 volumes striped as RAID 1+0
$ sudo apt-get install mdadm
$ sudo mdadm --create md0 --level=10 --chunk=64 --raid-devices=6 /dev/xvdf /dev/xvdg /dev/xvdh /dev/xvdi /dev/xvdk /dev/xvdj
$ sudo mkfs -t ext4 /dev/md/md0
Verify the new array
$ cat /proc/mdstat
Personalities : [linear] [multipath] [raid0] [raid1] [raid10] [raid6] [raid5] [raid4]
md127 : active raid10 xvdj[5] xvdk[4] xvdi[3] xvdh[2] xvdg[1] xvdf[0]
      31432320 blocks super 1.2 64K chunks 2 near-copies [6/6] [UUUUUU]
      [>....................] resync = 1.0% (326636/31432320) finish=76.1min speed=6806K/sec
unused devices: <none>
Add the array
$ sudo mdadm --detail --scan | sudo tee -a /etc/mdadm/mdadm.conf(ARRAY /dev/md/ip-10-0-1-27:md0 metadata=1.2 name=ip-10-0-1-27:md0 UUID=6e339907:9d9ff219:044ae233:47b4a362)
$ echo "/dev/md/ip-10-0-1-27:md0 data auto defaults,nobootwait,noatime,data=writeback,barrier=0,nobh 0 0" | sudo tee -a /etc/fstabMount the new volume
$ sudo mount -a
$ df -hT
Filesystem	Type	       Size	        Used	    Avail	    Use%	    Mounted on
/dev/xvda1	ext4	                8.0G	906M	    6.7G	    12%	    /
udev	        devtmpfs	        3.7G	8.0K	    3.7G	    1%	    /dev
tmpfs	        tmpfs	        1.5G	204K	    1.5G	    1%	    /run
none	        tmpfs	        5.0M	0	            5.0M	    0%	    /run/lock
none	        tmpfs	        3.7G	0	            3.7G	    0%	    /run/shm
/dev/xvdb	ext3	                414G	199M	    393G	    1%	    /mnt
/dev/md127	ext4	                30G	        582M	    28G	    2%	    /data
6. Quick Disk IO Performance Test
Lets do a simple test with dd. Write 8GB to /data and perform a sync once before exit.
Standard EBS volume
$ time sudo dd bs=16K count=524288 if=/dev/zero of=test conv=fdatasync
524288+0 records in
524288+0 records out
8589934592 bytes (8.6 GB) copied, 1157.38 s, 7.4 MB/s
real 19m17.440s
user 0m0.504s
sys 0m12.641s
RAID 1+0 on 6 provisioned IOP volumes, 10GBx6
$ time sudo dd bs=16K count=524288 if=/dev/zero of=test conv=fdatasync
524288+0 records in
524288+0 records out
8589934592 bytes (8.6 GB) copied, 1157.38 s, 7.4 MB/s
real 19m17.440s
user 0m0.504s
sys 0m12.641s
Read 8GB test file
Standard EBS volume
$ time sudo dd if=test of=/dev/null bs=16K
524288+0 records in
524288+0 records out
8589934592 bytes (8.6 GB) copied, 906.412 s, 9.5 MB/s
real    15m6.439s
user    0m0.428s
sys     0m6.256s
RAID 1+0 on 6 provisioned IOP volumes, 10GBx6
$ time sudo dd if=test of=/dev/null bs=16K
524288+0 records in
524288+0 records out
8589934592 bytes (8.6 GB) copied, 133.016 s, 64.6 MB/s
real    2m13.188s
user    0m0.180s
sys     0m5.080s
Galera Configurator
Now that we have the EC2 instances prepared it’s time to run the Severalnines’s Galera Configurator and generate the deployment scripts to be run from the ClusterControl instance.
Go to https://severalnines.com/galera-configurator/ and create a Galera deployment package. The wizard should be pretty self explanatory.
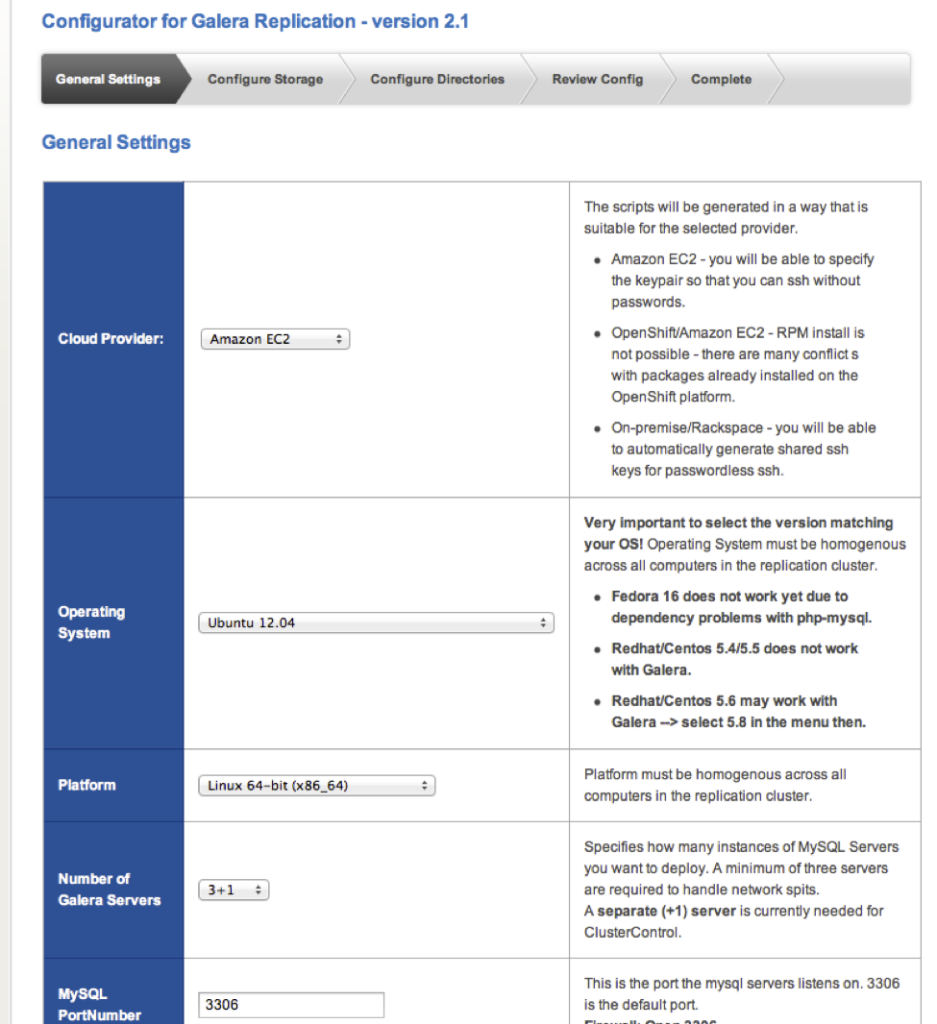
Select Amazon EC2 as the cloud provider and the OS used for your instances.
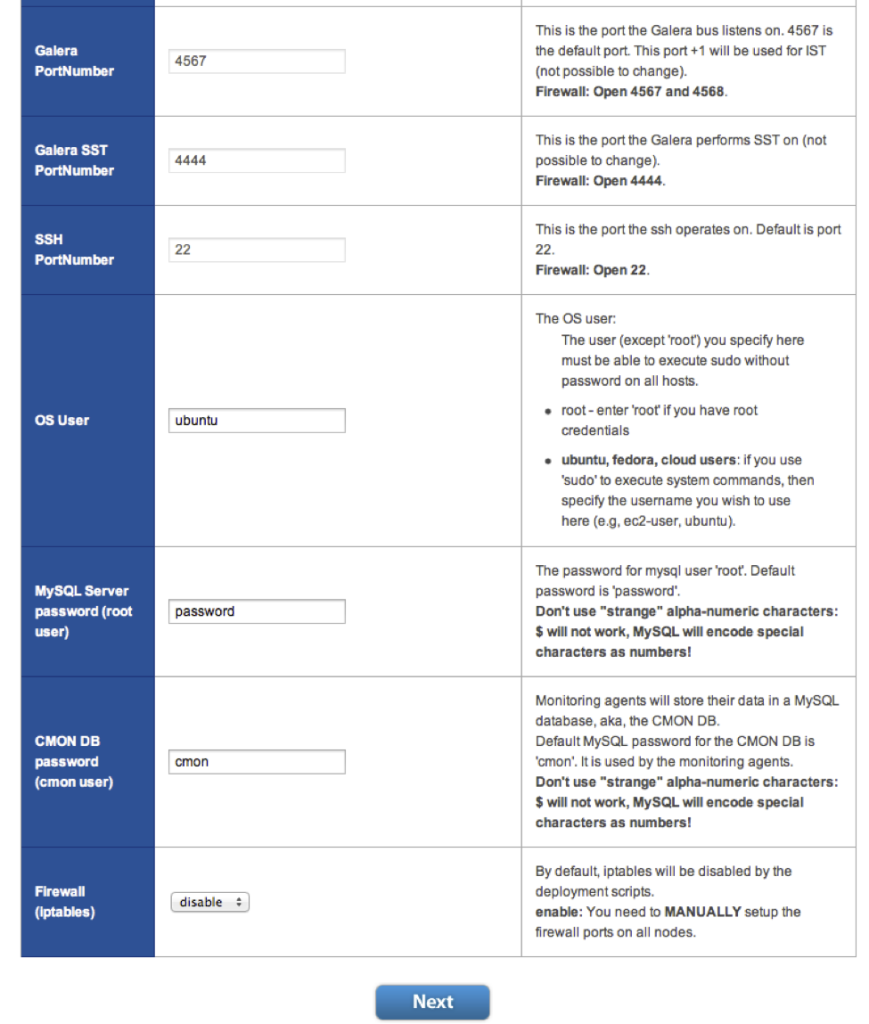
Enter the OS user as ‘ubuntu’ if you use debian/ubuntu based distributions or ‘root’ for rhel/centos variants.
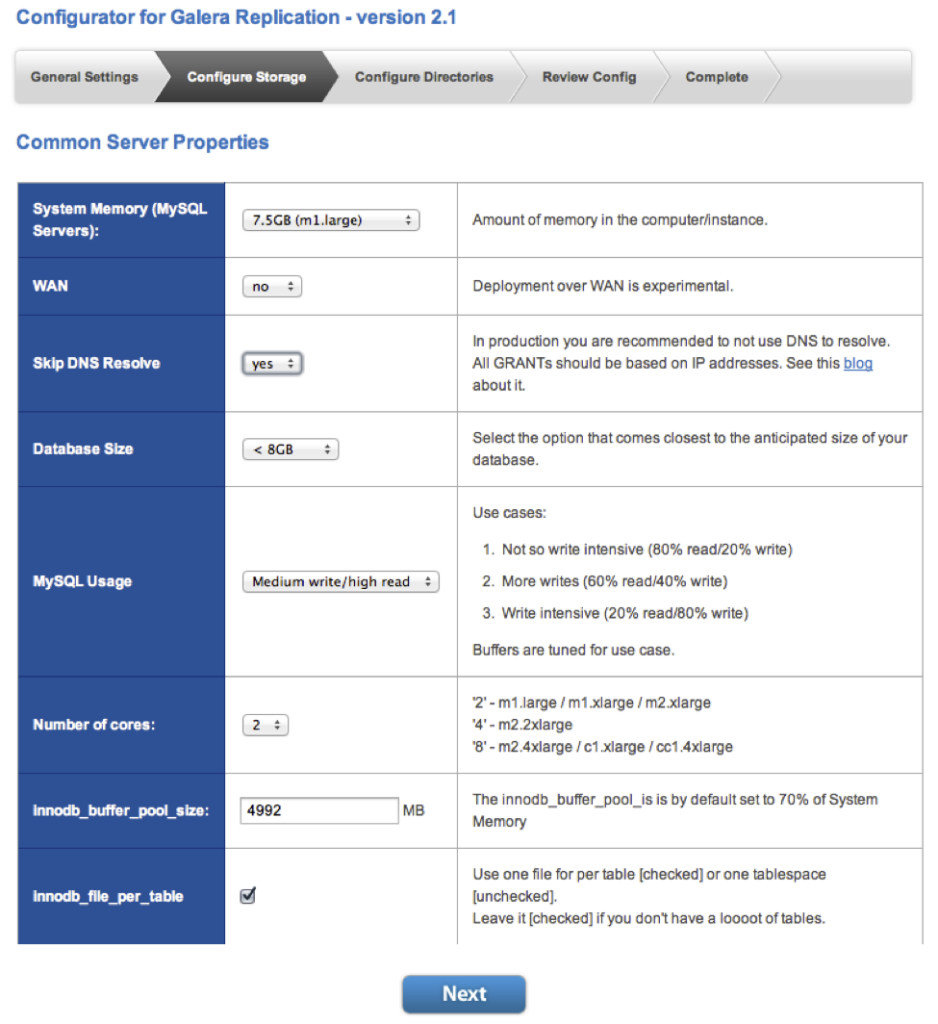
Here you should enable ‘Skip DNS Resolve’ and select a system memory size that is close to your Galera instance types, in our case m1.large.
The InnoDB buffer pool and other specific settings can be changed to better suite your workload and requirements. Just remember to change the MySQL configuration file before running the deployment script.
There are some settings like the InnoDB log file size that is easier to change before deploying although you can do that later as well but currently requires some manual steps.
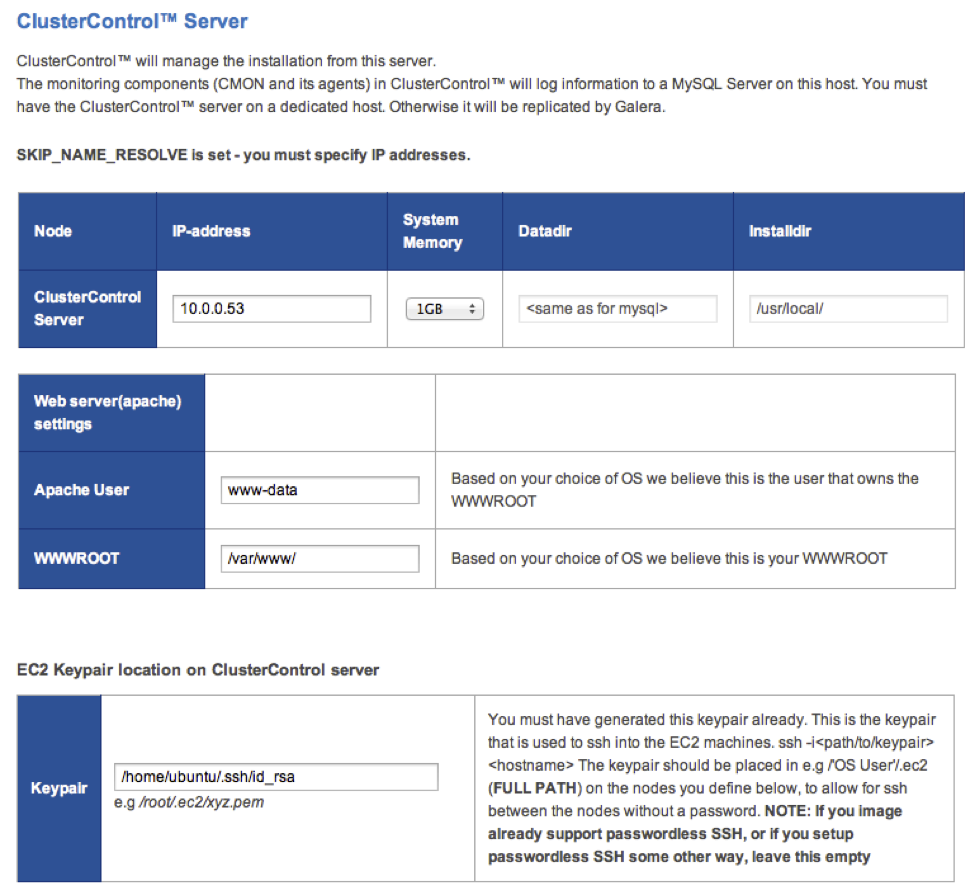
Enter the IP address for the ClusterControl instance and the location of your passwordless ssh key that you copied over to or generated for the ClusterControl instance.
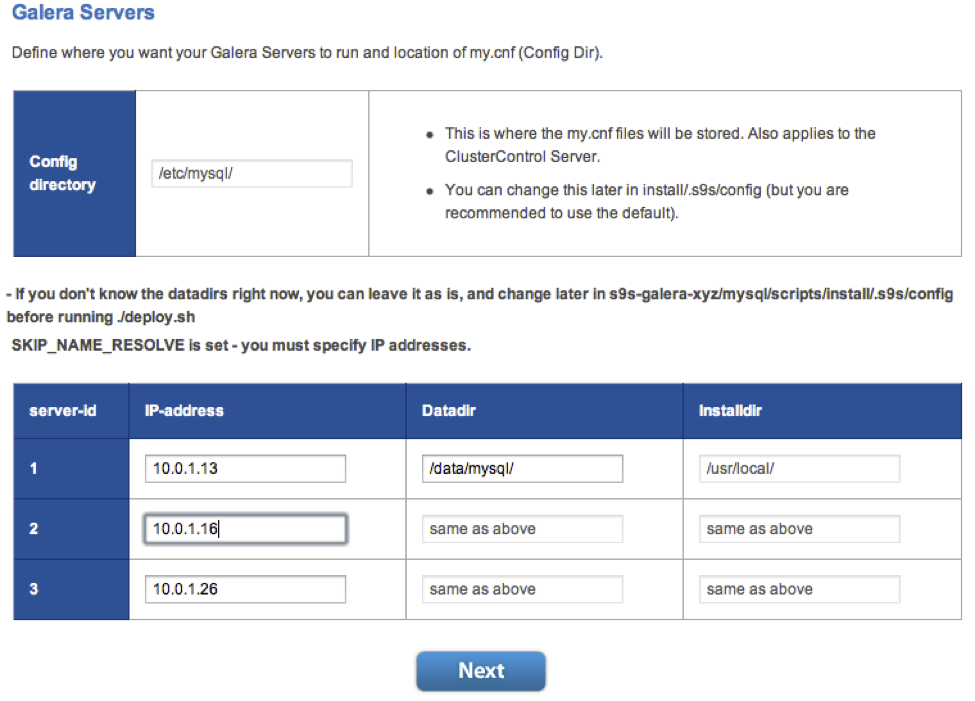
Enter the IP addresses for the Galera instances and make sure to change the default data directory path from ‘/mnt/data/mysql’ to ‘/data/mysql’ or to whatever path that you have mounted as the data volume for the database files.
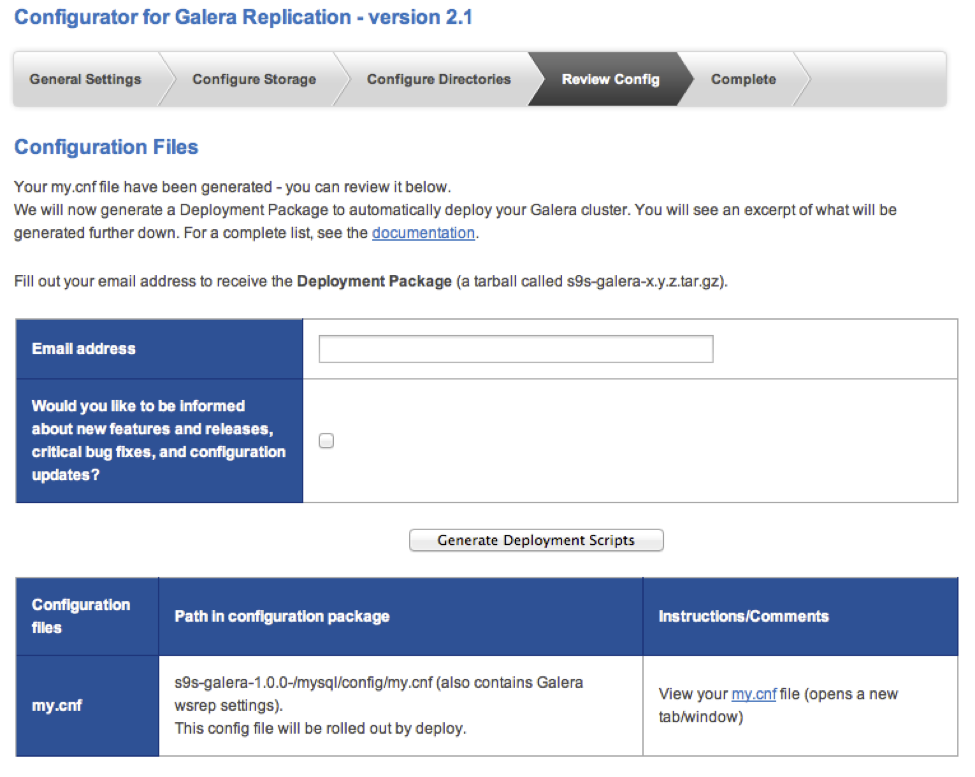
Finally enter an email address and click on the ‘Generate Deployment Scripts’.
7. Deploy and bootstrap a Galera Cluster
When you get the deployment package unpack it on the ClusterControl instance.
$ scp s9s-galera-2.10.tar.gz [email protected]:~/
$ ssh -i <your aws pem file> 54.249.30.164
$ tar zxvf s9s-galera-2.10.tar.gz
The my.cnf file that is initially used by all Galera is located under ~/s9s-galera-2.1.0/config. Before running the deployment script you might want to take a few minutes to change some settings in the MySQL configuration file to better suite your workload.
Deploy and bootstrap
$ cd s9s-galera-2.1.0/mysql/scripts/install
$ bash ./deploy.sh 2>&1 |tee cc.log
This could take up to about 10-15 minutes depending on your network.
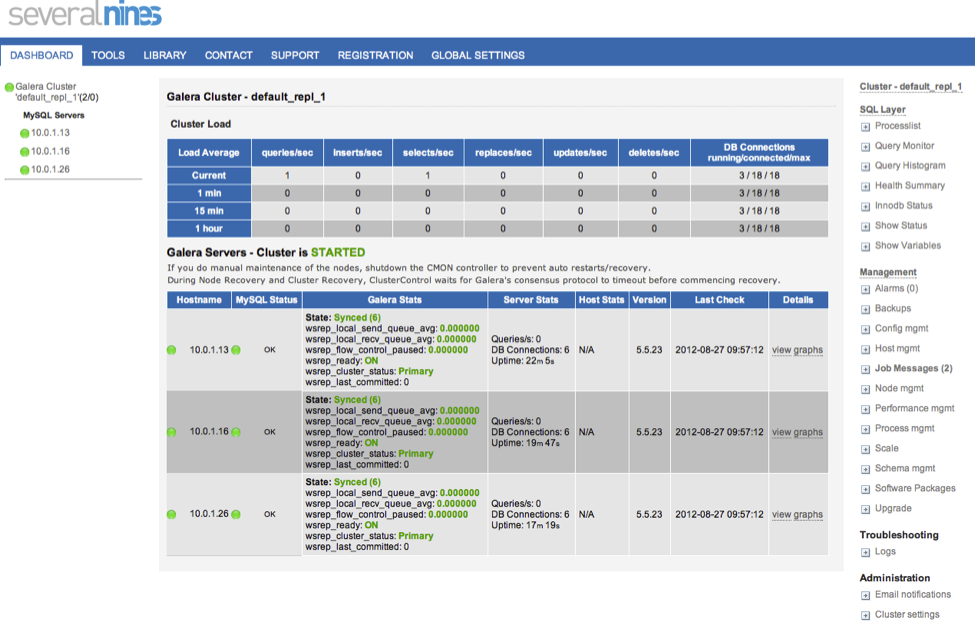
After the deployment script completes you should now be able to view your Galera cluster by going to the web application on the ClusterControl instance, http://54.249.30.164/cmon with your web browser.
Secure the Web application
If you want to secure the ClusterControl web interface you can try below script or follow our directions here: http://support.severalnines.com/entries/20637072-password-protecting-the-web-interface
Note: This script needs more testing…
#!/bin/bash
os=debian
if [ "$os" = debian ]
then
  www=/var/www/cmon
  www_user=www-data
  www_srv=apache2
else
  www=/var/www/html/cmon
  www_user=httpd
  www_srv=httpd
fi

htpasswd -cm $www/.htpasswd admin

cat >> "$www/.htaccess" << EOF
AuthType Basic
AuthName "CMON"
AuthUserFile $www/.htpasswd
Require valid-user
EOF

chown $www_user:$www_user $www/.htaccess
chmod 644 $www/.htaccess

if [ "$os" = "debian" ]
then
  sed -ibak s#AllowOverride None#AllowOverride All#g /etc/apache2/sites-available/default
else
  sed -ibak s#AllowOverride None#AllowOverride All#g /etc/httpd/conf/httpd.conf
fi
service $www_srv restart
Setup Internal and External Load Balancers
Next we are going to add two AWS load balancers, one internal for our database nodes and one external for our clients load balancing requests across our http servers. You can opt to install HAProxy (https://github.com/severalnines/haproxy) instead however you would need to handle failover for it.
Using Amazon’s elastic load balancers (ELB) we don’t need to worry about that however the ELBs are less configurable than HAProxy and lack other features as well.
Install the Galera http health check scripts
First on each Galera instances we are going to install a HTTP health check script that uses a Galera node’s state to determine whether the node should be classified as up or down.
$ cd ~/s9s-galera-2.1.0/mysql/scripts/install
$ wget https://severalnines.com/downloads/install-lbcheck.tar.gz
$ tar zxvf install-lbcheck.tar.gz
$ cd install-lbcheck
$ ./install-lbcheck.sh debian galera
Next step is to setup the internal load balancer and making sure the internal LB has 3 instances and that the health check is working fine.
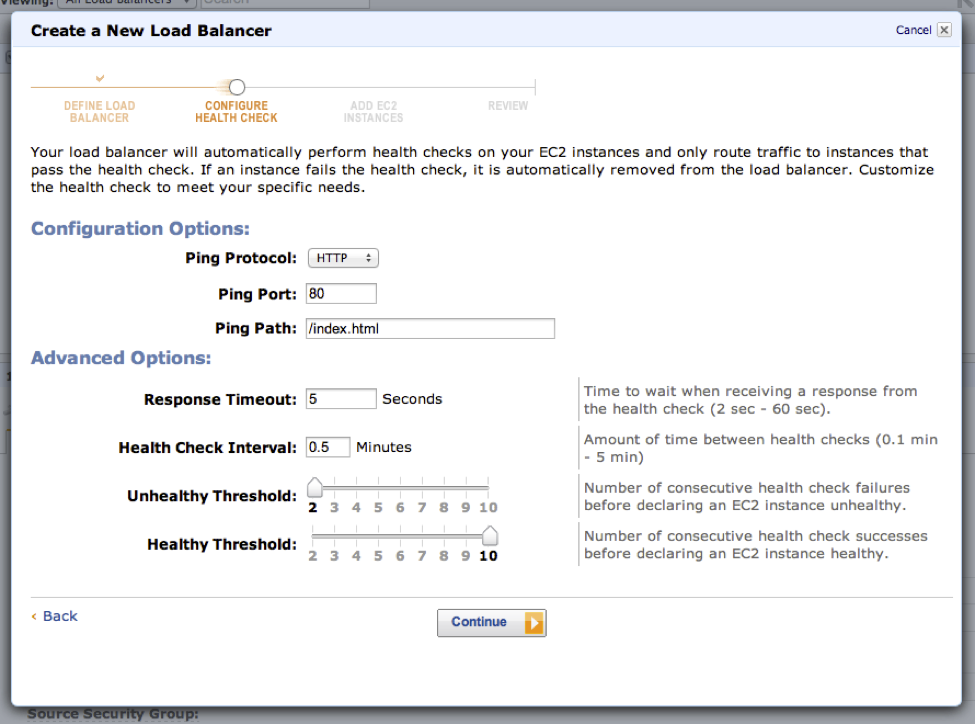
8. Add an Internal Load Balancer
The internal load balancer will load balance MySQL connections across our Galera nodes.
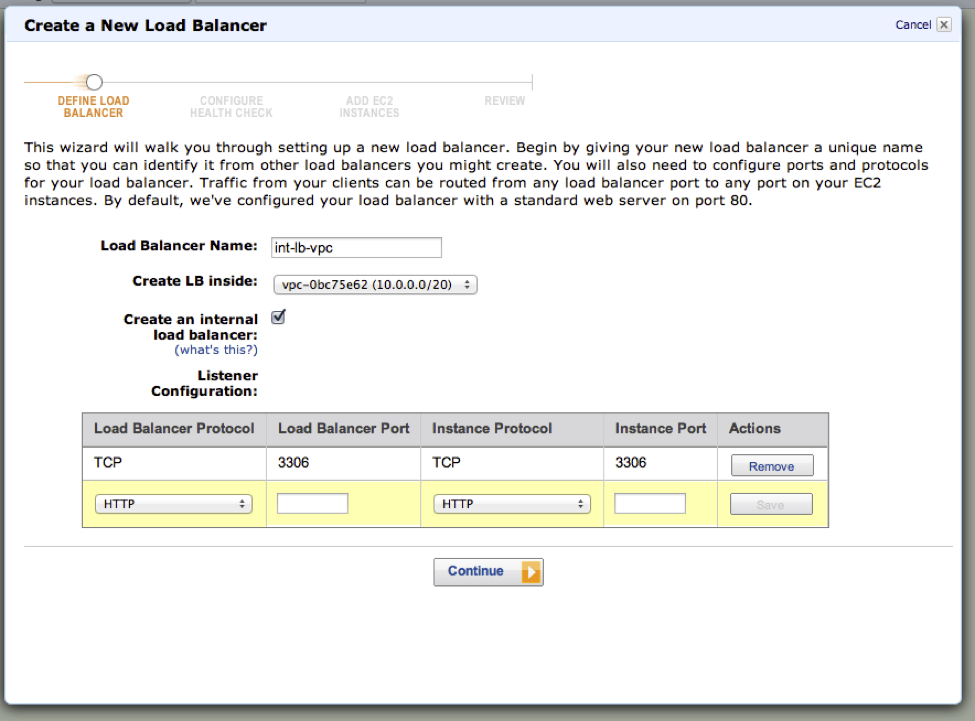
Make sure to enable ‘Create an Internal load balancer’.

The HTTP health check ping port for the Galera instances is on port 9200. The ping path is not relevant in our case so just leave at default.
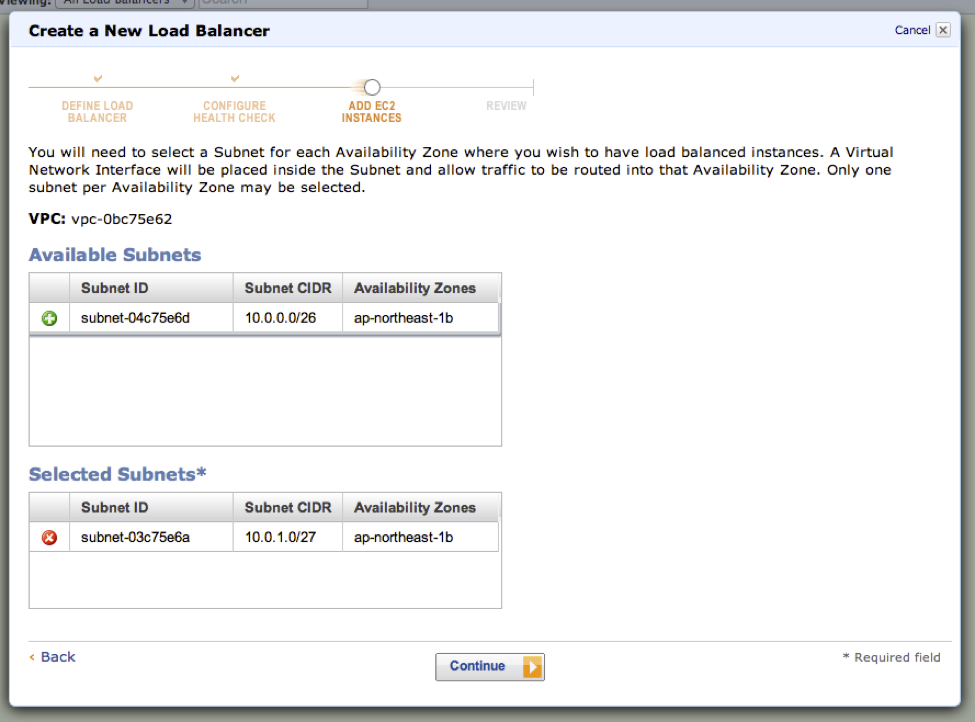
Select the private subnet for the internal load balancer. Next create a security group.
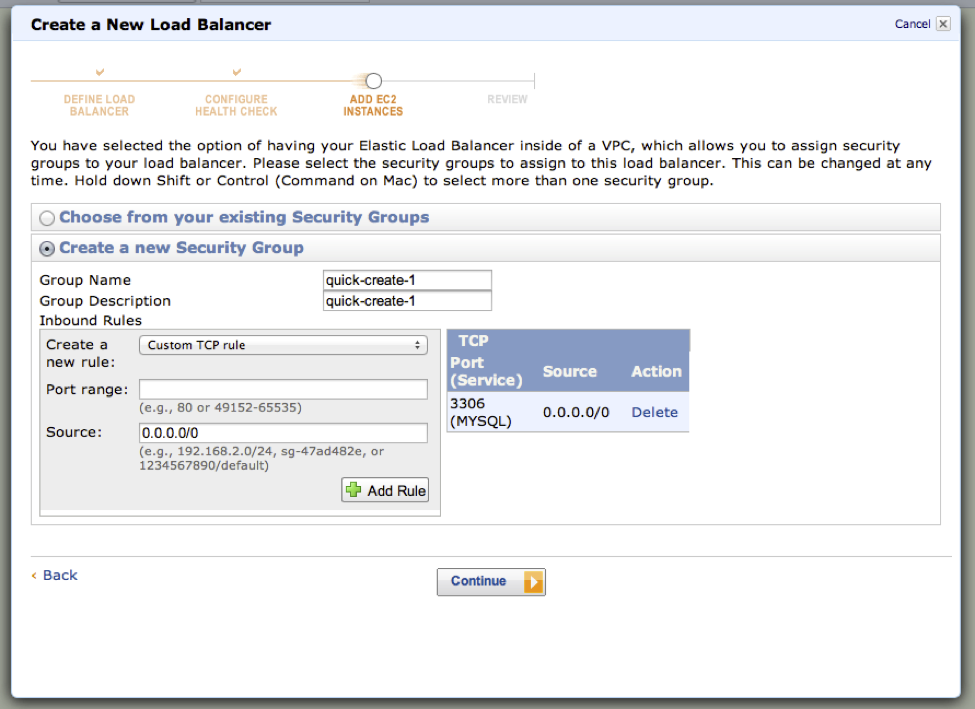
Since we’re load balancing MySQL connections you need to allow port 3306 to be opened
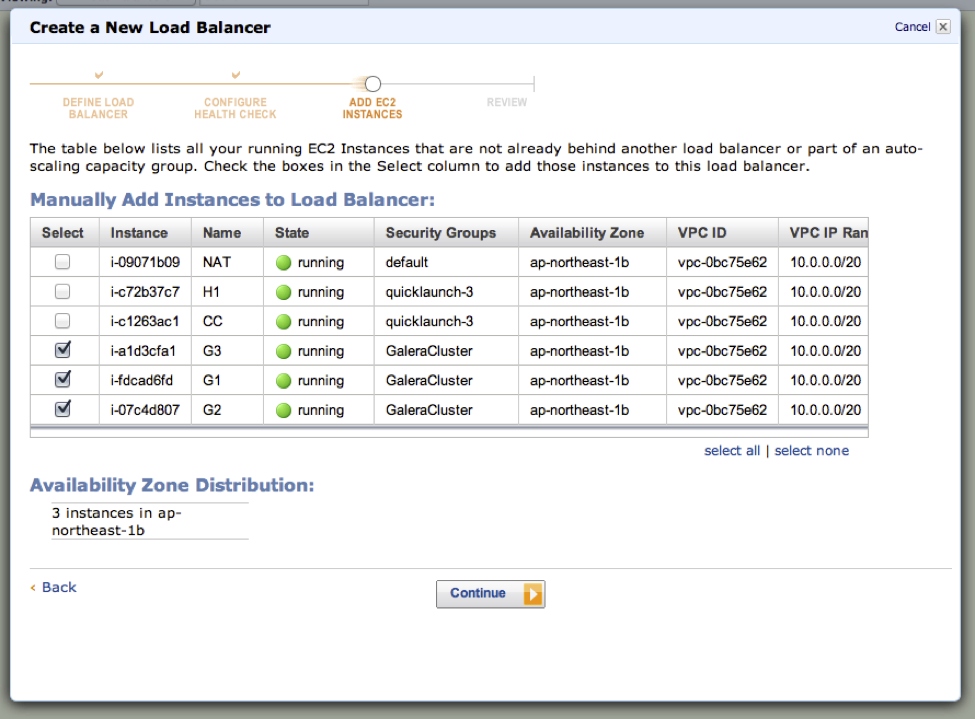
Select your three Galera instances for the load balancer pool.
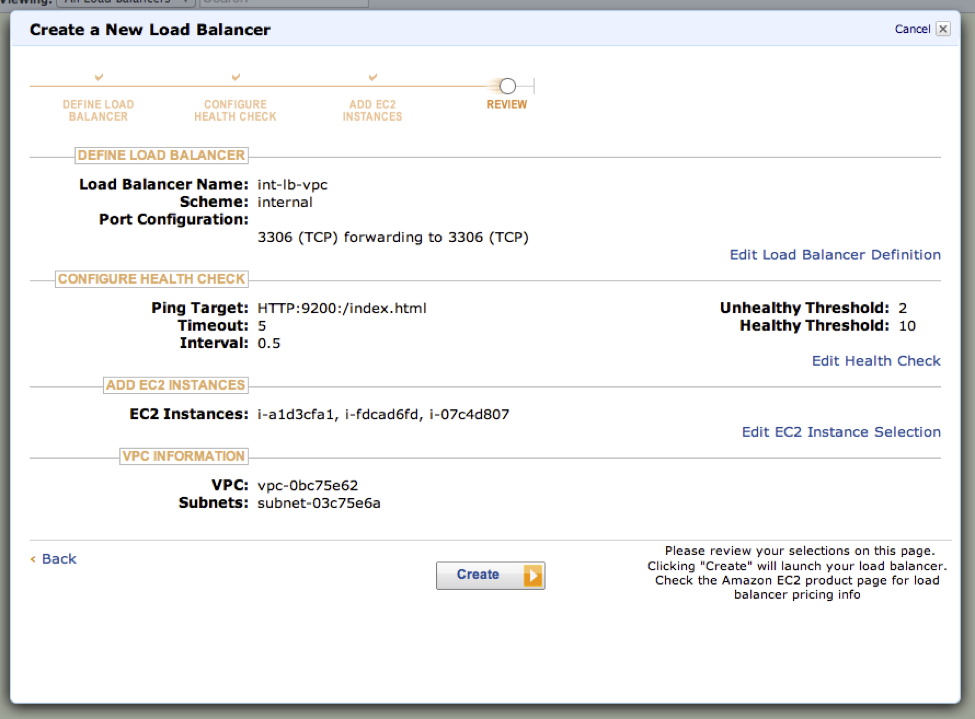
Review and finally create your internal load balancer.
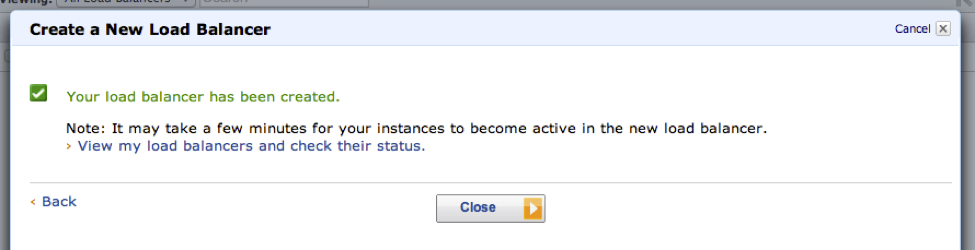
In a few minutes, you should see that all of your Galera instances have been registered and is now in the load balancer’s pool of healthy instances.
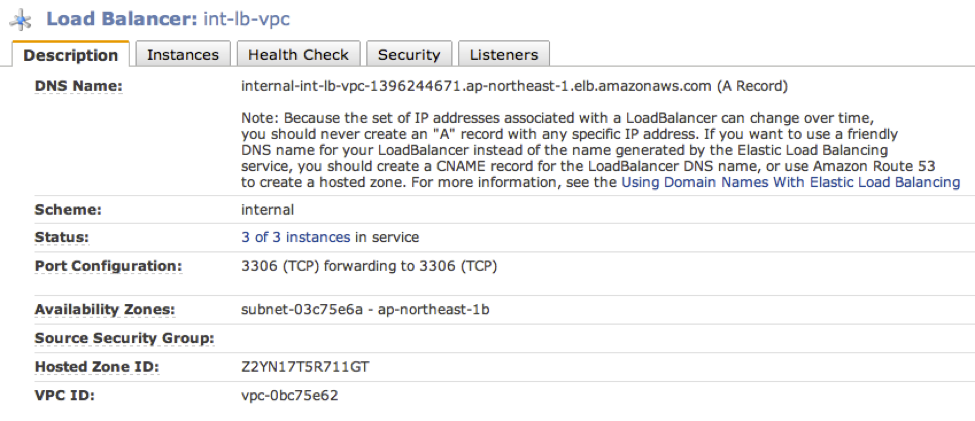
Note: Because the set of IP addresses associated with a LoadBalancer can change over time, you should never create an “A” record with any specific IP address. If you want to use a friendly DNS name for your LoadBalancer instead of the name generated by the Elastic Load Balancing service, you should create a CNAME record for the LoadBalancer DNS name, or use Amazon Route 53 to create a hosted zone.
This applies to the MySQL user and the hostname that is granted for the load balancer. In our example we are going to use the IP address however in a production environment a CNAME is much easier to use.
Note 2: The hostname for MySQL grants can be at most 60 characters. The AWS autogenerated part of the internal LB name if often longer than 50 characters that sits ontop of your specified LB name. So in our case we only had about 7 characters left for the LB if we wanted to use the internal DNS name for grants.
9. Add a MySQL User for the Internal Load Balancer
Next we create a user for the load balancer node which the web/http server should use.
On one of the Galera nodes install the mysql client (if not available)
$ sudo apt-get install mysql-client-core-5.5Lookup the IP address for the load balancer host
$ nslookup internal-int-lb-vpc-1396244671.ap-northeast-1.elb.amazonaws.com
Server:         10.0.0.2
Address:      10.0.0.2#53
Non-authoritative answer:
Name: internal-int-lb-vpc-1396244671.ap-northeast-1.elb.amazonaws.com
Address: 10.0.1.17
Add a MySQL user
$ mysql -uroot -p<your root password>
mysql> grant all privileges on *.* to 'lb'@'10.0.1.17' identified by 'lb';
NOTE: IP address used instead of internal DSN name since it is longer than 60 characters…
Verify that the load balancer works from the ClusterControl node by:
$ mysql -ulb -plb -hinternal-int-lb-vpc-1396244671.ap-northeast-1.elb.amazonaws.com
$ mysql -ulb -plb -h10.0.1.17
10. Add Web Servers Instances
Before creating the external load balancer lets create one or two web servers to be used for our external load balancer pool.
Allocate elastic IPs and associate it with the instances in order to reach the internet.
Install apache with a MySQL php driver to test the DB connection
$ sudo apt-get update
$ sudo apt-get install apache2 libapache2-mod-php5 php5-mysql
$ sudo service apache2 restart
In the next final post we’ll create a simple php test file on each web instance to verify that the external load balancer, web servers and database cluster are working properly.
11. Add an External Load Balancer
Create an external load balancer that will be the “single point” of access for your users.
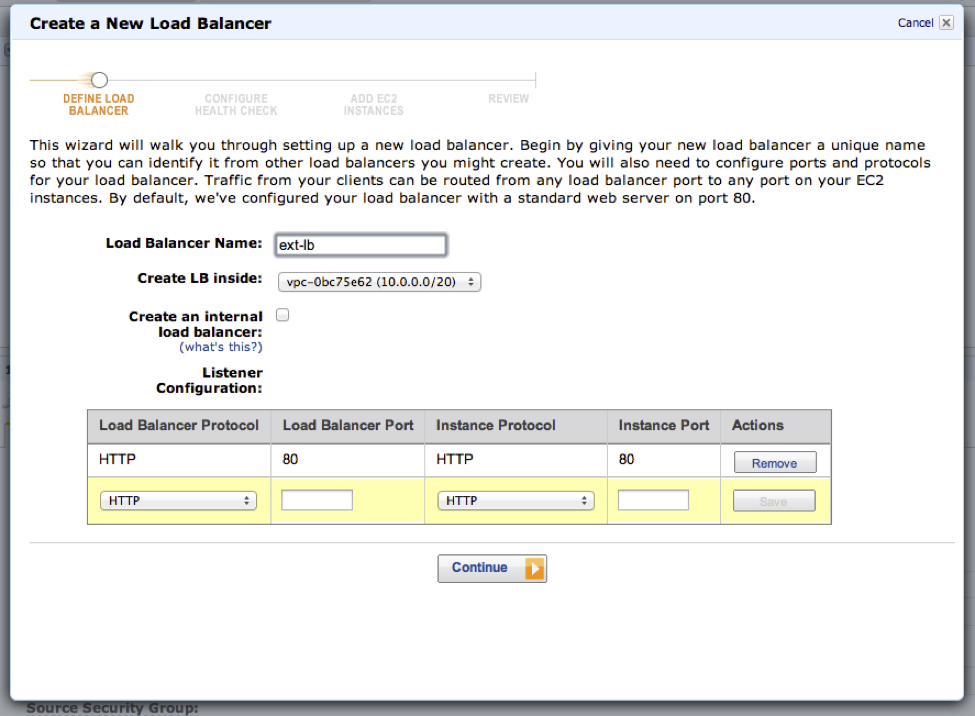
Make sure the load balancer is created on the correct public subnet.
Leave health check as is.
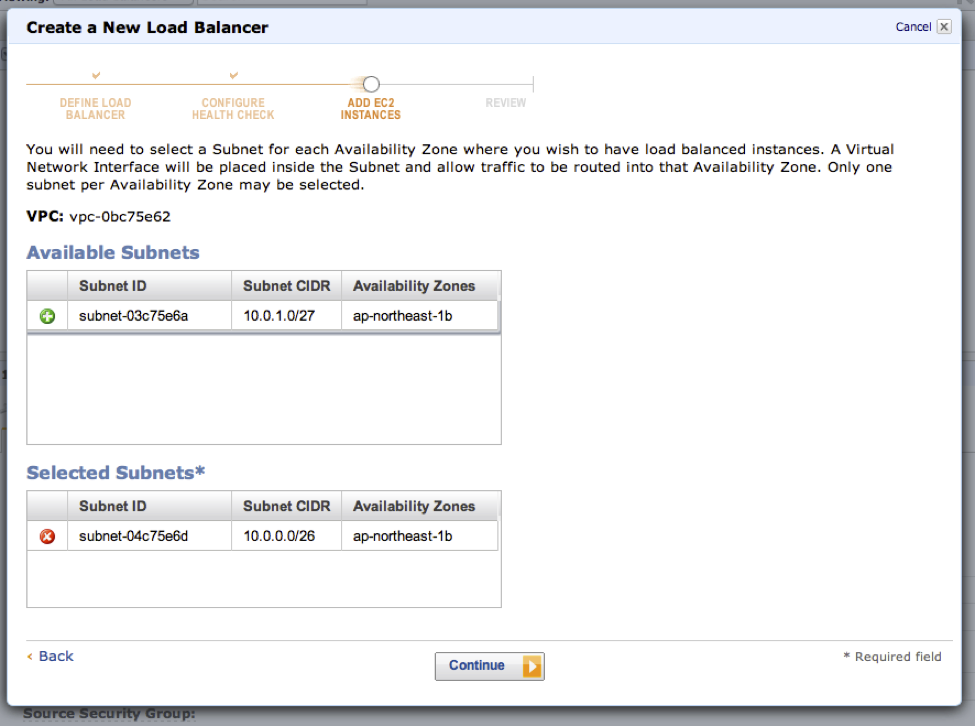
Select the public subnet.
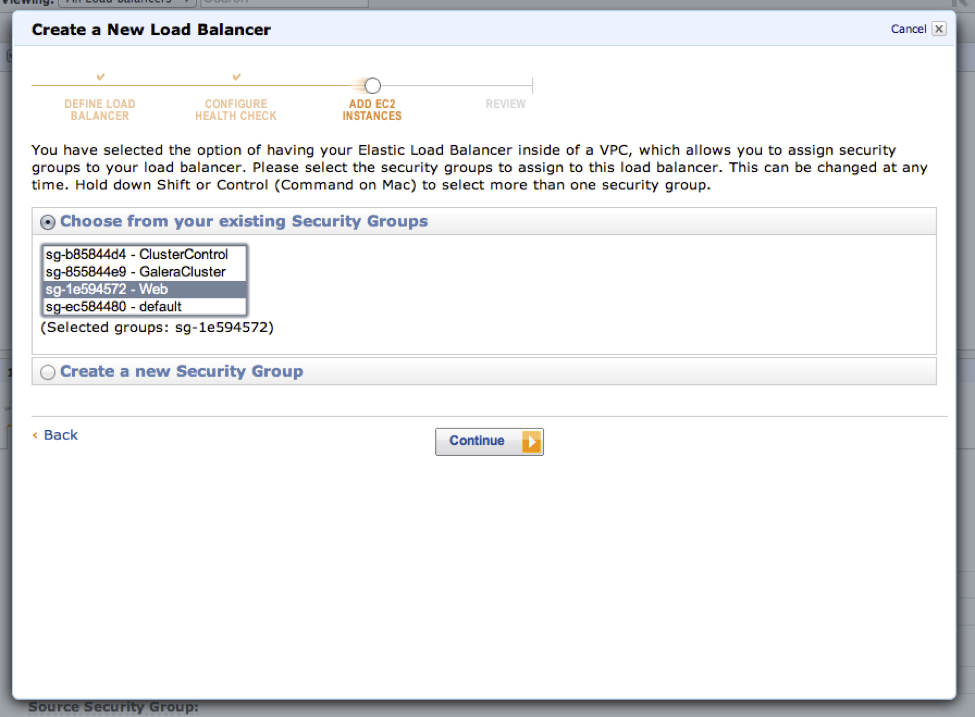
Select the previously created ‘Web’ security group.

Select your web servers/instances for the load balancer’s pool.
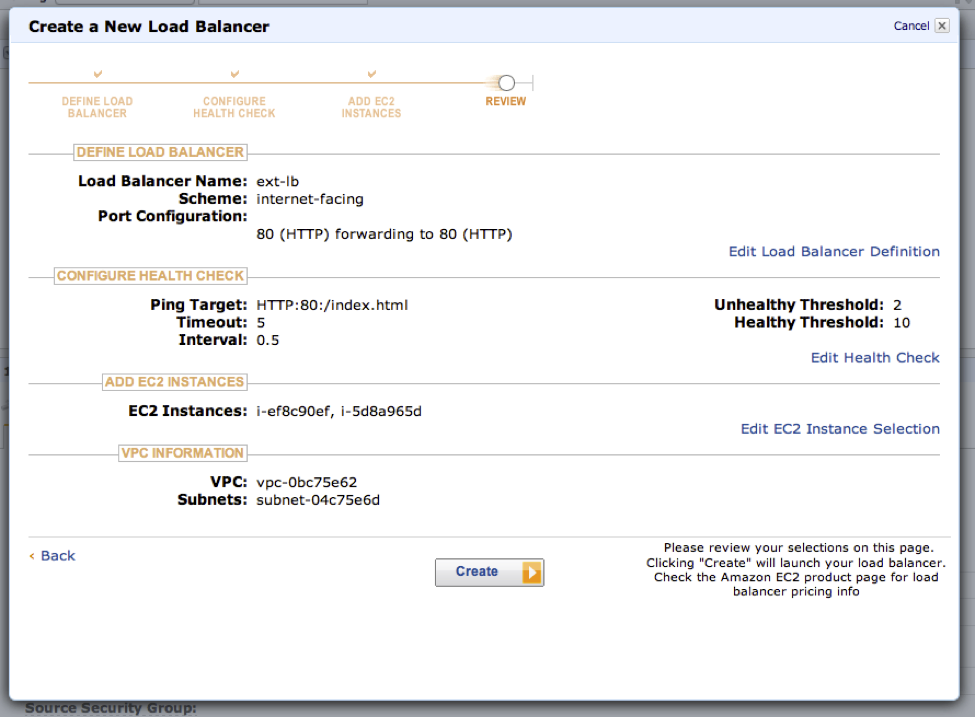
Review the configuration and create the external load balancer.
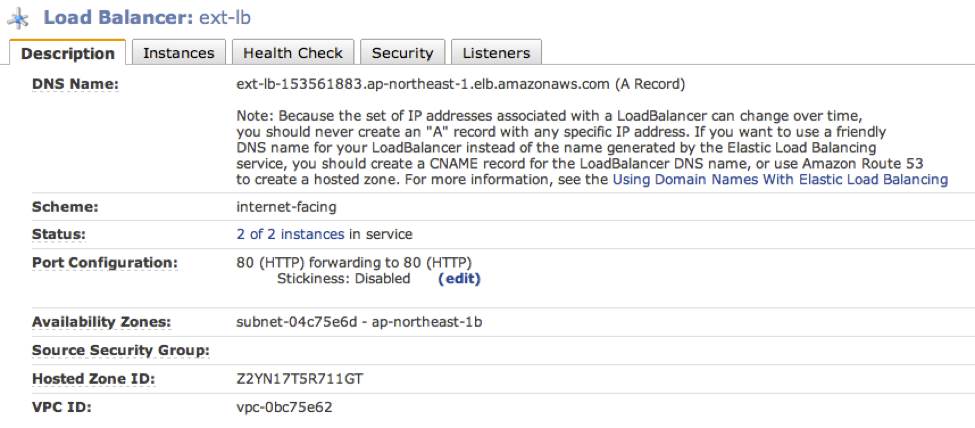
In a few minutes you should see that your web instances are registered and marked as healthy in the load balancer’s pool.
sysbench
sysbench is a popular system peformance benchmark tool and has a database OLTP benchmark module which is popular among MySQL users. We are going to use it to create the default OLTP schema that is used and run a light test.
The purpose is not to really bench our newly deployed Galera cluster but to get some test data that we can pull out from our web servers that we setup previously.
Prepare sysbench schema and table
Logon to your ClusterControl instance:
$ ssh -i <your aws pem> [email protected]Install the MySQL client (if you don’t have it):
$ sudo apt-get install mysql-client-core-5.5Create the ‘sbtest’ database schema. Test that the internal MySQL load balancer user is working by going via the internal load balancer.
$ mysql -ulb -plb -h 10.0.1.17 -e "create schema sbtest"
$ mysql -ulb -plb -h 10.0.1.17 -e "show schemas'
Prepare the sysbench test table by inserting 1M records.
$ sysbench --test=oltp --mysql-table-engine=innodb --oltp-table-size=1000000 --mysql-user=lb --mysql-password=lb --mysql-host=10.0.1.17 --mysql-port=3306 prepareDo a quick test run
$ sysbench --num-threads=2 --max-time=300 --max-requests=500000 --test=oltp --mysql-user=lb --mysql-password=lb --mysql-host=10.0.1.17 --mysql-port=3306 --oltp-test-mode=complex --oltp-table-size=1000000 runMonitor the Galera cluster performance by going to http:&< ClusterControl EIP >/cmon
12. Test the VPC database cluster setup
Check that the MySQL php driver is properly installed on your web instances.
$ echo "<? phpinfo(); ?> | sudo tee -a /var/www/phpinfo.php
$ wget -q0- http://10.0.0.38/phpinfo.php | grep -i mysql
or browse to the EIP of the web instance
Simple php select
On each web server instance add a sbtest.php file
$ sudo cat > "/var/www/sbtest.php" << EOF
<?
$user="lb";
$password="lb";
$database="sbtest";
$host="internal-int-lb-vpc-1396244671.ap-northeast-1.elb.amazonaws.com";
mysql_connect($host,$user,$password);

@mysql_select_db($database) or die( "Unable to select database");
$query="SELECT * FROM sbtest limit 20";

$result=mysql_query($query);
$num=mysql_numrows($result);

mysql_close();

echo "<table><th>sbtest</th><tbody>";

$i=0;
while ($i < $num)
     $id=mysql_result($result,$i,"id");
     $k=mysql_result($result,$i,"k");
     $c=mysql_result($result,$i,"c");
     $pad=mysql_result($result,$i,"pad");

     echo "<tr>";
     echo "<td>$id</td><td>$k</td><td>$c</td><td>$pad</td>";
     echo "</tr>";
$i++;
}
echo "</tbody></table>";
?>
EOF
Verify that the page loads by
$ wget -q0- http://10.0.0.28/sbtest.php
$ wget -q0- http://10.0.0.38/sbtest.php
or browse to the EIP of the web instances.
and finally test load the page through the external load balancer.
$ wget -q0- http://54.249.29.89/sbtest.phpand/or point your web browser to http://ext-lb-153561883.ap-northeast-1.elb.amazonaws.com/sbtest.php