blog
Using SSH Tunneling as a VPN Alternative

Using a VPN connection is the most secure way to access a network if you are working remotely, but as this configuration could require hardware, time, and knowledge, you should probably want to know alternatives to do it. Using SSH is also a secure way to access a remote network without extra hardware, less time consuming, and less effort than configuring a VPN server. In this blog, we’ll see how to configure SSH Tunneling to access your databases in a secure way.
What is SSH?
SSH (Secure SHell), is a program/protocol that allows you to access a remote host/network, run commands, or share information. You can configure different encrypted authentication methods, and it uses the 22/TCP port by default, but it’s recommended changing it for security reasons.
How to Use SSH?
The most secure way to use it is by creating an SSH Key Pair. With this, you don’t only need to have the password but also the private key to be able to access the remote host.
Also, you should have a host with only the SSH server role and keep it as isolated as possible, so in case of an external attack, it won’t affect your local servers. Something like this:
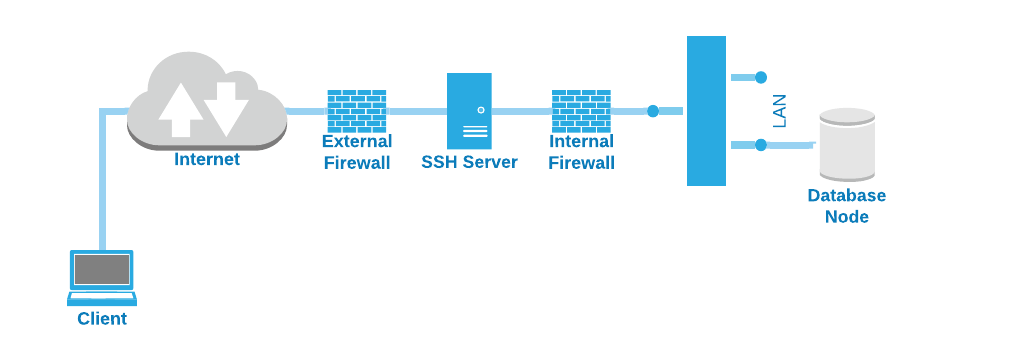
Let’s see first, how to configure the SSH server.
Server configuration
Most of the Linux Installation has SSH Server installed by default, but there are some cases where it could be missing (minimal ISO), so to install it, you just need to install the following packages:
RedHat-based OS
$ yum install openssh-clients openssh-serverDebian-based OS
$ apt update; apt install openssh-client openssh-serverNow you have the SSH Server installed, you can configure it to only accept connections using a key.
vi /etc/ssh/sshd_config

PasswordAuthentication no
Make sure you change it after having the public key in place, otherwise you won’t be able to log in.
You can also change the port and deny root access to make it more secure:
Port 20022

PermitRootLogin no
You must check if the selected port is open in the firewall configuration to be able to access it.
This is a basic configuration. There are different parameters to change here to improve the SSH security, so you can follow the documentation for this task.
Client configuration
Now, let’s generate the key pair for the local user “remote” to access the SSH Server. There are different types of keys, in this case, we’ll generate an RSA key.
$ ssh-keygen -t rsa

Generating public/private rsa key pair.

Enter file in which to save the key (/home/remote/.ssh/id_rsa):

Created directory '/home/remote/.ssh'.

Enter passphrase (empty for no passphrase):

Enter same passphrase again:

Your identification has been saved in /home/remote/.ssh/id_rsa.

Your public key has been saved in /home/remote/.ssh/id_rsa.pub.

The key fingerprint is:

SHA256:hT/36miDBbRa3Povz2FktC/zNb8ehAsjNZOiX7eSO4w remote@local

The key's randomart image is:

+---[RSA 3072]----+

|                 |

|        ..  .    |

|       o.+.=.    |

|        *o+.o..  |

|       +S+o+=o . |

|      . o +==o+  |

|         =oo=ooo.|

|        .E=*o* .+|

|         ..BB ooo|

+----[SHA256]-----+
This will generate the following files in a directory called “.ssh” inside the user’s home directory:
$ whoami

remote

$ pwd

/home/remote/.ssh

$ ls -la

total 20

drwx------ 2 remote remote 4096 Apr 16 15:40 .

drwx------ 3 remote remote 4096 Apr 16 15:27 ..

-rw------- 1 remote remote 2655 Apr 16 15:26 id_rsa

-rw-r--r-- 1 remote remote  569 Apr 16 15:26 id_rsa.pub
The “id_rsa” file is the private key (keep it as secure as possible), and the “id_rsa.pub” is the public one that must be copied to the remote host to access it. For this, run the following command as the corresponding user:
$ whoami

remote

$ ssh-copy-id -p 20022 [email protected]

/usr/bin/ssh-copy-id: INFO: Source of key(s) to be installed: "/home/remote/.ssh/id_rsa.pub"

/usr/bin/ssh-copy-id: INFO: attempting to log in with the new key(s), to filter out any that are already installed

/usr/bin/ssh-copy-id: INFO: 1 key(s) remain to be installed -- if you are prompted now it is to install the new keys

[email protected]'s password:


Number of key(s) added:        1


Now try logging into the machine, with:   "ssh -p '20022' '[email protected]"

and check to make sure that only the key(s) you wanted were added.
In this example, I’m using the port 20022 for SSH, and my remote host is 35.166.37.12. I have also the same user (remote) created in both local and remote hosts. You can use another user in the remote host, so in that case, you should change the user to the correct one in the ssh-copy-id command:
$ ssh-copy-id -p 20022 [email protected]This command will copy the public key to the authorized_keys file in the remote .ssh directory. So, in the SSH Server you should have this now:
$ pwd

/home/remote/.ssh

$ ls -la

total 20

drwx------ 2 remote remote 4096 Apr 16 15:40 .

drwx------ 3 remote remote 4096 Apr 16 15:27 ..

-rw------- 1 remote remote  422 Apr 16 15:40 authorized_keys

-rw------- 1 remote remote 2655 Apr 16 15:26 id_rsa

-rw-r--r-- 1 remote remote  569 Apr 16 15:26 id_rsa.pub
Now, you should be able to access the remote host:
$ ssh -p 20022 [email protected]But this is not enough to access your database node, as you are in the SSH Server yet.
SSH Database Access
To access your database node you have two options. The classic way is, if you are in the SSH Server, you can access it from there as you are in the same network, but for this, you should open two or three connections.
First, the SSH connection established to the SSH Server:
$ ssh -p 20022 [email protected]Then, the SSH connection to the Database Node:
$ ssh [email protected]And finally, the database connection, that in case of MySQL, is:
$ mysql -h localhost -P3306 -udbuser -pAnd for PostgreSQL:
$ psql -h localhost -p 5432 -Udbuser postgresIf you have the database client installed in the SSH Server, you can avoid the second SSH connection and just run the database connection directly from the SSH Server:
$ mysql -h 192.168.100.120 -P3306 -udbuser -por:
$ psql -h 192.168.100.120 -p 5432 -Udbuser postgresBut, this could be annoying as you used to use the database connection directly from your computer connected in the office, so let’s see how to use the SSH Tunneling for this.
SSH Tunneling
Following the same example, we have:
- SSH Server Public IP Address: 35.166.37.12
- SSH Server Port: 20022
- Database Node Private IP Address: 192.168.100.120
- Database Port: 3306/5432
- SSH user (local and remote): remote
- Database user: dbuser
Command Line
So, if you run the following command in your local machine:
$ ssh -L 8888:192.168.100.120:3306 [email protected] -p 20022 -NThis will open the port 8888 in your local machine, which will access the remote database node, port 3306, via the SSH Server, port 20022, using the “remote” user.
So, to make it more clear, after running this command, you can access the remote database node, running this in your local machine:
$ mysql -h localhost -P8888 -udbuser -pGraphic Tools
If you are using a graphic tool to manage databases, most probably it has the option to use SSH Tunneling to access the database node.
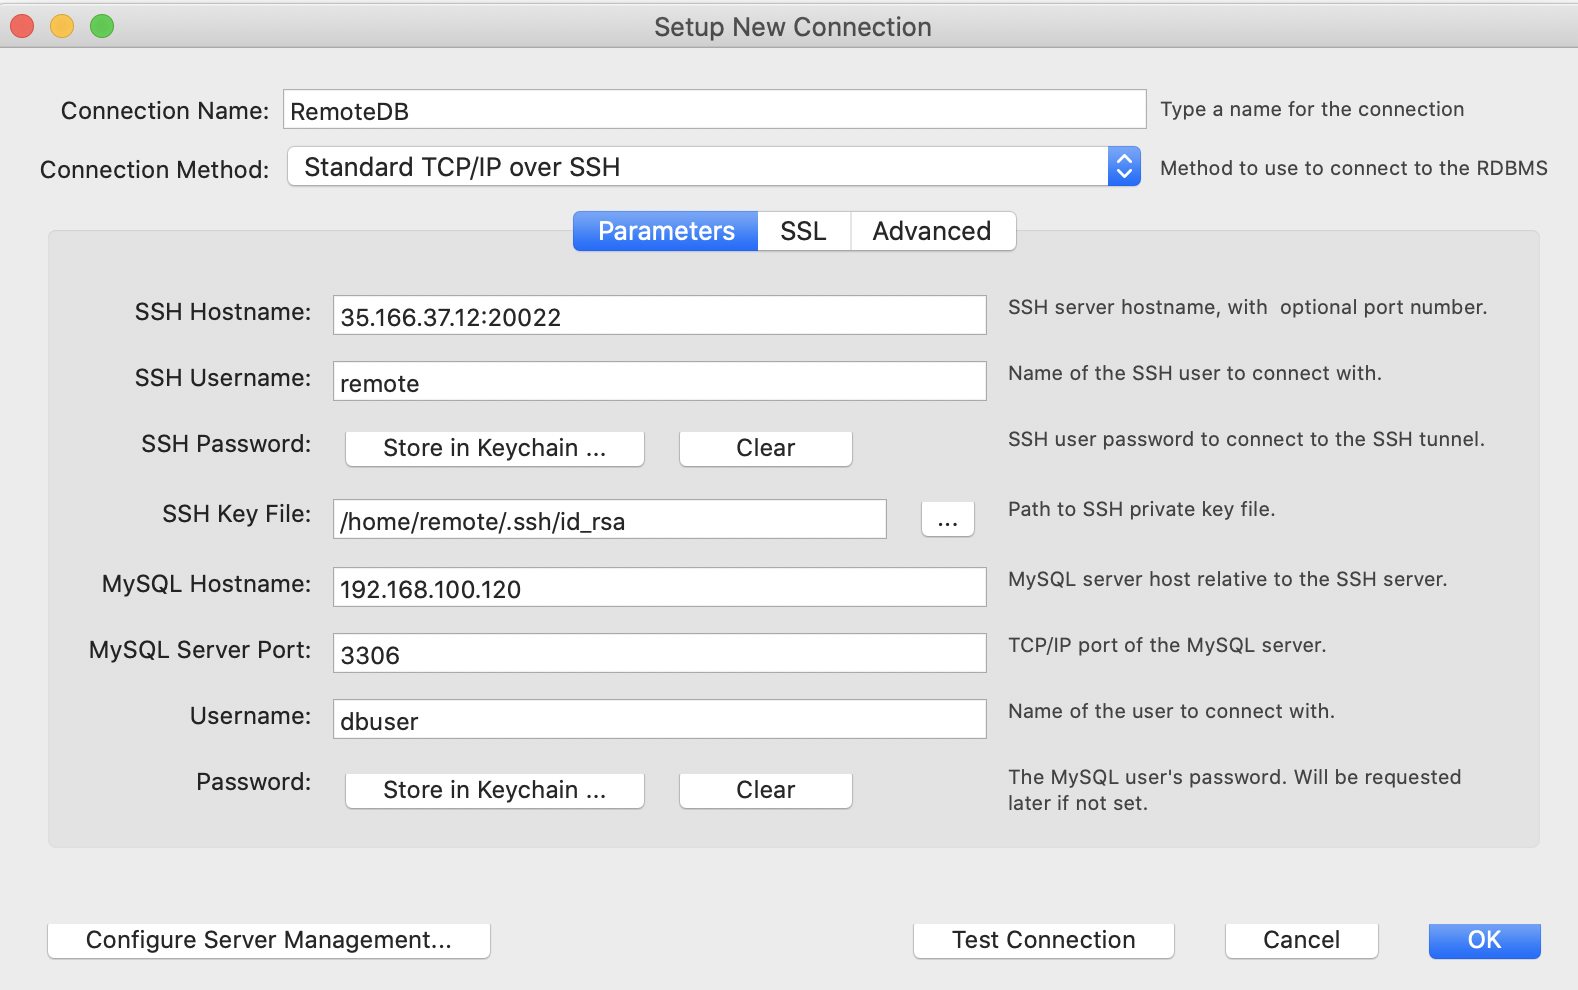
Let’s see an example using MySQL Workbench:
And the same for PgAdmin:
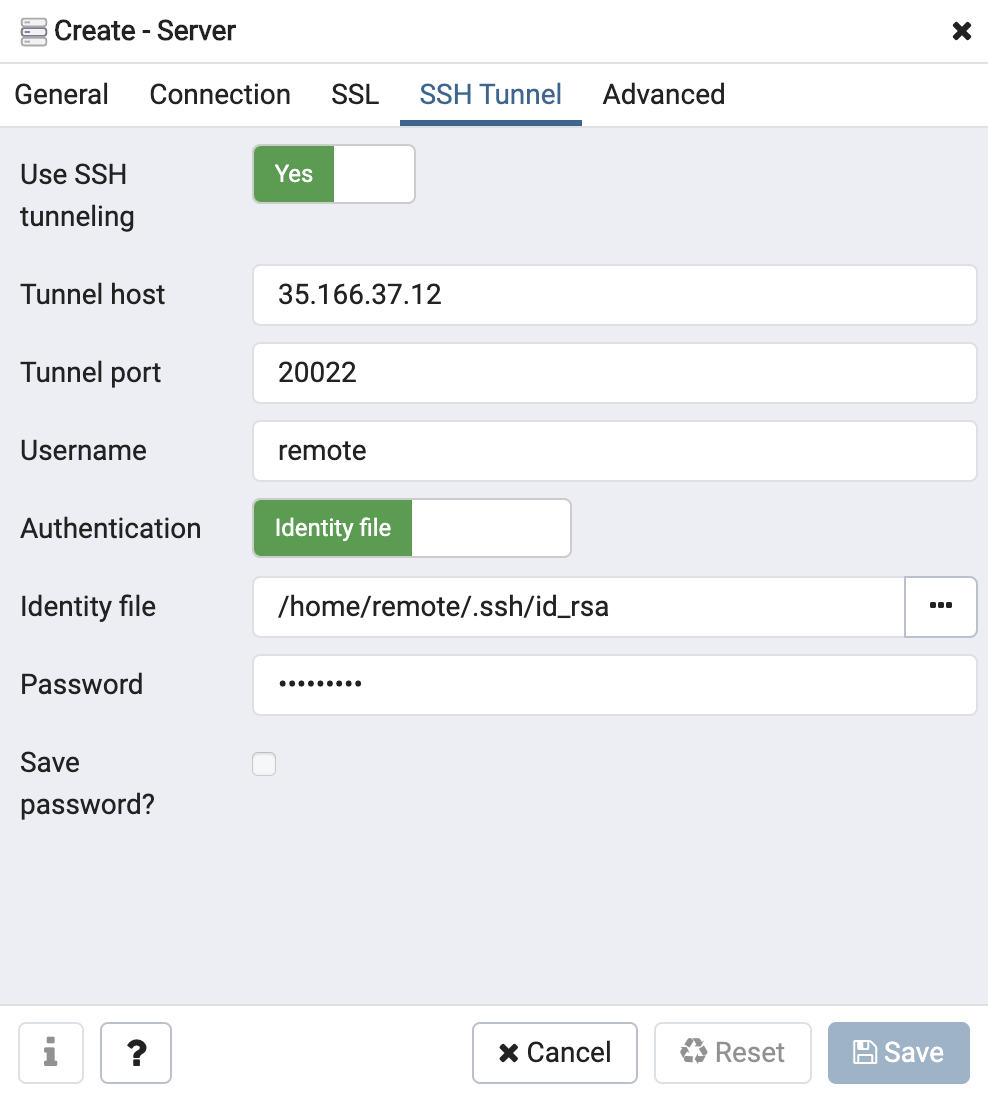
As you can see, the information asked here is pretty similar to the used for the command line SSH Tunneling connection.
Conclusion
Security is important for all companies, so if you are working from home, you must keep data as secure as you are while working in the office. As we mentioned, for this, probably the best solution is having a VPN connection to access the databases, but if for some reason it is not possible, you need to have an alternative to avoid handling data over the internet in an insecure way. As you could see, configuring SSH Tunneling for accessing your databases is not rocket science and is probably the best alternative in this case.
Want more database security tips and best practices? Subscribe to our newsletter and follow us on LinkedIn and Twitter for regular updates.