blog
Running Vitess and MySQL with ClusterControl

For all who are not familiar with Vitess, it is a MySQL-based database system that is intended to deliver an easy-to-scale, sharded, relational database management system. We will not get into details about the design but, in short, Vitess consists of proxy nodes that route the requests, gateways that are managing the database nodes and, finally, MySQL database nodes themselves, which are intended to store the data. If we are talking about MySQL, one may think if there is an option to, actually, use external tools like, for example, ClusterControl to manage those underlying databases. Short answer is “yes”. Longer answer will be this blog post.
MySQL in Vitess
First of all, we want to spend a bit of time talking about how Vitess uses MySQL. The high level architecture is described on the Vitess documentation page. In short, we have VTGate that acts as a proxy, we have a Topology Service which is a metadata store based on Zookeeper, Consul or Etcd, where all the information about the nodes in the system is located, finally we have VTTablets, which act as a middleman between VTGate and MySQL instance. MySQL instances can be standalone or they can be configured using standard asynchronous (or semi synchronous) replication. MySQL is used to store data. Data can be split into shards, in that case a MySQL instance will contain a subset of the data.
All this works great. Vitess is able to determine which node is the master, which nodes are slaves, routing queries accordingly. There are several issues, though. Not all of the most basic functionality is delivered by Vitess. Topology detection and query routing, yes. Backups – yes as well, Vitess can be configured to take backups of the data and allow users to restore whatever has been backed up. Unfortunately, there is no internal support for automated failover. There is no proper trending UI that would help users to understand the state of the databases and their workload. Luckily, as we are talking about standard MySQL, we can easily use external solutions to accomplish this. For example, for failover, Vitess can be integrated with Orchestrator. Let’s take a look at how ClusterControl can be used in conjunction with Vitess to provide management, monitoring and failover.
Deploying a new database cluster using ClusterControl
First, let’s have a new cluster deployed. As usual with ClusterControl, you have to provision hardware and ensure that ClusterControl can access those nodes using SSH.
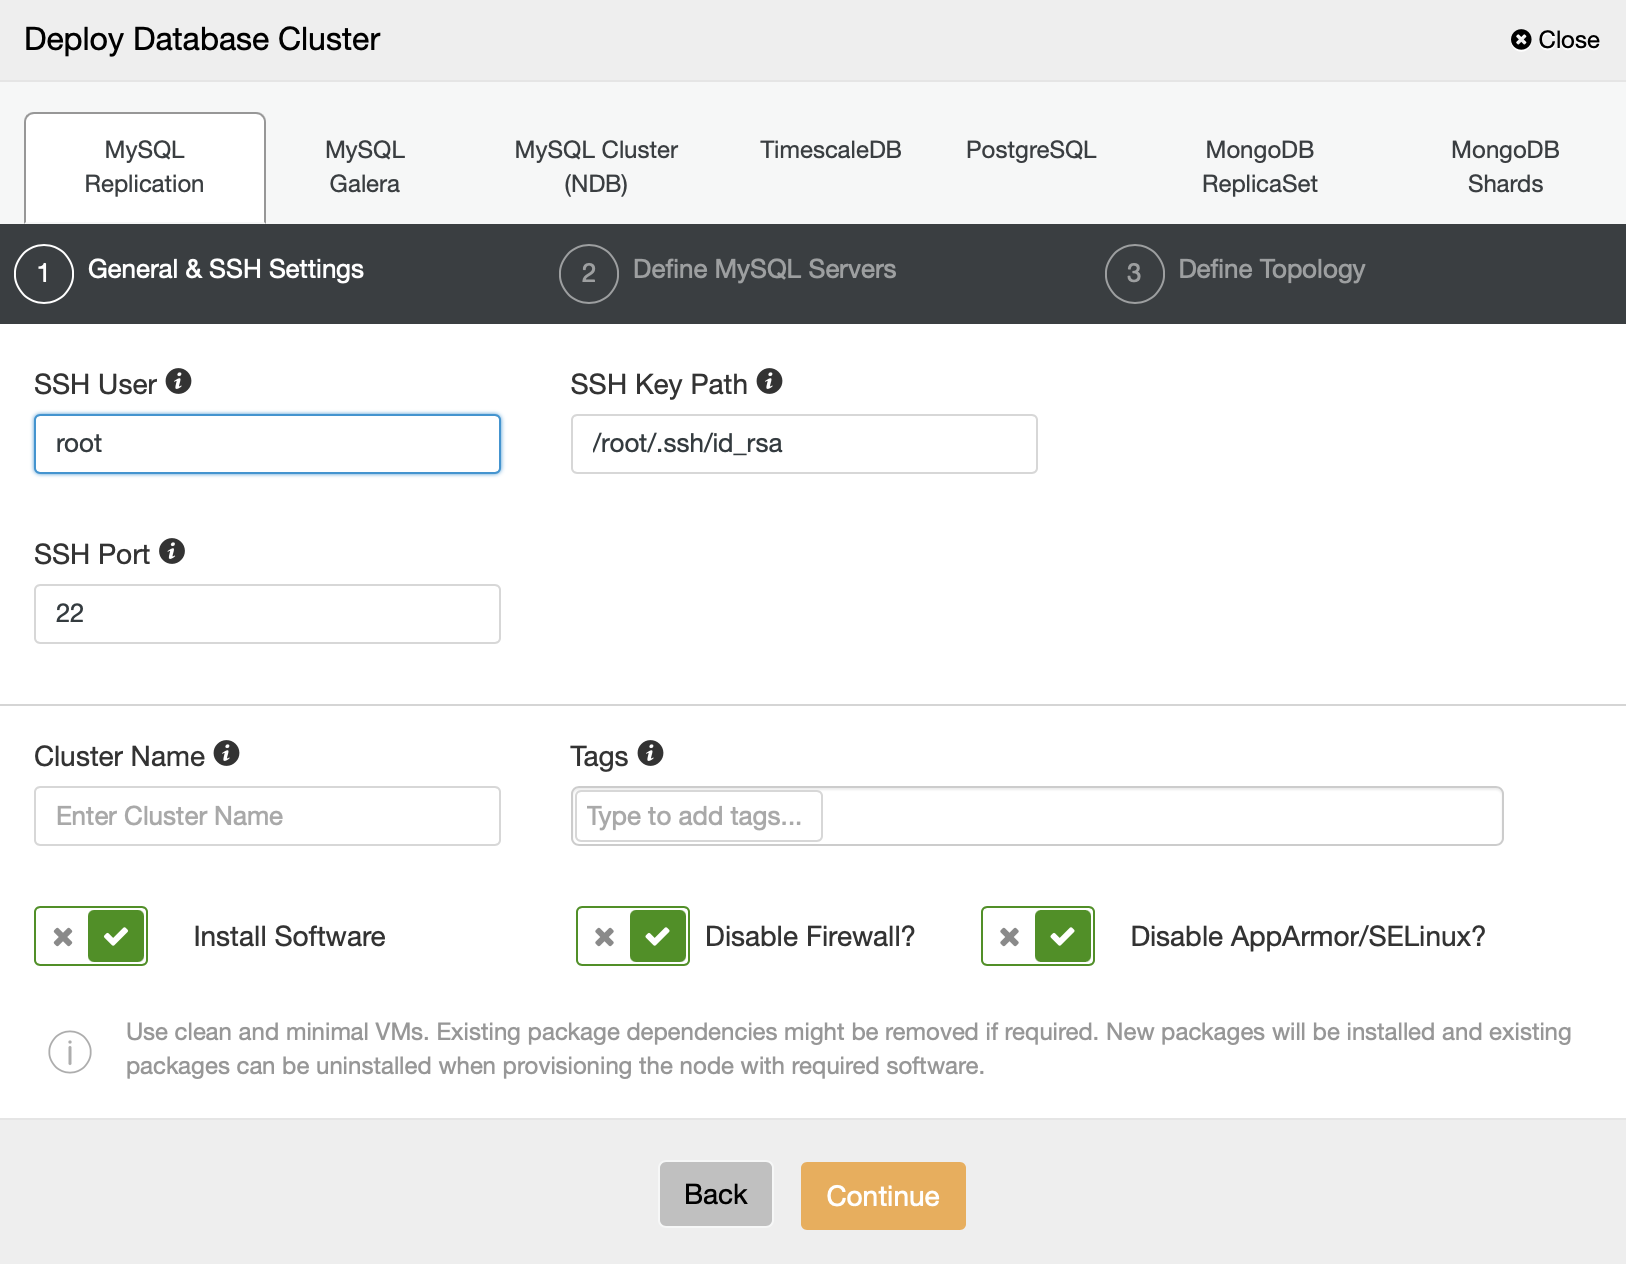
First, we have to define SSH connectivity.
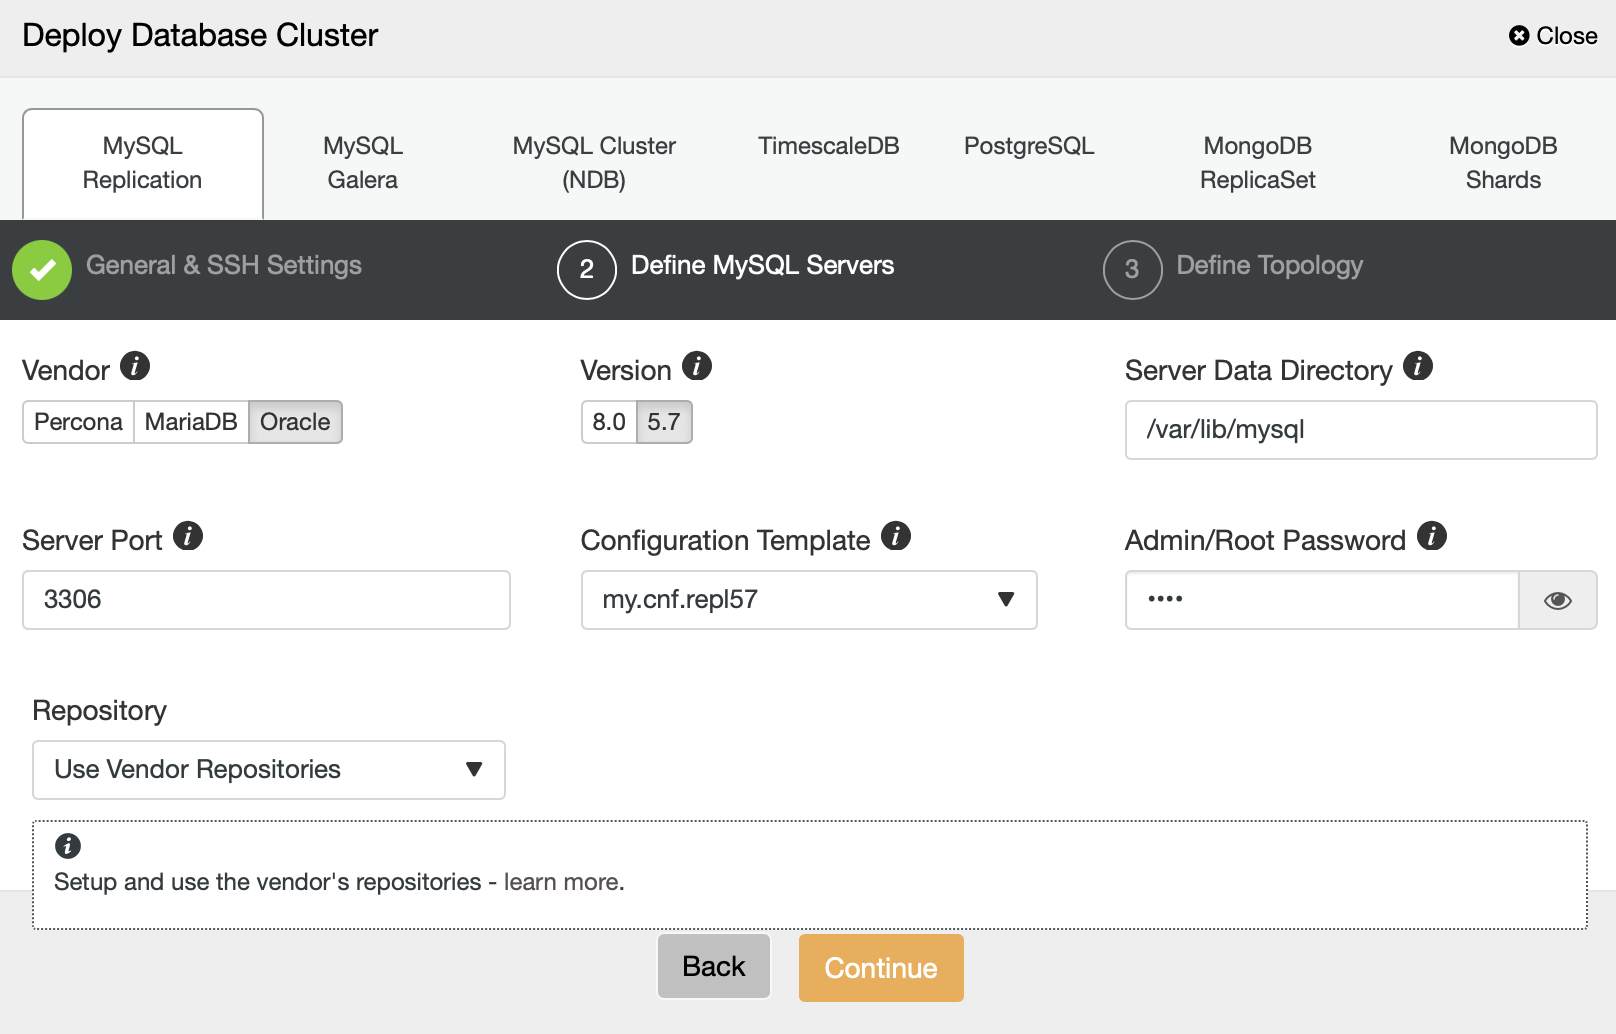
Next, we’ll pick the vendor and version. According to the documentation, Vitess supports MySQL and Percona Server in versions 5.7 and 8.0 (although it does not support caching_sha2_password method so you have to be careful when creating users). It also supports MariaDB up to 10.3.
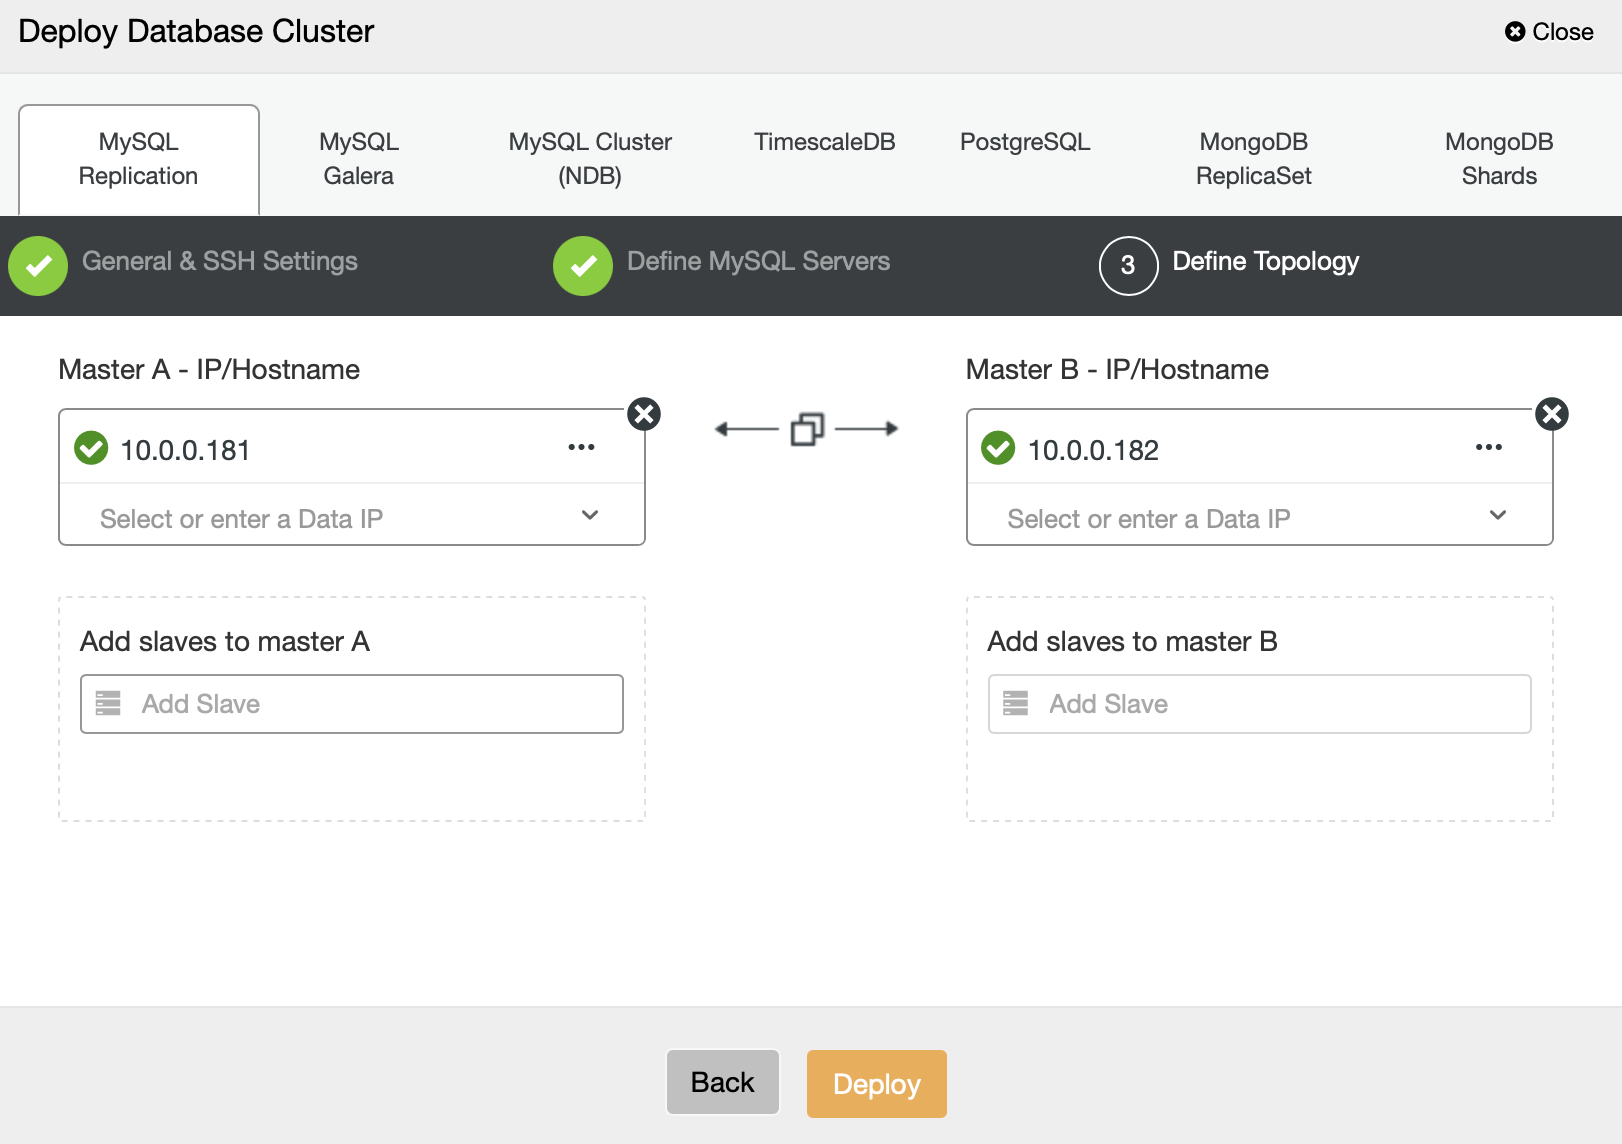
Finally, we define the topology. After clicking on “Deploy”, ClusterControl will perform the cluster deployment.
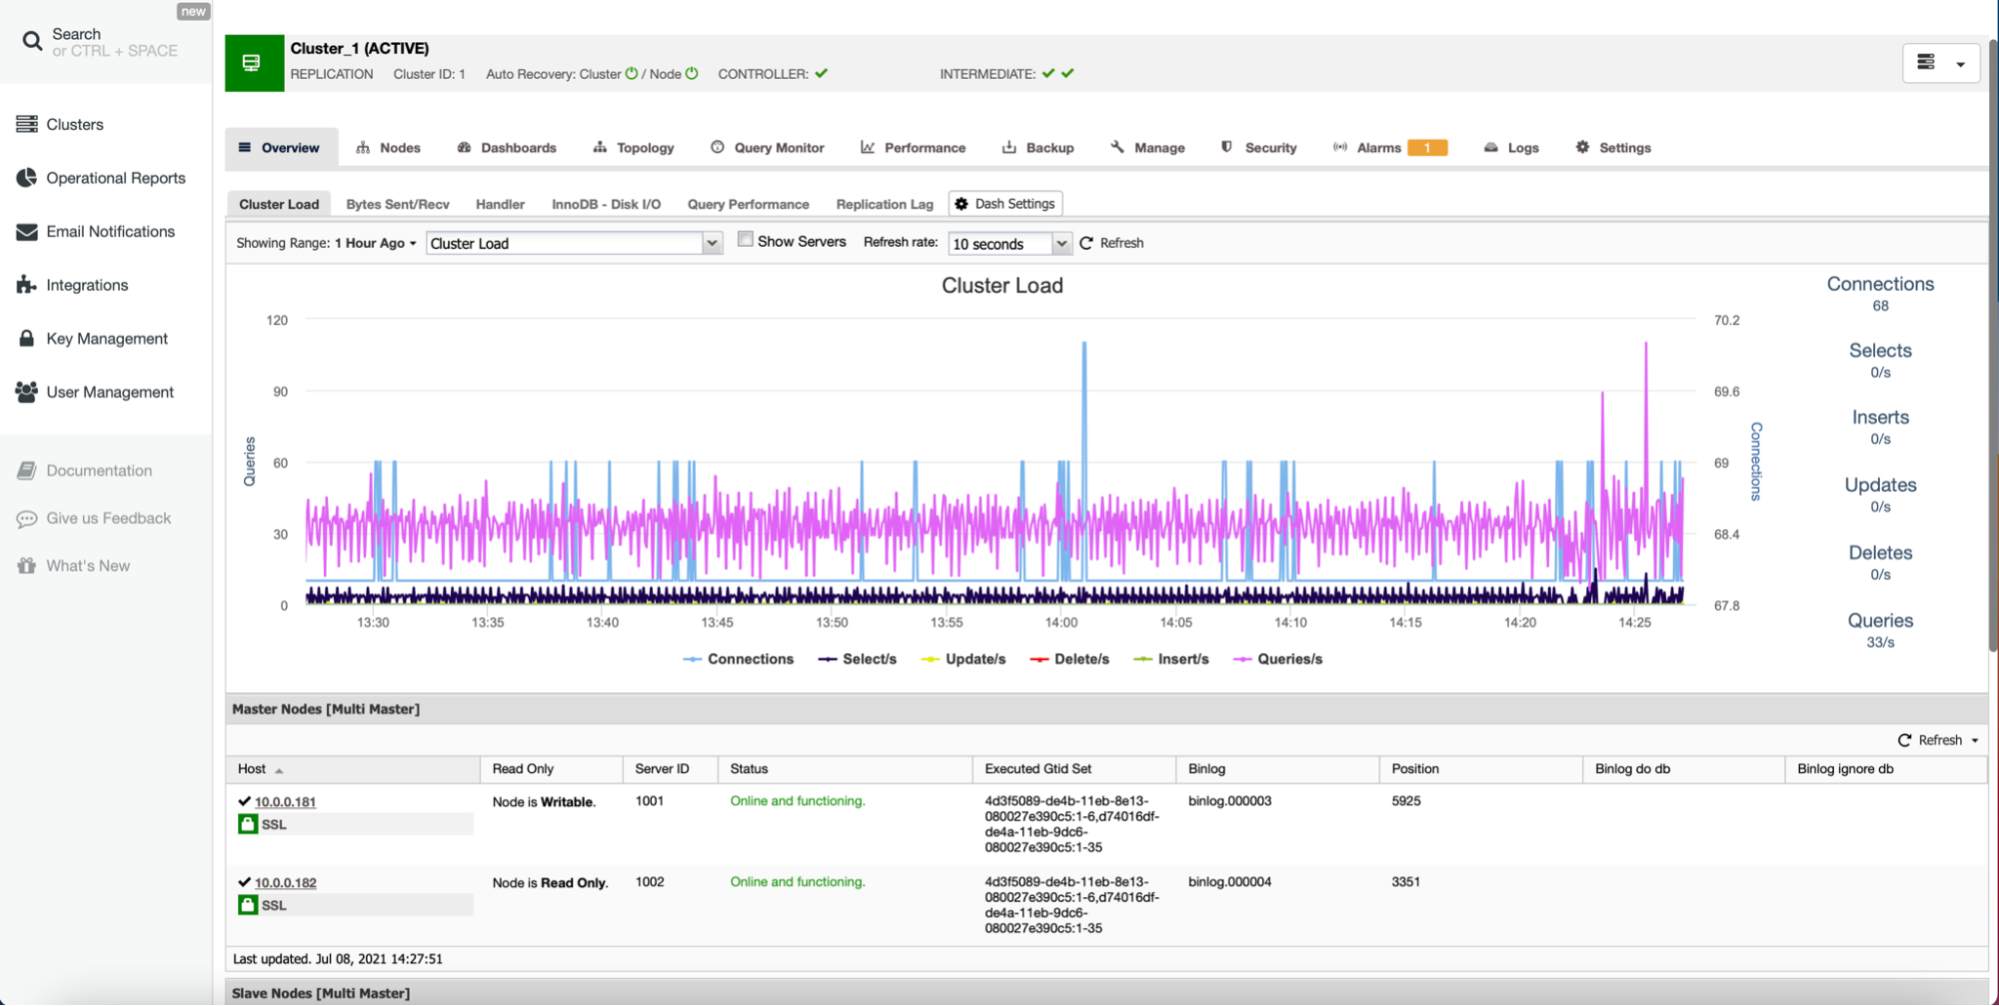
Once it’s ready, you should see the cluster and you should be able to manage it using ClusterControl. If Auto Recovery for Cluster and Node are enabled, ClusterControl will perform automated failovers should that be needed.
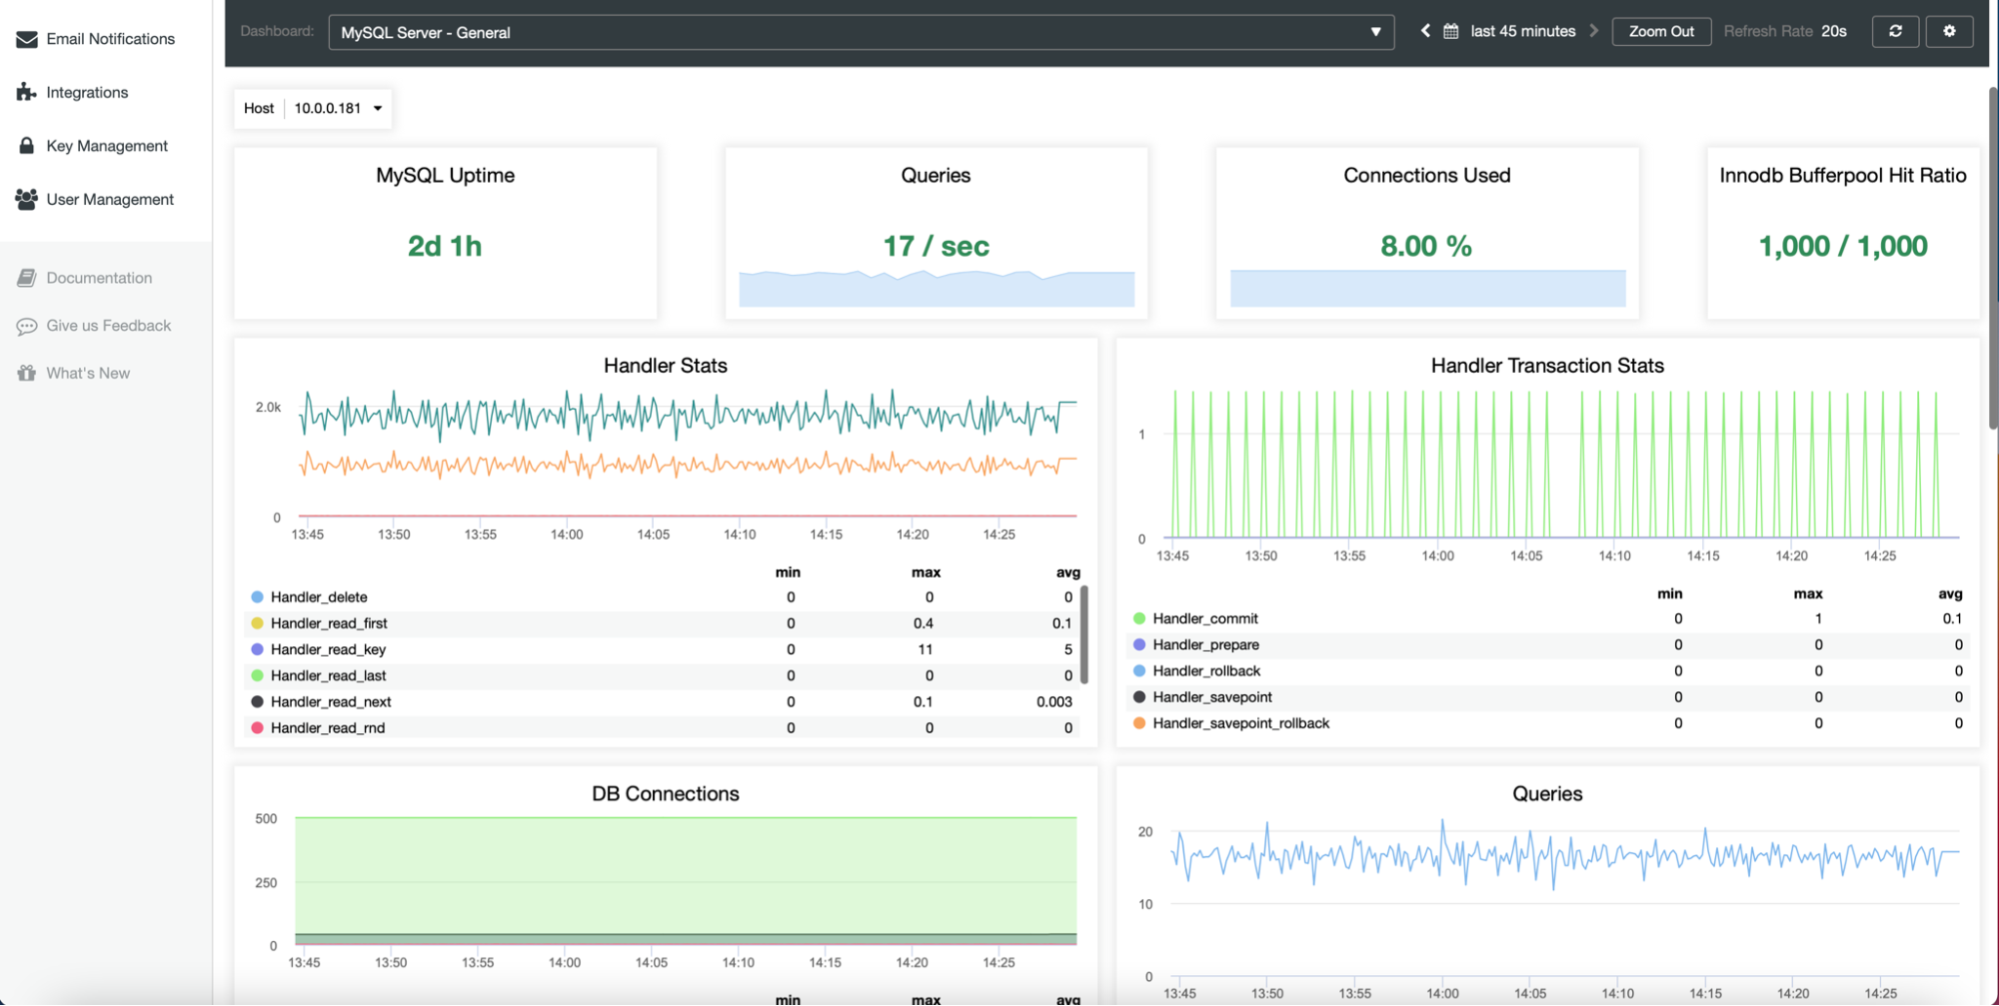
You will also benefit from agent-based monitoring in the “Dashboard” section of the ClusterControl UI.
Importing the cluster to Vitess
As a next step we should have Vitess deployed. What we describe here is by no means a production-grade setup therefore we are going to cut some corners and just deploy Vitess suite on a single node following the tutorial from Vitess documentation. To make it easier to deal with, we’ll go with the Local Install guide, which will deploy all of the services, along with example databases on a single node. Make it large enough to accommodate them. For testing purposes a node with a couple CPU cores and 4GB of memory should be enough.
Let’s assume that everything went just fine and you have a local Vitess deployment running on the node. The next step will be to import our cluster deployed by ClusterControl into Vitess. For that we have to run two more VTTablets. First, we shall create directories for those VTTablets:
vagrant@vagrant:~$ cd /home/vagrant/my-vitess-example/
vagrant@vagrant:~/my-vitess-example$ source env.sh
vagrant@vagrant:~/my-vitess-example$ mkdir $VTDATAROOT/vt_0000000401
vagrant@vagrant:~/my-vitess-example$ mkdir $VTDATAROOT/vt_0000000402
Then, on the database, we are going to create a user that will be used for Vitess to connect and manage the database.
mysql> CREATE USER vtuser@'%' IDENTIFIED BY 'pass';
Query OK, 0 rows affected (0.01 sec)
mysql> GRANT ALL ON *.* TO vtuser@'%' WITH GRANT OPTION;
Query OK, 0 rows affected (0.01 sec)
If we want, we may also want to create more users. Vitess allows us to pass a couple of users with different access privileges: application user, DBA user, replication user, fully privileged user and a couple more.
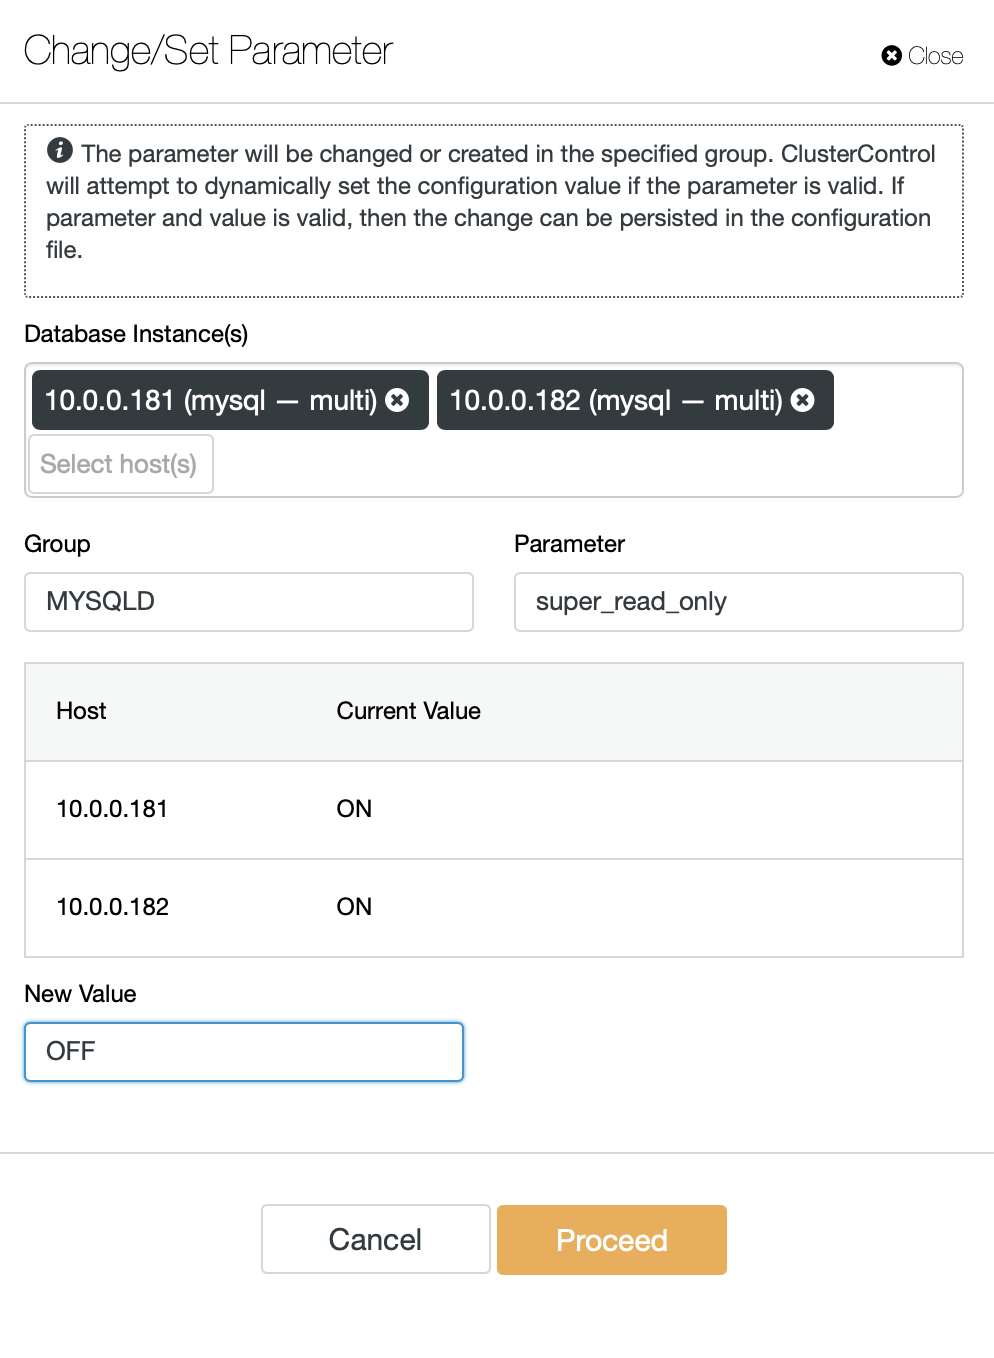
The last thing we have to do is to disable the super_read_only on all MySQL nodes as Vitess will attempt to create metadata on the replica, resulting in a failed attempt to start vttablet service.
Once this is done, we should start VTTablets. In both case we have to ensure that the ports are unique and that we pass correct credentials to access the database instance:
vttablet $TOPOLOGY_FLAGS -logtostderr -log_queries_to_file $VTDATAROOT/tmp/vttablet_0000000401_querylog.txt -tablet-path "zone1-0000000401" -init_keyspace clustercontrol -init_shard 0 -init_tablet_type replica -port 15401 -grpc_port 16401 -service_map 'grpc-queryservice,grpc-tabletmanager,grpc-updatestream' -pid_file $VTDATAROOT/vt_0000000401/vttablet.pid -vtctld_addr http://localhost:15000/ -db_host 10.0.0.181 -db_port 3306 -db_app_user vtuser -db_app_password pass -db_dba_user vtuser -db_dba_password pass -db_repl_user vtuser -db_repl_password pass -db_filtered_user vtuser -db_filtered_password pass -db_allprivs_user vtuser -db_allprivs_password pass -init_db_name_override clustercontrol -init_populate_metadata &

vttablet $TOPOLOGY_FLAGS -logtostderr -log_queries_to_file $VTDATAROOT/tmp/vttablet_0000000402_querylog.txt -tablet-path "zone1-0000000402" -init_keyspace clustercontrol -init_shard 0 -init_tablet_type replica -port 15402 -grpc_port 16402 -service_map 'grpc-queryservice,grpc-tabletmanager,grpc-updatestream' -pid_file $VTDATAROOT/vt_0000000402/vttablet.pid -vtctld_addr http://localhost:15000/ -db_host 10.0.0.182 -db_port 3306 -db_app_user vtuser -db_app_password pass -db_dba_user vtuser -db_dba_password pass -db_repl_user vtuser -db_repl_password pass -db_filtered_user vtuser -db_filtered_password pass -db_allprivs_user vtuser -db_allprivs_password pass -init_db_name_override clustercontrol -init_populate_metadata &
Once it is ready, we can check how Vitess sees the new VTTablets:
vagrant@vagrant:~/my-vitess-example$ mysql

Welcome to the MySQL monitor.  Commands end with ; or g.

Your MySQL connection id is 10

Server version: 5.7.9-vitess-10.0.2 Version: 10.0.2 (Git revision fc78470 branch 'HEAD') built on Thu May 27 08:45:22 UTC 2021 by runner@fv-az204-619 using go1.15.12 linux/amd64


Copyright (c) 2000, 2021, Oracle and/or its affiliates.


Oracle is a registered trademark of Oracle Corporation and/or its

affiliates. Other names may be trademarks of their respective

owners.


Type 'help;' or 'h' for help. Type 'c' to clear the current input statement.


mysql> SHOW vitess_tablets;

+-------+----------------+-------+------------+---------+------------------+------------+----------------------+

| Cell  | Keyspace       | Shard | TabletType | State   | Alias            | Hostname   | MasterTermStartTime  |

+-------+----------------+-------+------------+---------+------------------+------------+----------------------+

| zone1 | clustercontrol | 0     | REPLICA    | SERVING | zone1-0000000401 | vagrant.vm |                      |

| zone1 | clustercontrol | 0     | REPLICA    | SERVING | zone1-0000000402 | vagrant.vm |                      |

| zone1 | commerce       | 0     | MASTER     | SERVING | zone1-0000000100 | vagrant.vm | 2021-07-08T13:12:21Z |

| zone1 | commerce       | 0     | REPLICA    | SERVING | zone1-0000000101 | vagrant.vm |                      |

| zone1 | commerce       | 0     | RDONLY     | SERVING | zone1-0000000102 | vagrant.vm |                      |

+-------+----------------+-------+------------+---------+------------------+------------+----------------------+

5 rows in set (0.00 sec)
Nodes are there but both are reported as replicas by Vitess. We can now trigger Vitess to check the topology for our real master (node that we imported with ID of 401)
vagrant@vagrant:~/my-vitess-example$ vtctlclient TabletExternallyReparented zone1-401Now all looks correct:
mysql> SHOW vitess_tablets;

+-------+----------------+-------+------------+---------+------------------+------------+----------------------+

| Cell  | Keyspace       | Shard | TabletType | State   | Alias            | Hostname   | MasterTermStartTime  |

+-------+----------------+-------+------------+---------+------------------+------------+----------------------+

| zone1 | clustercontrol | 0     | MASTER     | SERVING | zone1-0000000401 | vagrant.vm | 2021-07-08T13:27:34Z |

| zone1 | clustercontrol | 0     | REPLICA    | SERVING | zone1-0000000402 | vagrant.vm |                      |

| zone1 | commerce       | 0     | MASTER     | SERVING | zone1-0000000100 | vagrant.vm | 2021-07-08T13:12:21Z |

| zone1 | commerce       | 0     | REPLICA    | SERVING | zone1-0000000101 | vagrant.vm |                      |

| zone1 | commerce       | 0     | RDONLY     | SERVING | zone1-0000000102 | vagrant.vm |                      |

+-------+----------------+-------+------------+---------+------------------+------------+----------------------+

5 rows in set (0.00 sec)
Integrating ClusterControl automated failover into Vitess
The last bit we want to take a look at is the automated failover handling with ClusterControl and see how you can integrate it with Vitess. It will be quite similar to what we have just seen. The main problem to deal with is that the failover does not change anything in the Vitess. The solution is what we have used earlier, TabletExternallyReparented command. The only challenge is to trigger it when the failover happens. Luckily, ClusterControl comes with hooks that allow us to plug into the failover process. We’ll use them to run the vtctlclient. It has to be installed on the ClusterControl instance first, though. The easiest way to accomplish that is just by copying the binary from Vitess instance to ClusterControl.
First, let’s create the directory on the ClusterControl node:
mkdir -r /usr/local/vitess/binThen, just copy the file:
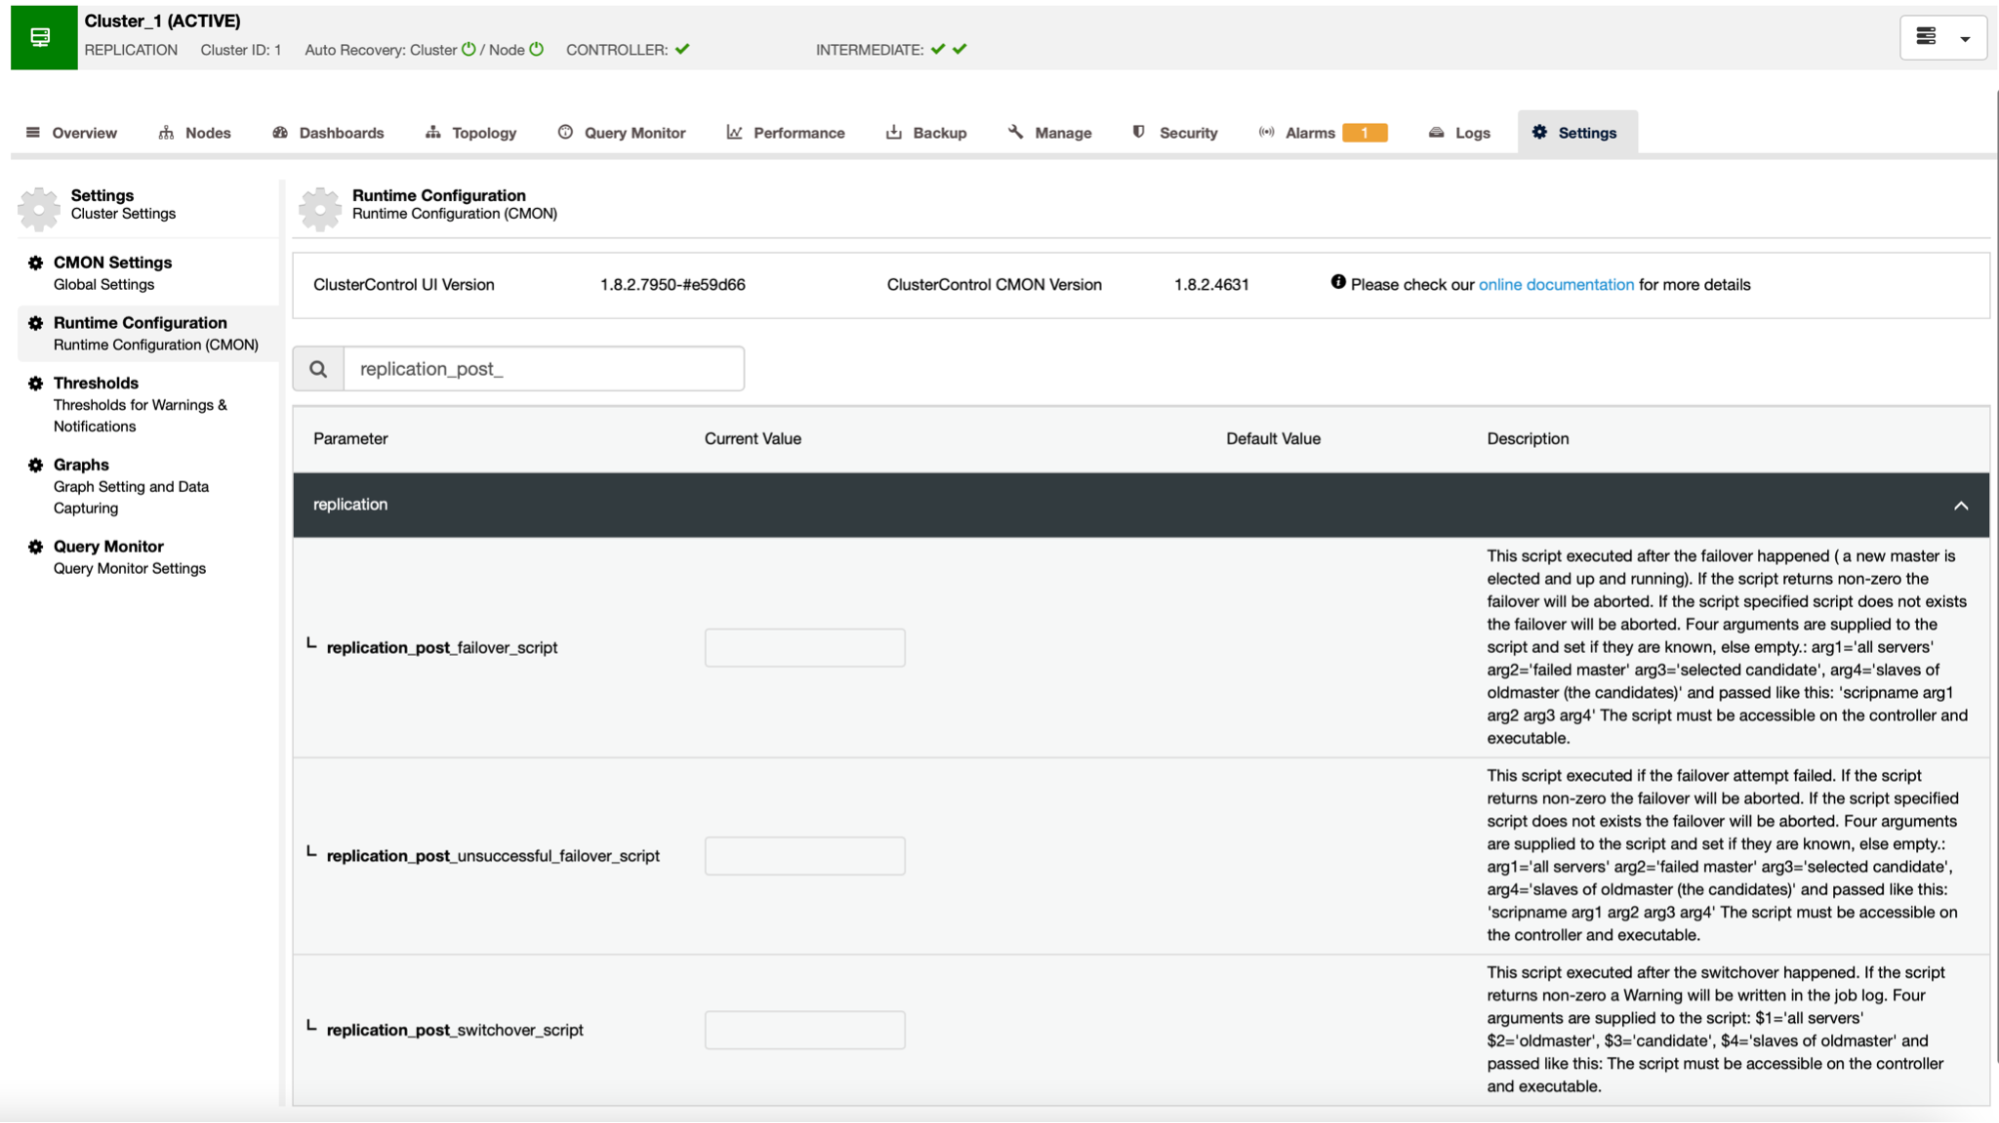
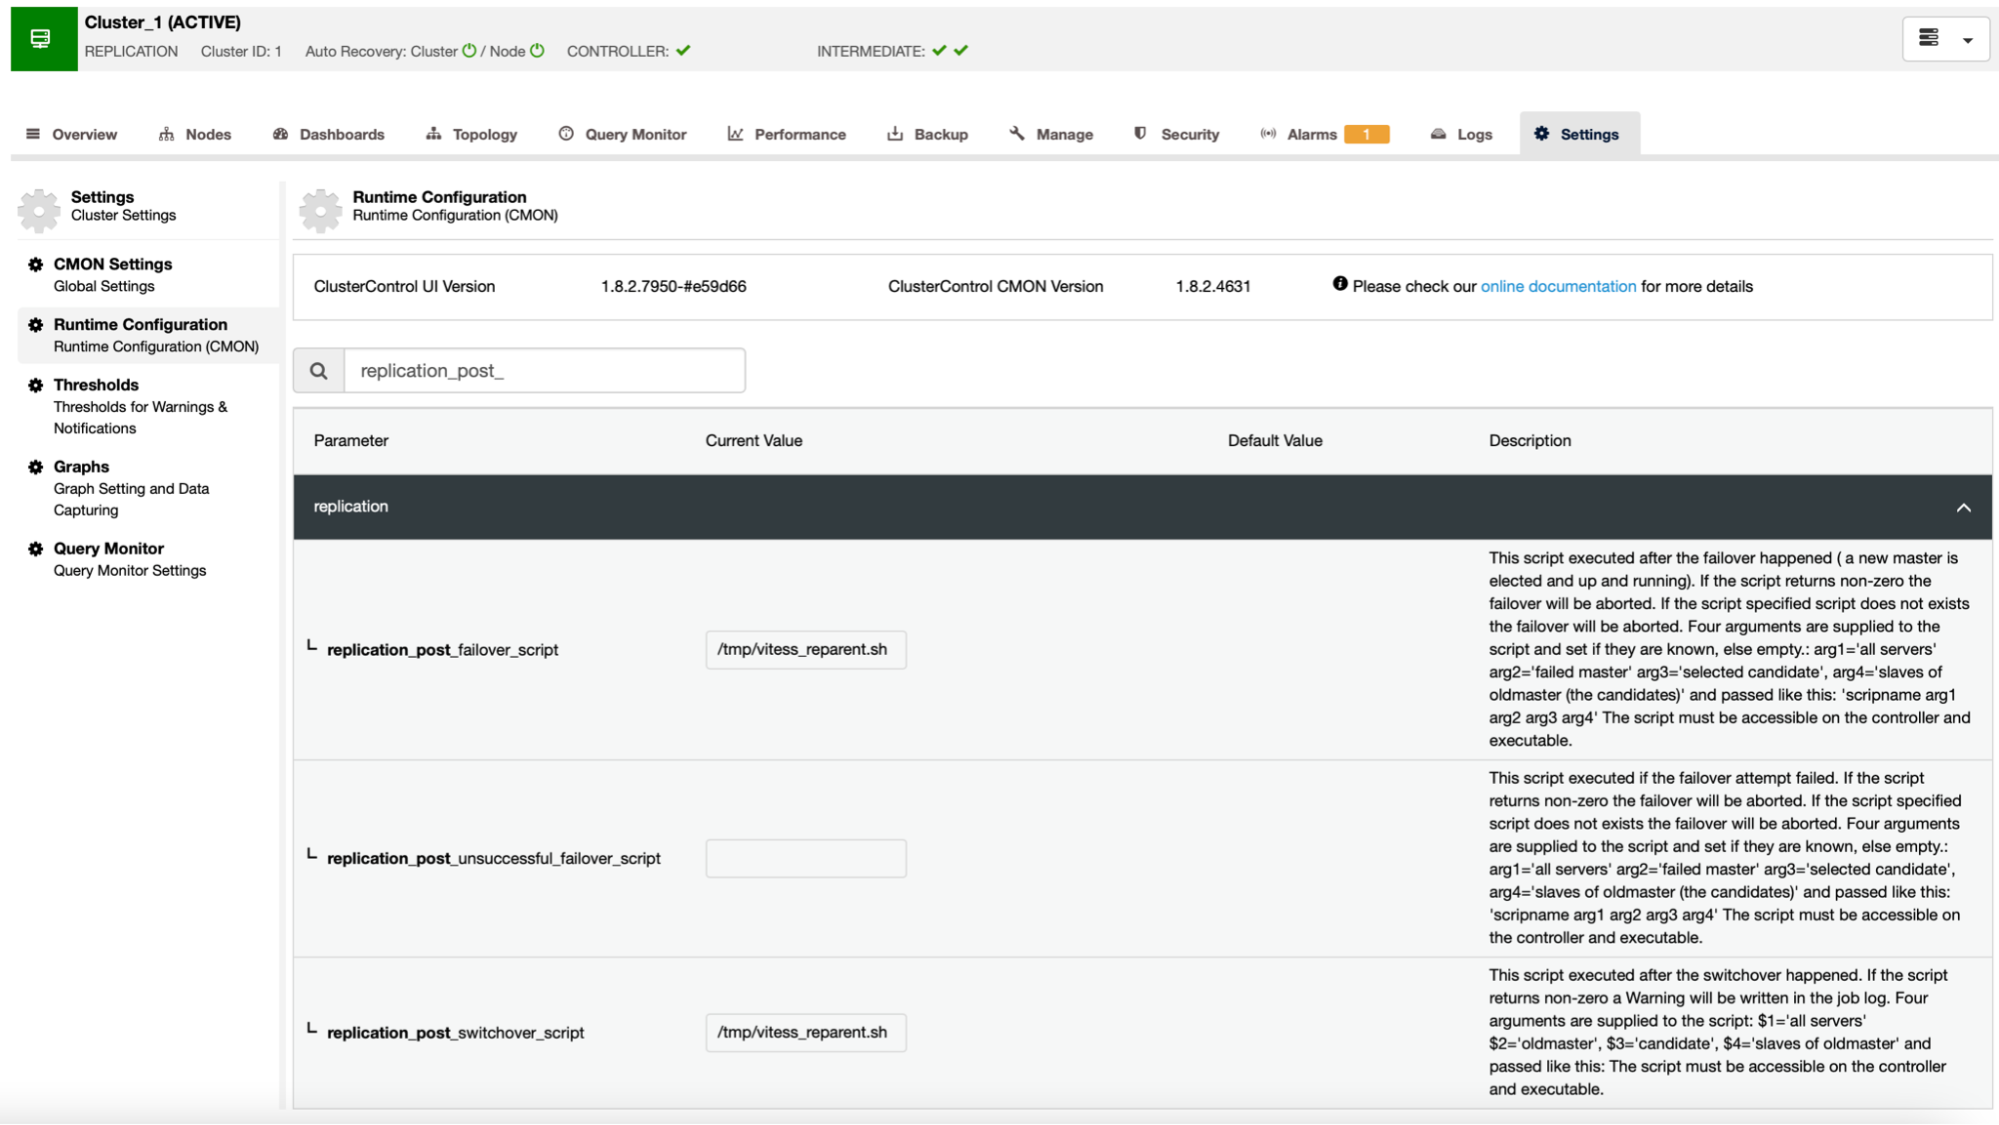
scp /usr/local/vitess/bin/vtctlclient [email protected]:/usr/local/vitess/bin/As a next step, we have to create a script that will execute the command to reparent shards. We will use replication_post_failover_script and replication_post_switchover_script. Cmon will execute the script with several arguments. We are interested in the third of them, it will contain the hostname of the master candidate – the node that has been picked as a new master.
The example script may look something like this.
#!/bin/bash

if [[ $3 == 10.0.0.181 ]] ; then tablet="zone1-401" ; fi

if [[ $3 == 10.0.0.182 ]] ; then tablet="zone1-402" ; fi

vitess="10.0.0.50"

/usr/local/vitess/bin/vtctlclient -server ${vitess}:15999 TabletExternallyReparented ${tablet}
Please keep in mind that this is just a bare minimum that works. You should implement a more detailed script that will perform maybe additional sanity checks. Instead of hardcoding the hostnames and tablet names you may actually query ClusterControl to get the list of nodes in the cluster, then you may want to compare it with the contents of the Topology Service to see which tablet alias should be used.
Once we are ready with the script, we should configure it to be executed by ClusterControl:
We can test this by manually promoting the replica. The initial state, as seen by Vitess, was:
mysql> SHOW vitess_tablets;

+-------+----------------+-------+------------+---------+------------------+------------+----------------------+

| Cell  | Keyspace       | Shard | TabletType | State   | Alias            | Hostname   | MasterTermStartTime  |

+-------+----------------+-------+------------+---------+------------------+------------+----------------------+

| zone1 | clustercontrol | 0     | MASTER     | SERVING | zone1-0000000401 | vagrant.vm | 2021-07-08T13:27:34Z |

| zone1 | clustercontrol | 0     | REPLICA    | SERVING | zone1-0000000402 | vagrant.vm |                      |

| zone1 | commerce       | 0     | MASTER     | SERVING | zone1-0000000100 | vagrant.vm | 2021-07-08T13:12:21Z |

| zone1 | commerce       | 0     | REPLICA    | SERVING | zone1-0000000101 | vagrant.vm |                      |

| zone1 | commerce       | 0     | RDONLY     | SERVING | zone1-0000000102 | vagrant.vm |                      |

+-------+----------------+-------+------------+---------+------------------+------------+----------------------+

5 rows in set (0.00 sec)
We are interested in ‘clustercontrol’ keyspace. 401 (10.0.0.181) was the master and 402 (10.0.0.182) was the replica.
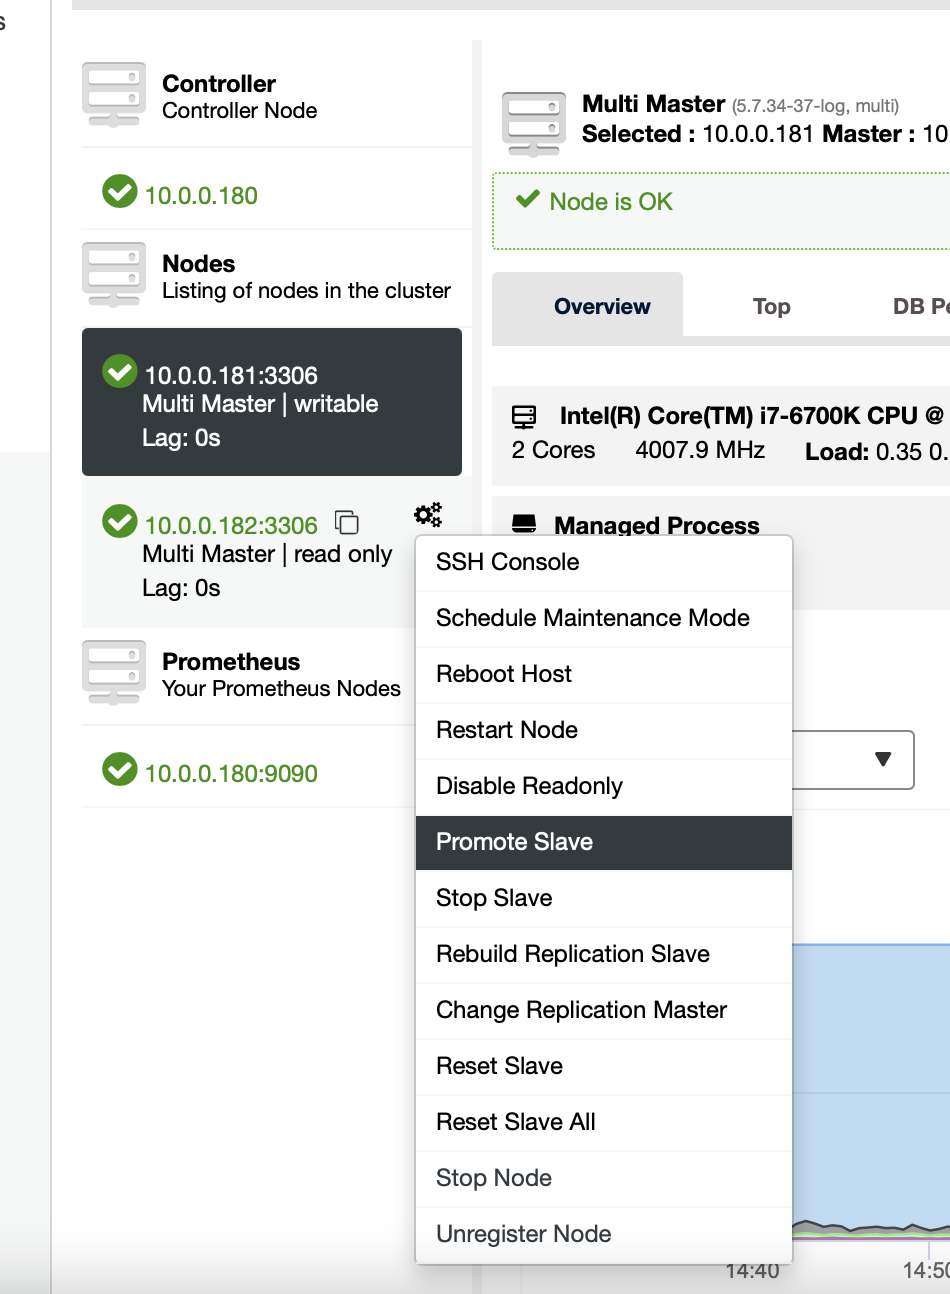
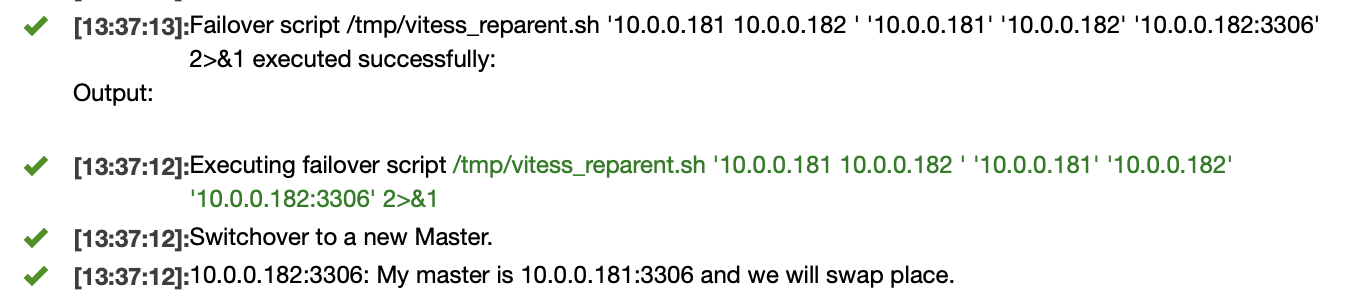
We can promote 10.0.0.182 to become a new master. Job starts and we can see that our script was executed:
Finally, job is completed:
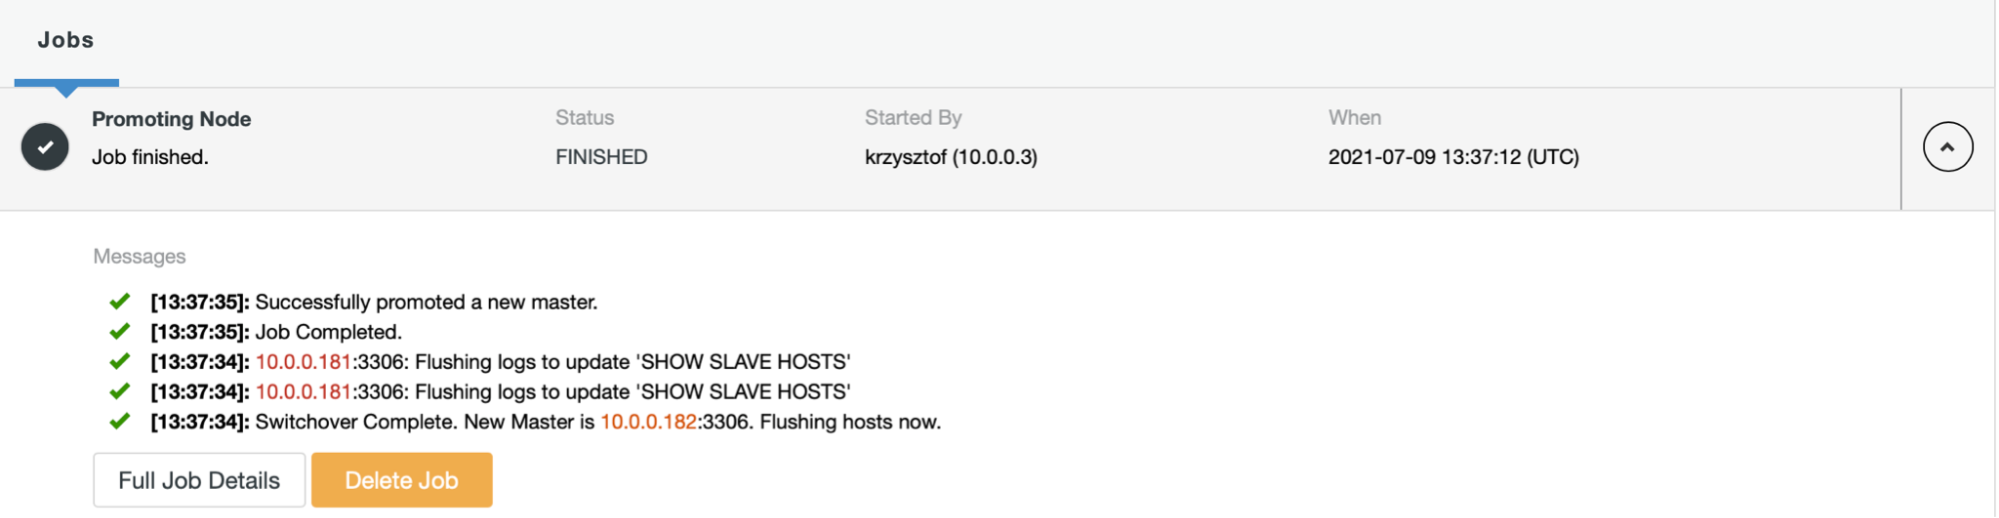
All went well in the ClusterControl. Let’s take a look at Vitess:
mysql> SHOW vitess_tablets;
+-------+----------------+-------+------------+---------+------------------+------------+----------------------+
| Cell  | Keyspace       | Shard | TabletType | State   | Alias            | Hostname   | MasterTermStartTime  |
+-------+----------------+-------+------------+---------+------------------+------------+----------------------+
| zone1 | clustercontrol | 0     | MASTER     | SERVING | zone1-0000000402 | vagrant.vm | 2021-07-09T13:38:00Z |
| zone1 | clustercontrol | 0     | REPLICA    | SERVING | zone1-0000000401 | vagrant.vm |                      |
| zone1 | commerce       | 0     | MASTER     | SERVING | zone1-0000000100 | vagrant.vm | 2021-07-08T13:12:21Z |
| zone1 | commerce       | 0     | REPLICA    | SERVING | zone1-0000000101 | vagrant.vm |                      |
| zone1 | commerce       | 0     | RDONLY     | SERVING | zone1-0000000102 | vagrant.vm |                      |
+-------+----------------+-------+------------+---------+------------------+------------+----------------------+
5 rows in set (0.00 sec)
As you can see, all is ok here as well. 402 is the new master and 401 is marked as the replica.
Of course, this is just an example of how you can benefit from ClusterControl’s ability to monitor and manage your MySQL databases while still being able to leverage Vitess’ ability to scale out and shard the data. Vitess is a great tool but it lacks a couple of elements. Luckily, ClusterControl can back you up in those cases.


