blog
Multiple Delayed Replication Slaves for Disaster Recovery with Low RTO

Delayed replication allows a replication slave to deliberately lag behind the master by at least a specified amount of time. Before executing an event, the slave will first wait, if necessary, until the given time has passed since the event was created on the master. The result is that the slave will reflect the state of the master some time back in the past. This feature is supported since MySQL 5.6 and MariaDB 10.2.3. It can come in handy in case of accidental data deletion, and should be part of your disaster recovery plan.
The problem when setting up a delayed replication slave is how much delay we should put on. Too short of time and you risk the bad query getting to your delayed slave before you can get to it, thus wasting the point of having the delayed slave. Optionally, you can have your delayed time to be so long that it take hours for your delayed slave to catch up to where the master was at the time of the error.
Luckily with Docker, process isolation is its strength. Running multiple MySQL instances is pretty convenient with Docker. It allows us to have multiple delayed slaves within a single physical host to improve our recovery time and save hardware resources. If you think a 15-minute delay is too short, we can have another instance with 1-hour delay or 6-hour for an even older snapshot of our database.
In this blog post, we are going to deploy multiple MySQL delayed slaves on one single physical host with Docker, and show some recovery scenarios. The following diagram illustrates our final architecture that we want to build:

Our architecture consists of an already deployed 2-node MySQL Replication running on physical servers (blue) and we would like to set up another three MySQL slaves (green) with following behaviour:
- 15 minutes delay
- 1 hour delay
- 6 hours delay
Take note that we are going to have 3 copies of the exact same data on the same physical server. Ensure our Docker host has the storage required, so do allocate sufficient disk space beforehand.
MySQL Master Preparation
Firstly, login to the master server and create the replication user:
mysql> GRANT REPLICATION SLAVE ON *.* TO rpl_user@'%' IDENTIFIED BY 'YlgSH6bLLy';Then, create a PITR-compatible backup on the master:
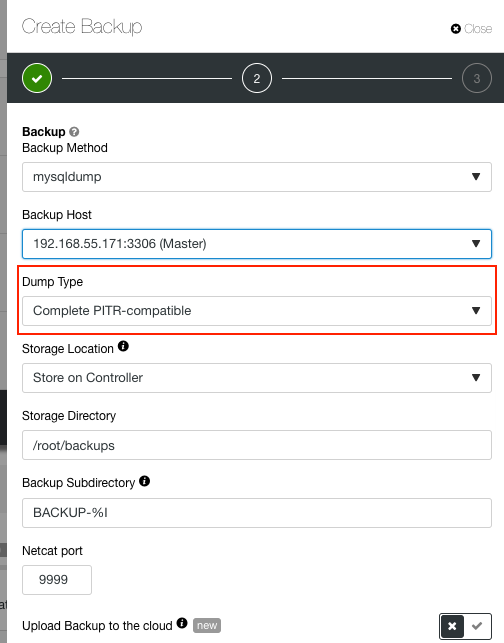
$ mysqldump -uroot -p --flush-privileges --hex-blob --opt --master-data=1 --single-transaction --skip-lock-tables --skip-lock-tables --triggers --routines --events --all-databases | gzip -6 -c > mysqldump_complete.sql.gzIf you are using ClusterControl, you can make a PITR-compatible backup easily. Go to Backups -> Create Backup and pick “Complete PITR-compatible” under the “Dump Type” dropdown:
Finally, transfer this backup to the Docker host:
$ scp mysqldump_complete.sql.gz [email protected]:~This backup file will be used by the MySQL slave containers during the slave bootstrapping process, as shown in the next section.
Delayed Slave Deployment
Prepare our Docker container directories. Create 3 directories (mysql.conf.d, datadir and sql) for every MySQL container that we are going to launch (you can use loop to simplify the commands below):
$ mkdir -p /storage/mysql-slave-15m/mysql.conf.d
$ mkdir -p /storage/mysql-slave-15m/datadir
$ mkdir -p /storage/mysql-slave-15m/sql
$ mkdir -p /storage/mysql-slave-1h/mysql.conf.d
$ mkdir -p /storage/mysql-slave-1h/datadir
$ mkdir -p /storage/mysql-slave-1h/sql
$ mkdir -p /storage/mysql-slave-6h/mysql.conf.d
$ mkdir -p /storage/mysql-slave-6h/datadir
$ mkdir -p /storage/mysql-slave-6h/sql
“mysql.conf.d” directory will store our custom MySQL configuration file and will be mapped into the container under /etc/mysql.conf.d. “datadir” is where we want Docker to store the MySQL data directory, which maps to /var/lib/mysql of the container and “sql” directory stores our SQL files – backup files in .sql or .sql.gz format to stage the slave before replicating and also .sql files to automate the replication configuration and startup.
15-minute Delayed Slave
Prepare the MySQL configuration file for our 15-minute delayed slave:
$ vim /storage/mysql-slave-15m/mysql.conf.d/my.cnfAnd add the following lines:
[mysqld]
server_id=10015
binlog_format=ROW
log_bin=binlog
log_slave_updates=1
gtid_mode=ON
enforce_gtid_consistency=1
relay_log=relay-bin
expire_logs_days=7
read_only=ON
** The server-id value we used for this slave is 10015.
Next, under /storage/mysql-slave-15m/sql directory, create two SQL files, one to RESET MASTER (1reset_master.sql) and another one to establish the replication link using CHANGE MASTER statement (3setup_slave.sql).
Create a text file 1reset_master.sql and add the following line:
RESET MASTER;Create a text file 3setup_slave.sql and add the following lines:
CHANGE MASTER TO MASTER_HOST = '192.168.55.171', MASTER_USER = 'rpl_user', MASTER_PASSWORD = 'YlgSH6bLLy', MASTER_AUTO_POSITION = 1, MASTER_DELAY=900;
START SLAVE;
MASTER_DELAY=900 is equal to 15 minutes (in seconds). Then copy the backup file taken from our master (that has been transferred into our Docker host) to the “sql” directory and renamed it as 2mysqldump_complete.sql.gz:
$ cp ~/mysqldump_complete.tar.gz /storage/mysql-slave-15m/sql/2mysqldump_complete.tar.gzThe final look of our “sql” directory should be something like this:
$ pwd
/storage/mysql-slave-15m/sql
$ ls -1
1reset_master.sql
2mysqldump_complete.sql.gz
3setup_slave.sql
Take note that we prefix the SQL filename with an integer to determine the execution order when Docker initializes the MySQL container.
Once everything is in place, run the MySQL container for our 15-minute delayed slave:
$ docker run -d
--name mysql-slave-15m
-e MYSQL_ROOT_PASSWORD=password
--mount type=bind,source=/storage/mysql-slave-15m/datadir,target=/var/lib/mysql
--mount type=bind,source=/storage/mysql-slave-15m/mysql.conf.d,target=/etc/mysql/mysql.conf.d
--mount type=bind,source=/storage/mysql-slave-15m/sql,target=/docker-entrypoint-initdb.d
mysql:5.7
** The MYSQL_ROOT_PASSWORD value must be the same as the MySQL root password on the master.
The following lines are what we are looking for to verify if MySQL is running correctly and connected as a slave to our master (192.168.55.171):
$ docker logs -f mysql-slave-15m
...
2018-12-04T04:05:24.890244Z 0 [Note] mysqld: ready for connections.
Version: '5.7.24-log'  socket: '/var/run/mysqld/mysqld.sock'  port: 3306  MySQL Community Server (GPL)
2018-12-04T04:05:25.010032Z 2 [Note] Slave I/O thread for channel '': connected to master '[email protected]:3306',replication started in log 'FIRST' at position 4
You can then verify the replication status with following statement:
$ docker exec -it mysql-slave-15m mysql -uroot -p -e 'show slave statusG'
...
Slave_IO_Running: Yes
Slave_SQL_Running: Yes
SQL_Delay: 900
Auto_Position: 1
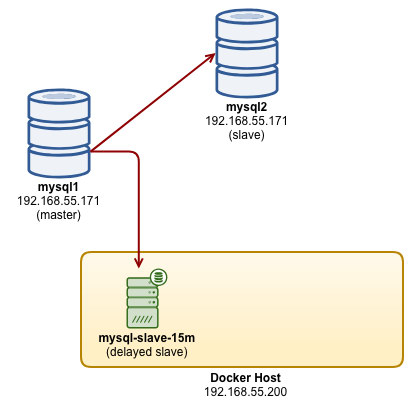
...At this point, our 15-minute delayed slave container is replicating correctly and our architecture is looking something like this:
1-hour Delayed Slave
Prepare the MySQL configuration file for our 1-hour delayed slave:
$ vim /storage/mysql-slave-1h/mysql.conf.d/my.cnfAnd add the following lines:
[mysqld]
server_id=10060
binlog_format=ROW
log_bin=binlog
log_slave_updates=1
gtid_mode=ON
enforce_gtid_consistency=1
relay_log=relay-bin
expire_logs_days=7
read_only=ON
** The server-id value we used for this slave is 10060.
Next, under /storage/mysql-slave-1h/sql directory, create two SQL files, one to RESET MASTER (1reset_master.sql) and another one to establish the replication link using CHANGE MASTER statement (3setup_slave.sql).
Create a text file 1reset_master.sql and add the following line:
RESET MASTER;Create a text file 3setup_slave.sql and add the following lines:
CHANGE MASTER TO MASTER_HOST = '192.168.55.171', MASTER_USER = 'rpl_user', MASTER_PASSWORD = 'YlgSH6bLLy', MASTER_AUTO_POSITION = 1, MASTER_DELAY=3600;
START SLAVE;
MASTER_DELAY=3600 is equal to 1 hour (in seconds). Then copy the backup file taken from our master (that has been transferred into our Docker host) to the “sql” directory and renamed it as 2mysqldump_complete.sql.gz:
$ cp ~/mysqldump_complete.tar.gz /storage/mysql-slave-1h/sql/2mysqldump_complete.tar.gzThe final look of our “sql” directory should be something like this:
$ pwd
/storage/mysql-slave-1h/sql
$ ls -1
1reset_master.sql
2mysqldump_complete.sql.gz
3setup_slave.sql
Take note that we prefix the SQL filename with an integer to determine the execution order when Docker initializes the MySQL container.
Once everything is in place, run the MySQL container for our 1-hour delayed slave:
$ docker run -d
--name mysql-slave-1h
-e MYSQL_ROOT_PASSWORD=password
--mount type=bind,source=/storage/mysql-slave-1h/datadir,target=/var/lib/mysql
--mount type=bind,source=/storage/mysql-slave-1h/mysql.conf.d,target=/etc/mysql/mysql.conf.d
--mount type=bind,source=/storage/mysql-slave-1h/sql,target=/docker-entrypoint-initdb.d
mysql:5.7
** The MYSQL_ROOT_PASSWORD value must be the same as the MySQL root password on the master.
The following lines are what we are looking for to verify if MySQL is running correctly and connected as a slave to our master (192.168.55.171):
$ docker logs -f mysql-slave-1h
...
2018-12-04T04:05:24.890244Z 0 [Note] mysqld: ready for connections.
Version: '5.7.24-log'  socket: '/var/run/mysqld/mysqld.sock'  port: 3306  MySQL Community Server (GPL)
2018-12-04T04:05:25.010032Z 2 [Note] Slave I/O thread for channel '': connected to master '[email protected]:3306',replication started in log 'FIRST' at position 4
You can then verify the replication status with following statement:
$ docker exec -it mysql-slave-1h mysql -uroot -p -e 'show slave statusG'
...
Slave_IO_Running: Yes
Slave_SQL_Running: Yes
SQL_Delay: 3600
Auto_Position: 1
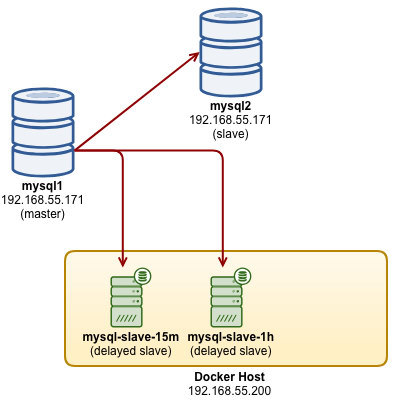
...At this point, our 15-minute and 1-hour MySQL delayed slave containers are replicating from the master and our architecture is looking something like this:
6-hour Delayed Slave
Prepare the MySQL configuration file for our 6-hour delayed slave:
$ vim /storage/mysql-slave-15m/mysql.conf.d/my.cnfAnd add the following lines:
[mysqld]
server_id=10006
binlog_format=ROW
log_bin=binlog
log_slave_updates=1
gtid_mode=ON
enforce_gtid_consistency=1
relay_log=relay-bin
expire_logs_days=7
read_only=ON
** The server-id value we used for this slave is 10006.
Next, under /storage/mysql-slave-6h/sql directory, create two SQL files, one to RESET MASTER (1reset_master.sql) and another one to establish the replication link using CHANGE MASTER statement (3setup_slave.sql).
Create a text file 1reset_master.sql and add the following line:
RESET MASTER;Create a text file 3setup_slave.sql and add the following lines:
CHANGE MASTER TO MASTER_HOST = '192.168.55.171', MASTER_USER = 'rpl_user', MASTER_PASSWORD = 'YlgSH6bLLy', MASTER_AUTO_POSITION = 1, MASTER_DELAY=21600;
START SLAVE;
MASTER_DELAY=21600 is equal to 6 hours (in seconds). Then copy the backup file taken from our master (that has been transferred into our Docker host) to the “sql” directory and renamed it as 2mysqldump_complete.sql.gz:
$ cp ~/mysqldump_complete.tar.gz /storage/mysql-slave-6h/sql/2mysqldump_complete.tar.gzThe final look of our “sql” directory should be something like this:
$ pwd
/storage/mysql-slave-6h/sql
$ ls -1
1reset_master.sql
2mysqldump_complete.sql.gz
3setup_slave.sql
Take note that we prefix the SQL filename with an integer to determine the execution order when Docker initializes the MySQL container.
Once everything is in place, run the MySQL container for our 6-hour delayed slave:
$ docker run -d
--name mysql-slave-6h
-e MYSQL_ROOT_PASSWORD=password
--mount type=bind,source=/storage/mysql-slave-6h/datadir,target=/var/lib/mysql
--mount type=bind,source=/storage/mysql-slave-6h/mysql.conf.d,target=/etc/mysql/mysql.conf.d
--mount type=bind,source=/storage/mysql-slave-6h/sql,target=/docker-entrypoint-initdb.d
mysql:5.7
** The MYSQL_ROOT_PASSWORD value must be the same as the MySQL root password on the master.
The following lines are what we are looking for to verify if MySQL is running correctly and connected as a slave to our master (192.168.55.171):
$ docker logs -f mysql-slave-6h
...
2018-12-04T04:05:24.890244Z 0 [Note] mysqld: ready for connections.
Version: '5.7.24-log'  socket: '/var/run/mysqld/mysqld.sock'  port: 3306  MySQL Community Server (GPL)
2018-12-04T04:05:25.010032Z 2 [Note] Slave I/O thread for channel '': connected to master '[email protected]:3306',replication started in log 'FIRST' at position 4
You can then verify the replication status with following statement:
$ docker exec -it mysql-slave-6h mysql -uroot -p -e 'show slave statusG'
...
             Slave_IO_Running: Yes
            Slave_SQL_Running: Yes
                    SQL_Delay: 21600
                Auto_Position: 1
...
At this point, our 5 minutes, 1-hour and 6-hour delayed slave containers are replicating correctly and our architecture is looking something like this:
Disaster Recovery Scenario
Let’s say a user has accidentally dropped a wrong column on a big table. Consider the following statement was executed on the master:
mysql> USE shop;
mysql> ALTER TABLE settings DROP COLUMN status;
If you are lucky enough to realize it immediately, you could use the 15-minute delayed slave to catch up to the moment before the disaster happens and promote it to become master, or export the missing data out and restore it on the master.
Firstly, we have to find the binary log position before the disaster happened. Grab the time now() on the master:
mysql> SELECT now();
+---------------------+
| now()               |
+---------------------+
| 2018-12-04 14:55:41 |
+---------------------+
Then, get the active binary log file on the master:
mysql> SHOW MASTER STATUS;
+---------------+----------+--------------+------------------+---------------------------------------------------------------------------------------------------------------------------------------------------------------------------------------+
| File          | Position | Binlog_Do_DB | Binlog_Ignore_DB | Executed_Gtid_Set                                                                                                                                                                     |
+---------------+----------+--------------+------------------+---------------------------------------------------------------------------------------------------------------------------------------------------------------------------------------+
| binlog.000004 | 20260658 |              |                  | 1560665e-ed2b-11e8-93fa-000c29b7f985:1-12031,
1b235f7a-d37b-11e8-9c3e-000c29bafe8f:1-62519,
1d8dc60a-e817-11e8-82ff-000c29bafe8f:1-326575,
791748b3-d37a-11e8-b03a-000c29b7f985:1-374 |
+---------------+----------+--------------+------------------+---------------------------------------------------------------------------------------------------------------------------------------------------------------------------------------+
Using the same date format, extract the information that we want from the binary log, binlog.000004. We estimate the start time to read from the binlog around 20 minutes ago (2018-12-04 14:35:00) and filter the output to show 25 lines before the “drop column” statement:
$ mysqlbinlog --start-datetime="2018-12-04 14:35:00" --stop-datetime="2018-12-04 14:55:41" /var/lib/mysql/binlog.000004 | grep -i -B 25 "drop column"
'/*!*/;
# at 19379172
#181204 14:54:45 server id 1  end_log_pos 19379232 CRC32 0x0716e7a2     Table_map: `shop`.`settings` mapped to number 766
# at 19379232
#181204 14:54:45 server id 1  end_log_pos 19379460 CRC32 0xa6187edd     Write_rows: table id 766 flags: STMT_END_F

BINLOG '
tSQGXBMBAAAAPAAAACC0JwEAAP4CAAAAAAEABnNidGVzdAAHc2J0ZXN0MgAFAwP+/gME/nj+PBCi
5xYH
tSQGXB4BAAAA5AAAAAS1JwEAAP4CAAAAAAEAAgAF/+AYwwAAysYAAHc0ODYyMjI0NjI5OC0zNDE2
OTY3MjY5OS02MDQ1NTQwOTY1Ny01MjY2MDQ0MDcwOC05NDA0NzQzOTUwMS00OTA2MTAxNzgwNC05
OTIyMzM3NzEwOS05NzIwMzc5NTA4OC0yODAzOTU2NjQ2MC0zNzY0ODg3MTYzOTswMTM0MjAwNTcw
Ni02Mjk1ODMzMzExNi00NzQ1MjMxODA1OS0zODk4MDQwMjk5MS03OTc4MTA3OTkwNQEAAADdfhim
'/*!*/;
# at 19379460
#181204 14:54:45 server id 1  end_log_pos 19379491 CRC32 0x71f00e63     Xid = 622405
COMMIT/*!*/;
# at 19379491
#181204 14:54:46 server id 1  end_log_pos 19379556 CRC32 0x62b78c9e     GTID    last_committed=11507    sequence_number=11508   rbr_only=no
SET @@SESSION.GTID_NEXT= '1560665e-ed2b-11e8-93fa-000c29b7f985:11508'/*!*/;
# at 19379556
#181204 14:54:46 server id 1  end_log_pos 19379672 CRC32 0xc222542a     Query   thread_id=3162  exec_time=1     error_code=0
SET TIMESTAMP=1543906486/*!*/;
/*!C utf8 *//*!*/;
SET @@session.character_set_client=33,@@session.collation_connection=33,@@session.collation_server=8/*!*/;
ALTER TABLE settings DROP COLUMN status
In the bottom few lines of the mysqlbinlog output, you should have the erroneous command that was executed at position 19379556. The position that we should restore is one step before this, which is in position 19379491. This is the binlog position where we want our delayed slave to be up to.
Then, on the chosen delayed slave, stop the delayed replication slave and start again the slave to a fixed end position that we figured out above:
$ docker exec -it mysql-slave-15m mysql -uroot -p
mysql> STOP SLAVE;
mysql> START SLAVE UNTIL MASTER_LOG_FILE = 'binlog.000004', MASTER_LOG_POS = 19379491;
Monitor the replication status and wait until Exec_Master_Log_Pos is equal to Until_Log_Pos value. This could take some time. Once caught up, you should see the following:
$ docker exec -it mysql-slave-15m mysql -uroot -p -e 'SHOW SLAVE STATUSG'
...
          Exec_Master_Log_Pos: 19379491
              Relay_Log_Space: 50552186
              Until_Condition: Master
               Until_Log_File: binlog.000004
                Until_Log_Pos: 19379491
...
Finally verify if the missing data that we were looking for is there (column “status” still exists):
mysql> DESCRIBE shop.settings;
+--------+------------------+------+-----+---------+----------------+
| Field  | Type             | Null | Key | Default | Extra          |
+--------+------------------+------+-----+---------+----------------+
| id     | int(10) unsigned | NO   | PRI | NULL    | auto_increment |
| sid    | int(10) unsigned | NO   | MUL | 0       |                |
| param  | varchar(100)     | NO   |     |         |                |
| value  | varchar(255)     | NO   |     |         |                |
| status | int(11)          | YES  |     | 1       |                |
+--------+------------------+------+-----+---------+----------------+
Then export the table from our slave container and transfer it to the master server:
$ docker exec -it mysql-slave-1h mysqldump -uroot -ppassword --single-transaction shop settings > shop_settings.sqlDrop the problematic table and restore it back on the master:
$ mysql -uroot -p -e 'DROP TABLE shop.settings'
$ mysqldump -uroot -p -e shop < shop_setttings.sql
We have now recovered our table back to its original state before the disastrous event. To summarize, delayed replication can be used for several purposes:
- To protect against user mistakes on the master. A DBA can roll back a delayed slave to the time just before the disaster.
- To test how the system behaves when there is a lag. For example, in an application, a lag might be caused by a heavy load on the slave. However, it can be difficult to generate this load level. Delayed replication can simulate the lag without having to simulate the load. It can also be used to debug conditions related to a lagging slave.
- To inspect what the database looked like in the past, without having to reload a backup. For example, if the delay is one week and the DBA needs to see what the database looked like before the last few days' worth of development, the delayed slave can be inspected.
Final Thoughts
With Docker, running multiple MySQL instances on a same physical host can be done efficiently. You may use Docker orchestration tools like Docker Compose and Swarm to simplify the multi-container deployment as opposed to the steps shown in this blog post.