blog
How to Automate Deployment of PostgreSQL Database

In the world of information technology, automation is not a new thing for most of us. In fact, most organizations are using it for various purposes depending on their work type and objectives. For example, data analysts use automation to generate reports, system administrators use automation for their repetitive tasks like cleaning disk space, and developers use automation to automate their development process.
Nowadays, there are a lot of automation tools for IT available and can be chosen, thanks to the DevOps era. Which is the best tool? The answer is a predictable ‘it depends’, as it depends on what we are trying to achieve as well as our environment setup. Some of the automation tools are Terraform, Bolt, Chef, SaltStack and a very trendy one is Ansible. Ansible is an open-source agentless IT engine that can automate application deployment, configuration management and IT orchestration. Ansible was founded in 2012 and has been written in the most popular language, Python. It uses a playbook to implement all the automation, where all the configurations are written in a human-readable language, YAML.
In today’s post, we are going to learn how to use Ansible to do Postgresql database deployment.
What Makes Ansible Special?
The reason why ansible is used mainly because of its features. Those features are:
-
Anything can be automated by using simple human-readable language YAML
-
No agent will be installed on the remote machine (agentless architecture)
-
The configuration will be pushed from your local machine to the server from your local machine (push model)
-
Developed using Python (one of the popular languages currently used) and a lot of libraries can be chosen from
-
Collection of Ansible modules carefully selected by the Red Had Engineering Team
The Way Ansible Works
Before Ansible can run any operational tasks to the remote hosts, we need to install it in one host which will become the controller node. In this controller node, we will be orchestrating any tasks that we would like to do into the remote hosts also known as managed nodes.
The controller node must have the inventory of the managed nodes and the Ansible software to manage it. The required data to be used by Ansible like managed node’s hostname or IP address will be placed inside this inventory. Without a proper inventory, Ansible could not do the automation correctly. See here to learn more about inventory.
Ansible is agentless and using SSH to push the changes, which means we don’t have to install Ansible in all nodes, but all the managed nodes must have python and any necessary python libraries installed. Both the controller node and managed nodes must be set as passwordless. It’s worth mentioning that the connection between all controller node and managed nodes are good and tested properly.
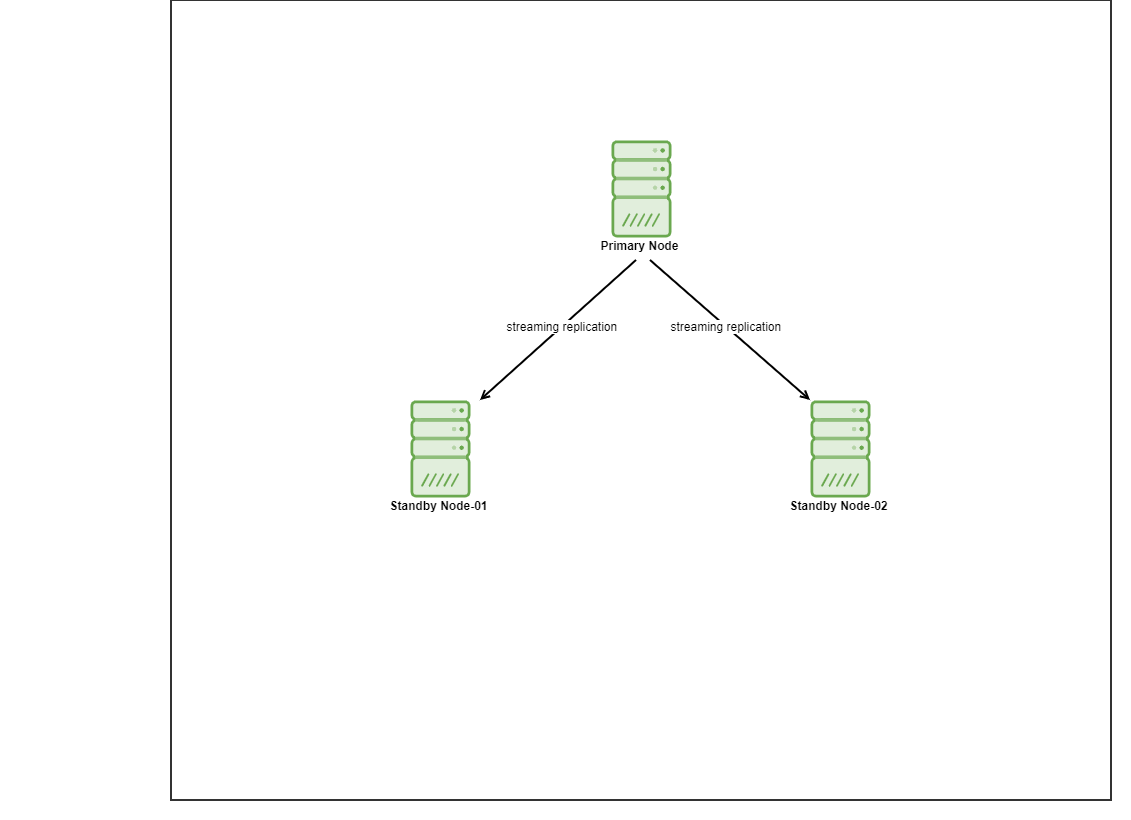
For this demo, I have provisioned 4 Centos 8 VMs by using vagrant. One will act as a controller node and the other 2 VMs will act as the database nodes to be deployed. We are not going into details on how to install Ansible in this blog post but in case you would like to see the guide, feel free to visit this link. Note that we are using 3 nodes to set up a streaming replication topology, with one primary and 2 standby nodes. Nowadays, many production databases are in a high availability setup and a 3 node setup is a common one.
Installing PostgreSQL
There are several ways to install PostgreSQL by using Ansible. Today, I will be using Ansible Roles to achieve this purpose. Ansible Roles in a nutshell is a set of tasks to configure a host to serve a certain purpose like configuring a service. Ansible Roles are defined using YAML files with a predefined directory structure available for download from the Ansible Galaxy portal.
Ansible Galaxy on the other hand is a repository for Ansible Roles that are available to drop directly into your Playbooks to streamline your automation projects.
For this demo, I have chosen the roles that have been maintained by dudefellah. In order for us to utilize this role, we need to download and install it to the controller node. The task is pretty straightforward and can be done by running the following command provided that Ansible has been installed on your controller node:
$ ansible-galaxy install dudefellah.postgresqlYou should see the following result once the role installed successfully in your controller node:
$ ansible-galaxy install dudefellah.postgresql
- downloading role 'postgresql', owned by dudefellah
- downloading role from https://github.com/dudefellah/ansible-role-postgresql/archive/0.1.0.tar.gz
- extracting dudefellah.postgresql to /home/ansible/.ansible/roles/dudefellah.postgresql
- dudefellah.postgresql (0.1.0) was installed successfully
In order for us to install PostgreSQL using this role, there are a few steps that need to be done. Here comes the Ansible Playbook. Ansible Playbook is where we can write Ansible code or a collection of the scripts that we would like to run on the managed nodes. Ansible Playbook uses YAML and consists of one or more plays run in a particular order. You can define hosts as well as a set of tasks that you would like to run on that assigned hosts or managed nodes.
All tasks will be executed as the ansible user that logged in. In order for us to execute the tasks with a different user including ‘root’, we can make use of become. Let’s take a look at pg-play.yml below:
$ cat pg-play.yml
- hosts: pgcluster
  become: yes
  vars_files:
    - ./custom_var.yml
  roles:
    - role: dudefellah.postgresql
      postgresql_version: 13
As you can see, I have defined the hosts as pgcluster and make use of become so that Ansible run the tasks with the sudo privilege. User vagrant is already in the sudoer group. I also have defined the role that I installed dudefellah.postgresql. pgcluster has been defined in the hosts file that I created. In case you wonder how it looks like, you can have a look below:
$ cat pghost
[pgcluster]
10.10.10.11 ansible_user=ansible
10.10.10.12 ansible_user=ansible
10.10.10.13 ansible_user=ansible
In addition to that, I have created another custom file (custom_var.yml) in which I included all the configuration and setting for PostgreSQL that I would like to implement. The details for the custom file are as below:
$ cat custom_var.yml
postgresql_conf:
  listen_addresses: "*"
  wal_level: replica
  max_wal_senders: 10
  max_replication_slots: 10
  hot_standby: on

postgresql_users:
  - name: replication
    password: r3pLic@tion
    privs: "ALL"
    role_attr_flags: "SUPERUSER,REPLICATION"


postgresql_pg_hba_conf:
 - { type: "local", database: "all", user: "all", method: "trust" }
 - { type: "host", database: "all", user: "all", address: "0.0.0.0/0", method: "md5" }
 - { type: "host", database: "replication", user: "replication", address: "0.0.0.0/0", method: "md5" }
 - { type: "host", database: "replication", user: "replication", address: "127.0.0.1/32", method: "md5" }
To run the installation, all we have to do is to execute the following command. You will not able to run the ansible-playbook command without the playbook file created (in my case it’s pg-play.yml).
$ ansible-playbook pg-play.yml -i pghostAfter I executed this command, it will run a few tasks defined by the role and will show this message if the command ran successfully:
PLAY [pgcluster] *************************************************************************************
TASK [Gathering Facts] *******************************************************************************
ok: [10.10.10.11]
ok: [10.10.10.12]

TASK [dudefellah.postgresql : Load platform variables] ***********************************************
ok: [10.10.10.11]
ok: [10.10.10.12]


TASK [dudefellah.postgresql : Set up role-specific facts based on some inputs and the OS distribution] ***
included: /home/ansible/.ansible/roles/dudefellah.postgresql/tasks/role_facts.yml for 10.10.10.11, 10.10.10.12
Once the ansible completed the tasks, I logged in to the slave (n2), stopped the PostgreSQL service, remove the contents of the data directory (/var/lib/pgsql/13/data/) and run the following command to initiate the backup task:
$ sudo -u postgres pg_basebackup -h 10.10.10.11 -D /var/lib/pgsql/13/data/ -U replication -P -v -R -X stream -C -S slaveslot1
10.10.10.11 is the IP address of the master. We can now verify the replication slot by logging into the master:
$ sudo -u postgres psql
postgres=# SELECT * FROM pg_replication_slots;
-[ RECORD 1 ]-------+-----------
slot_name           | slaveslot1
plugin              |
slot_type           | physical
datoid              |
database            |
temporary           | f
active              | t
active_pid          | 63854
xmin                |
catalog_xmin        |
restart_lsn         | 0/3000148
confirmed_flush_lsn |
wal_status          | reserved
safe_wal_size       |
We can also check the status of the replication on standby using the following command after we started back PostgreSQL service:
$ sudo -u postgres psql

postgres=# SELECT * FROM pg_stat_wal_receiver;

-[ RECORD 1 ]---------+------------------------------------------------------------------------------------------------------------------------------------------------------------------------------------------------------------------------------------------------------------------------------
pid                   | 229552
status                | streaming
receive_start_lsn     | 0/3000000
receive_start_tli     | 1
written_lsn           | 0/3000148
flushed_lsn           | 0/3000148
received_tli          | 1
last_msg_send_time    | 2021-05-09 14:10:00.29382+00
last_msg_receipt_time | 2021-05-09 14:09:59.954983+00
latest_end_lsn        | 0/3000148
latest_end_time       | 2021-05-09 13:53:28.209279+00
slot_name             | slaveslot1
sender_host           | 10.10.10.11
sender_port           | 5432
conninfo              | user=replication password=******** channel_binding=prefer dbname=replication host=10.10.10.11 port=5432 fallback_application_name=walreceiver sslmode=prefer sslcompression=0 ssl_min_protocol_version=TLSv1.2 gssencmode=prefer krbsrvname=postgres target_session_attrs=any
As you can see, there are a lot of works need to be done in order for us to setup the replication for PostgreSQL even though we have automated some of the tasks. Let’s see how this can be accomplished with ClusterControl.
PostgreSQL Deployment Using ClusterControl GUI
Now that we know how to deploy PostgreSQL by using Ansible, let’s see how we can deploy by using ClusterControl. ClusterControl is a management and automation software for database clusters including MySQL, MariaDB, MongoDB as well as TimescaleDB. It helps deploy, monitor, manage and scale your database cluster. There are two ways of deploying the database, in this blog post we will show you how to deploy it using the graphical user interface (GUI) assuming that you already have ClusterControl installed on your environment.
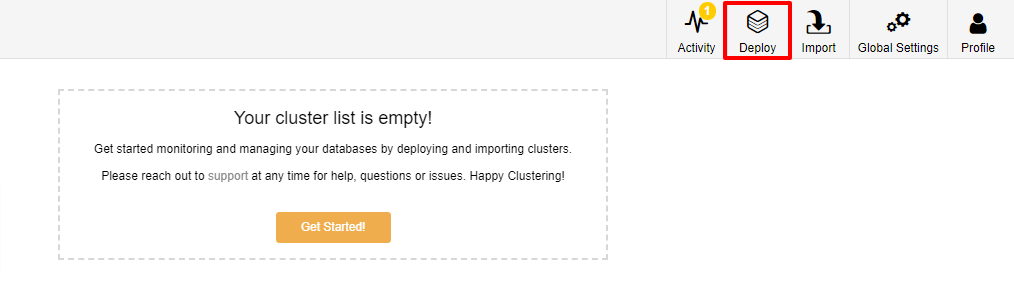
The first step is to log in to your ClusterControl and click on Deploy:
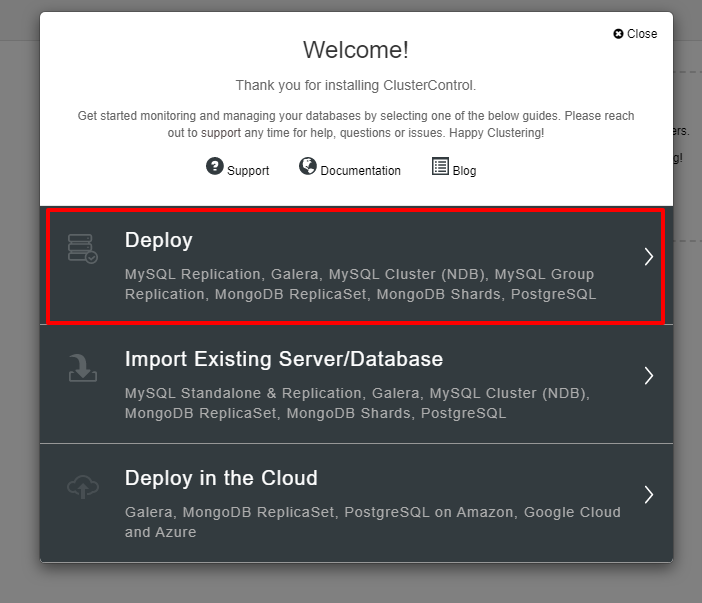
You will be presented with the screenshot below for the next step of the deployment, choose the PostgreSQL tab to continue:

Before we move further, I would like to remind you that the connection between the ClusterControl node and the databases nodes must be passwordless. Prior to deployment, all we need to do is to generate the ssh-keygen from the ClusterControl node and then copy it to all the nodes. Fill in the input for the SSH User, Sudo Password as well as Cluster Name as per your requirement and click Continue.
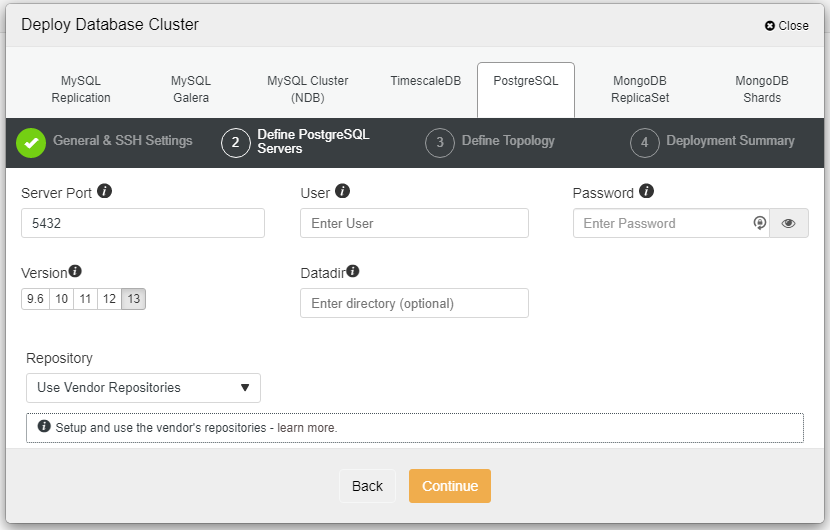
In the screenshot above, you will need to define the Server Port (in case you would like to use others), the user that you would like to as well as the password and the Version that you want to install.

Here we need to define the servers either using the hostname or the IP address, like in this case 1 master and 2 slaves. The final step is to choose the replication mode for our cluster.

After you click Deploy, the deployment process will start and we can monitor the progress in the Activity tab.

The deployment will normally take a couple of minutes, performance depends mostly on the network and the spec of the server.

Now that we have the PostgreSQL installed using ClusterControl.
PostgreSQL Deployment Using ClusterControl CLI
The other alternative way to deploy PostgreSQL is by using the CLI. provided we already configured the passwordless connection, we can just execute the following command and let it finish.
$ s9s cluster --create --cluster-type=postgresql --nodes="10.10.50.11?master;10.10.50.12?slave;10.10.50.13?slave" --provider-version=13 --db-admin="postgres" --db-admin-passwd="P@$$W0rd" --cluster-name=PGCluster --os-user=root --os-key-file=/root/.ssh/id_rsa --logYou should see the message below once the process completed successfully and can log in to the ClusterControl web to verify:
...
Saving cluster configuration.
Directory is '/etc/cmon.d'.
Filename is 'cmon_1.cnf'.
Configuration written to 'cmon_1.cnf'.
Sending SIGHUP to the controller process.
Waiting until the initial cluster starts up.
Cluster 1 is running.
Registering the cluster on the web UI.
Waiting until the initial cluster starts up.
Cluster 1 is running.
Generated & set RPC authentication token.
Conclusion
As you can see there are a few ways on how to deploy PostgreSQL. In this blog post, we have learned how to deploy it by using Ansible and as well as using our ClusterControl. Both of the ways are easy to follow and can be achieved with a minimal learning curve. With ClusterControl, the streaming replication setup can be complemented with HAProxy, VIP and PGBouncer to add connection failover, Virtual IP and connection pooling to the setup.
Note that deployment is just one aspect of a production database environment. Keeping it up and running, automating failovers, recovering broken nodes and other aspects like monitoring, alerting, backups are essential.
Hopefully, this blog post will beneficial some of you and give an idea on how to automate PostgreSQL deployments.