blog
What’s New in ClusterControl 1.4 – Backup Management

ClusterControl 1.4 introduces some major improvements in the area of backup management, with a revamped interface and simplified options to create backups. In this blog post, we’ll have a look at the new backup features available in this release.
Upgrading to 1.4
If you upgrade ClusterControl from version 1.3.x to version 1.4, the CMON process will internally migrate all backup related data/schedules to the new interface. The migration will happen during the first startup after you have upgraded (you are required to restart the CMON process after a package upgrade). To upgrade, please refer to the documentation.
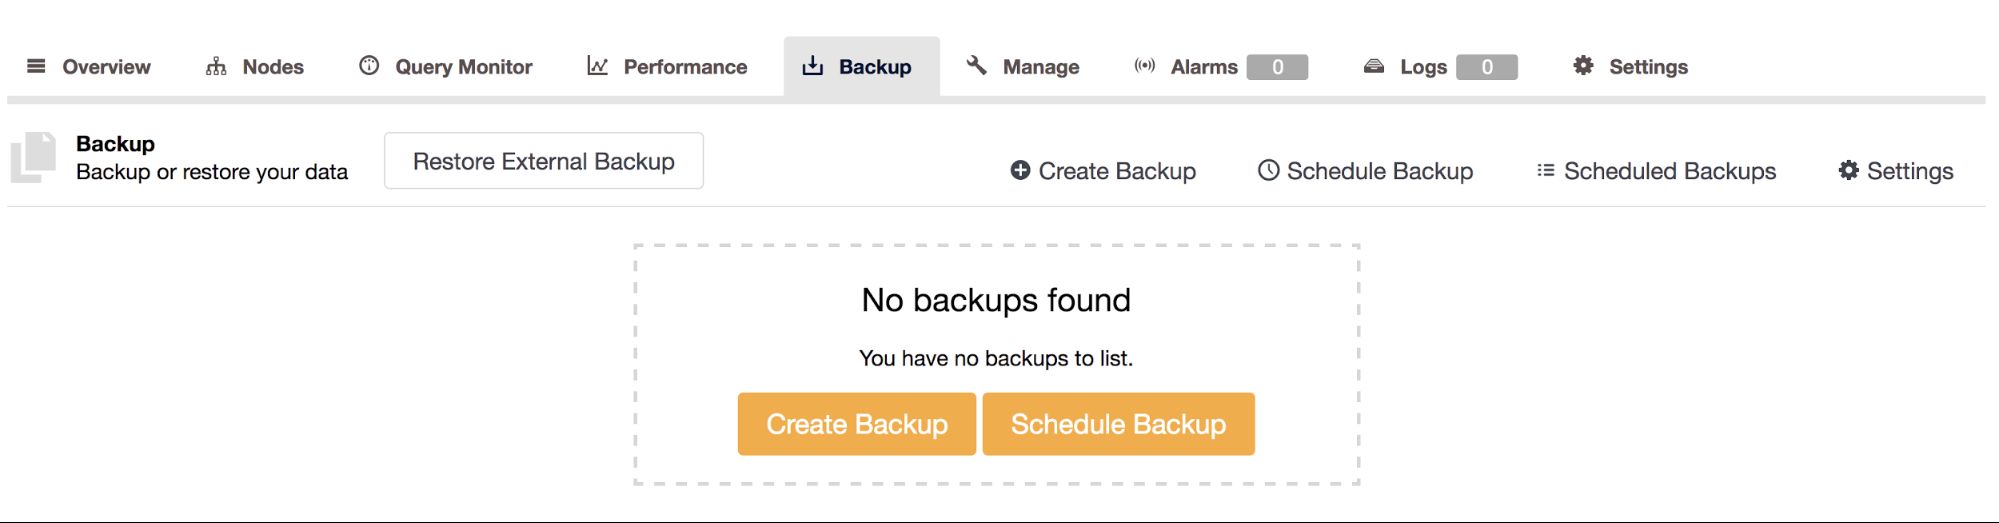
Redesigned User Interface
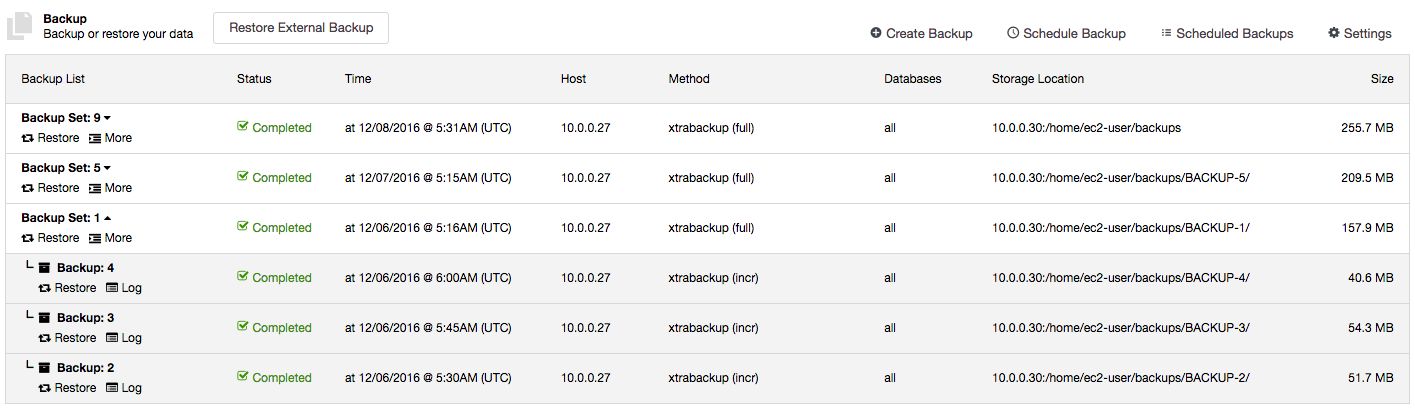
In the user interface, we have now consolidated related functionality onto a single interface. This includes Backup Settings, which were previously found under ClusterControl -> Settings -> Backups. It is now accessible under the same backup management tab:

The interface is now responsive to any action taken and requires no manual refresh. When a backup is created, you will see it in the backup list with a spinning arrows icon:
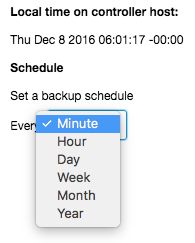
It is also possible now to schedule a backup every minute (the lowest interval) or year (the highest interval):
The backup options when scheduling or creating a backup now appear on the right side:
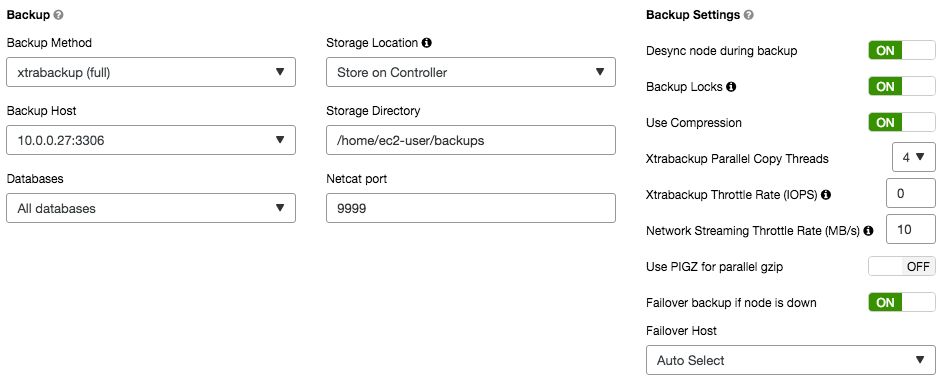
This allows you to quickly configure the backup, rather than having to scroll down the page.
Backup Report
Here is how it used to look pre v1.4:
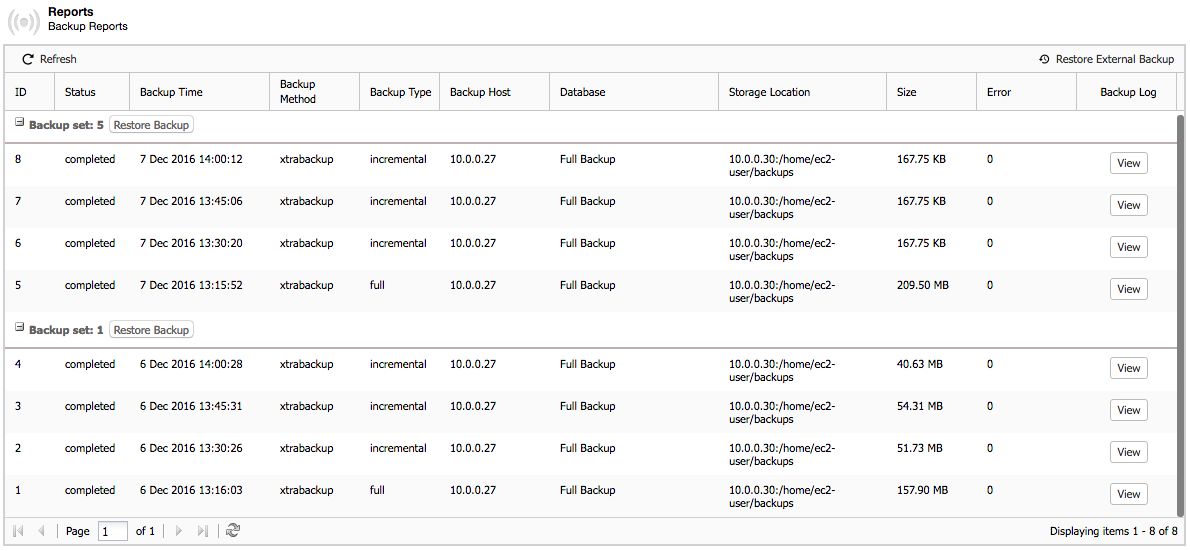
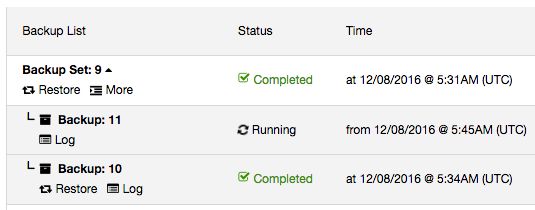
After upgrading to ClusterControl v1.4, the report will look like this:
All incremental backups are automatically grouped together under the last full backup and expandable with a drop down. This makes the backups more organized per backup set. Each created backup will have “Restore” and “Log” buttons. The “Time” column also now contains timezone information, useful if you are dealing with geographically distributed infrastructure.
Restore to an Incremental Backup Point
You are now able to restore up to a certain incremental backup. Previously, ClusterControl supported restoration per backup set. All incremental backups under a single backup set would be restored and there was no way, for instance, to skip some of the incremental backups.
Consider the below example:
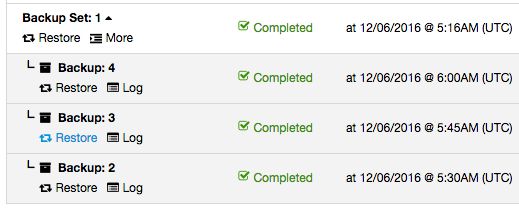
Full backup happens every day around 5:15 AM while incremental backup was scheduled every 15 minutes after the hour. If something happened around 5:50 AM and you would like to restore up to the backup taken just before that, you can skip the 6 AM backup by just clicking on the “Restore” link of the 5:45 AM incremental backup. You should then see the following Restore wizard and a couple of post-restoration options:
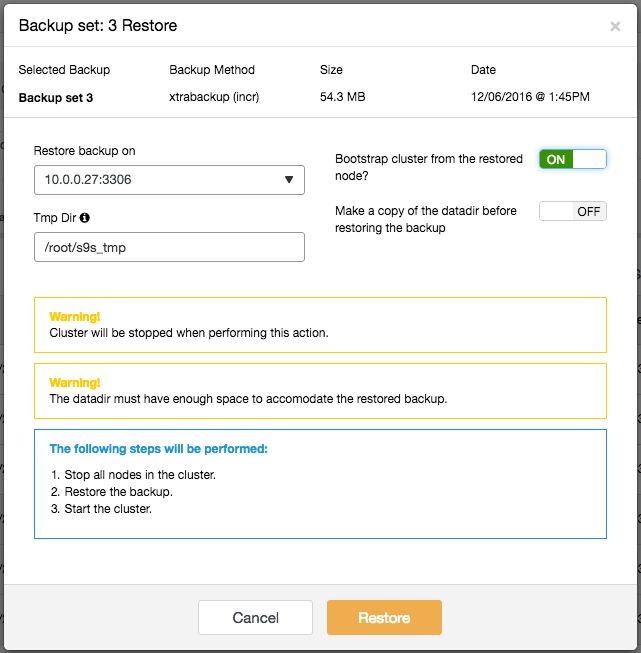
ClusterControl will then prepare the backup up until the selected point and the rest will be skipped. It also highlights “Warning” and “Notes” so you are aware of what will happen with the cluster during the restoration process. Note that mysqldump restoration can be performed online, while Xtrabackup requires the cluster/database instance to be stopped.
Operational Report
You might have multiple database systems running, and perhaps in different datacenters. Would it not be nice to get a consolidated report of the systems, when they were last backed up, and if there were any failed backups? This is available in 1.4. Note that you have other types of ops reports available in ClusterControl.
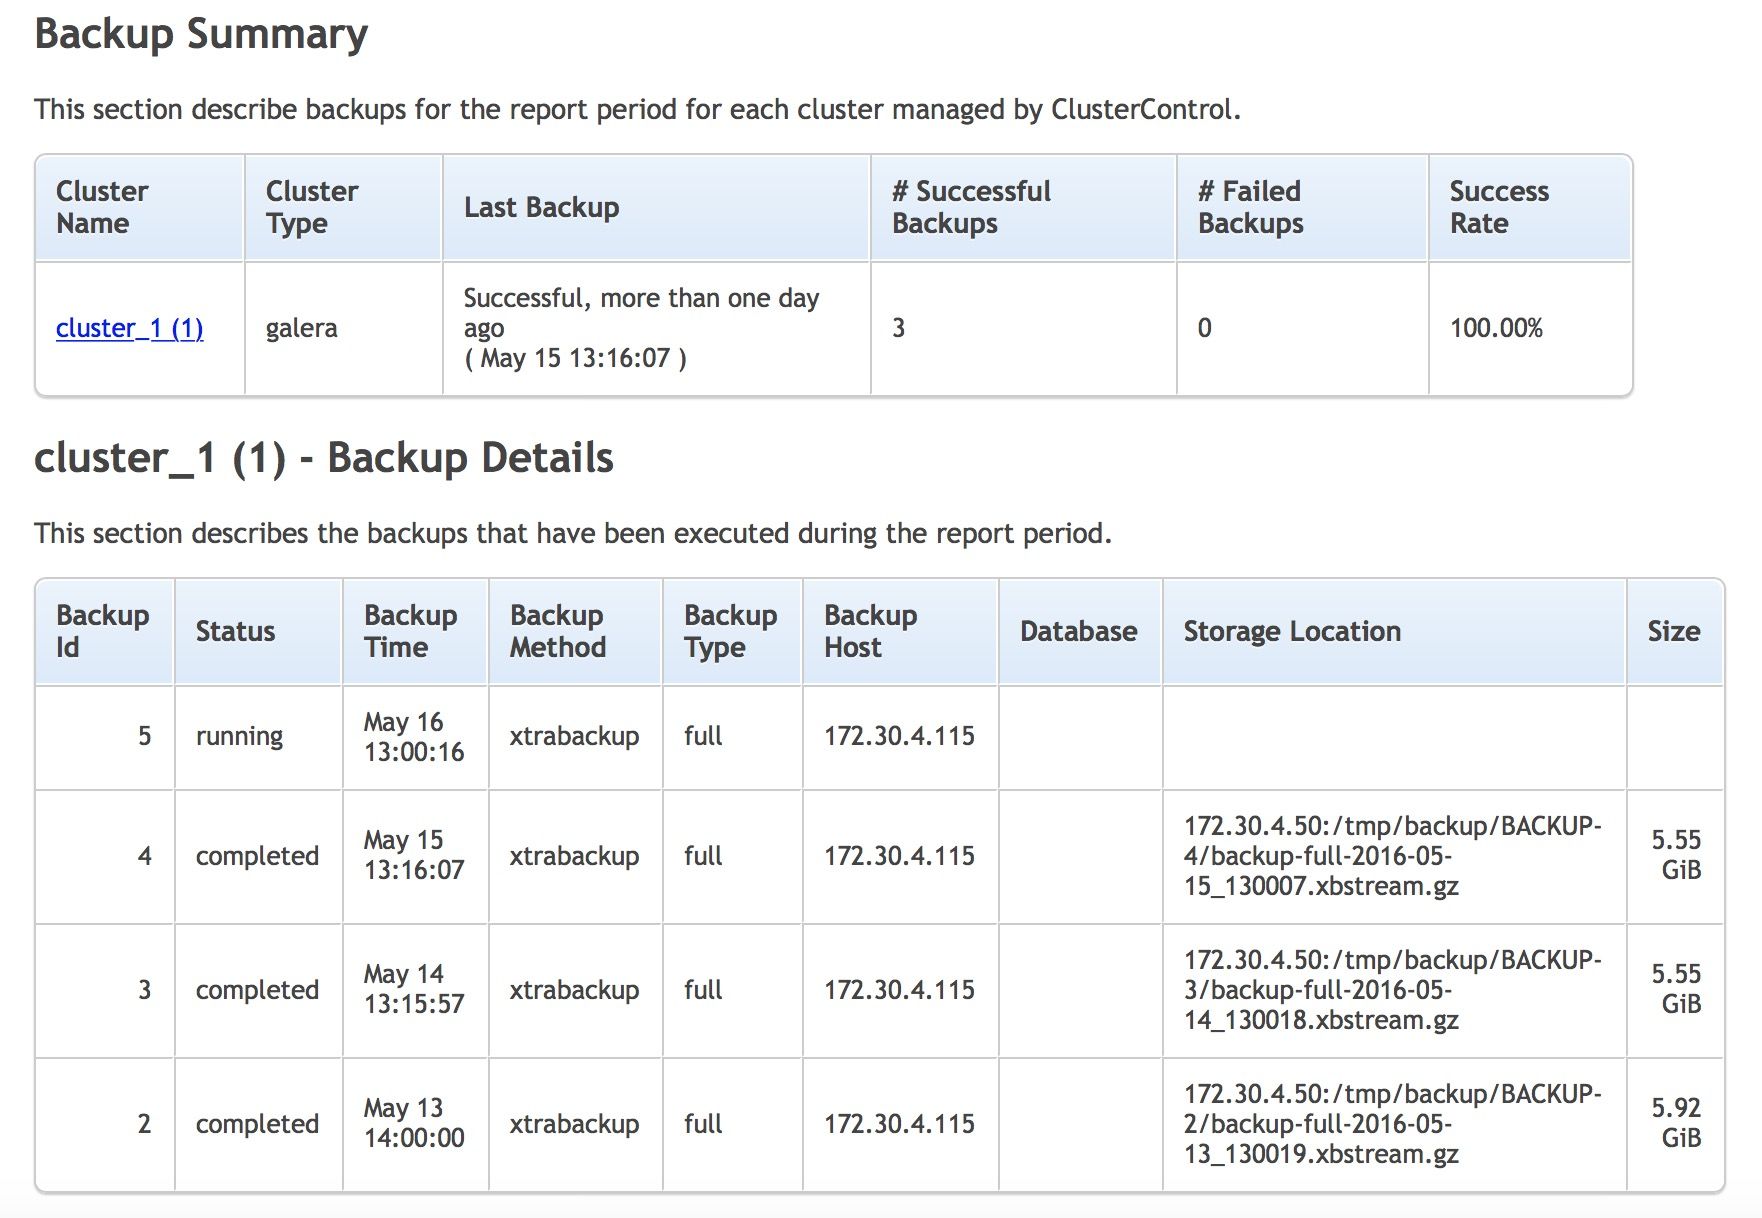
The report contains two sections and gives you a short summary of when the last backup was created, if it completed successfully or failed. You can also check the list of backups executed on the cluster with their state, type and size. This is as close you can get to check that backups work correctly without running a full recovery test. However, we definitely recommend that such tests are regularly performed.
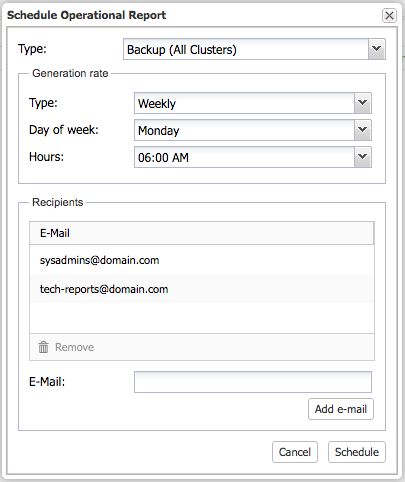
The operational report can be scheduled and emailed to a set of recipients under Settings -> Operational Reports section, as shown in the following screenshot:
Access via ClusterControl RPC interface
The new backup features are now exposed under ClusterControl RPC interface, which means you can interact via API call with a correct RPC key. For example, to list the created backup on cluster ID 2, the following call should be enough:
$ curl -XPOST -d '{"operation": "listbackups", "token": "RB81tydD0exsWsaM"}' http://localhost:9500/2/backup
{
  "cc_timestamp": 1477063671,
  "data": [
  {
      "backup": [
      {
          "db": "mysql",
          "files": [
          {
              "class_name": "CmonBackupFile",
              "created": "2016-10-21T15:26:40.000Z",
              "hash": "md5:c7f4b2b80ea439ae5aaa28a0f3c213cb",
              "path": "mysqldump_2016-10-21_172640_mysqldb.sql.gz",
              "size": 161305,
              "type": "data,schema"
          } ],
          "start_time": "2016-10-21T15:26:41.000Z"
      } ],
      "backup_host": "192.168.33.125",
      "cid": 101,
      "class_name": "CmonBackupRecord",
      "config":
      {
          "backupDir": "/tmp",
          "backupHost": "192.168.33.125",
          "backupMethod": "mysqldump",
          "backupToIndividualFiles": false,
          "backup_failover": false,
          "backup_failover_host": "",
          "ccStorage": false,
          "checkHost": false,
          "compression": true,
          "includeDatabases": "",
          "netcat_port": 9999,
          "origBackupDir": "/tmp",
          "port": 3306,
          "set_gtid_purged_off": true,
          "throttle_rate_iops": 0,
          "throttle_rate_netbw": 0,
          "usePigz": false,
          "wsrep_desync": false,
          "xtrabackupParallellism": 1,
          "xtrabackup_locks": false
      },
      "created": "2016-10-21T15:26:40.000Z",
      "created_by": "",
      "description": "",
      "finished": "2016-10-21T15:26:41.000Z",
      "id": 5,
      "job_id": 2952,
      "log_file": "",
      "lsn": 140128879096992,
      "method": "mysqldump",
      "parent_id": 0,
      "root_dir": "/tmp/BACKUP-5",
      "status": "Completed",
      "storage_host": "192.168.33.125"
  },
  {
      "backup": [
      {
          "db": "",
          "files": [
          {
              "class_name": "CmonBackupFile",
              "created": "2016-10-21T15:21:50.000Z",
              "hash": "md5:538196a9d645c34b63cec51d3e18cb47",
              "path": "backup-full-2016-10-21_172148.xbstream.gz",
              "size": 296000,
              "type": "full"
          } ],
          "start_time": "2016-10-21T15:21:50.000Z"
      } ],
      "backup_host": "192.168.33.125",
      "cid": 101,
      "class_name": "CmonBackupRecord",
      "config":
      {
          "backupDir": "/tmp",
          "backupHost": "192.168.33.125",
          "backupMethod": "xtrabackupfull",
          "backupToIndividualFiles": false,
          "backup_failover": false,
          "backup_failover_host": "",
          "ccStorage": false,
          "checkHost": false,
          "compression": true,
          "includeDatabases": "",
          "netcat_port": 9999,
          "origBackupDir": "/tmp",
          "port": 3306,
          "set_gtid_purged_off": true,
          "throttle_rate_iops": 0,
          "throttle_rate_netbw": 0,
          "usePigz": false,
          "wsrep_desync": false,
          "xtrabackupParallellism": 1,
          "xtrabackup_locks": true
      },
      "created": "2016-10-21T15:21:47.000Z",
      "created_by": "",
      "description": "",
      "finished": "2016-10-21T15:21:50.000Z",
      "id": 4,
      "job_id": 2951,
      "log_file": "",
      "lsn": 1627039,
      "method": "xtrabackupfull",
      "parent_id": 0,
      "root_dir": "/tmp/BACKUP-4",
      "status": "Completed",
      "storage_host": "192.168.33.125"
  } ],
  "requestStatus": "ok",
  "total": 2
}
Other supported operations are:
- deletebackup
- listschedules
- schedule
- deleteschedule
- updateschedule
By having those operations extensible via ClusterControl RPC, one could automate the backup management and list the backup schedule via scripting or application call. However, to create a backup, ClusterControl handles it differently via job call (operation: createJob) since some backups may take hours or days to complete. To create a backup on cluster ID 9, one would do:
$ curl -XPOST -d '{"token": "c8gY3Eq5iFE3DC4i", "username":"[email protected]","operation":"createJob","job":{"command":"backup", "job_data": {"backup_method":"xtrabackupfull", "hostname": "192.168.33.121", "port":3306, "backupdir": "/tmp/backups/" }}}' http://localhost:9500/9/jobWhere:
- The URL format is: http://[ClusterControl_host]/clusterid/job
- Backup method: Xtrabackup (full)
- RPC token: c8gY3Eq5iFE3DC4i (retrievable from cmon_X.cnf)
- Backup host: 192.168.33.121, port 3306
- Backup destination: /tmp/backups on the backup host
For example, it’s a good idea to create a backup when testing DDL queries like TRUNCATE or DROP because those are not transactions, meaning they are impossible to rollback. We are going to cover this in details in an upcoming blog post.
With a BASH script together with correct API call, it is now possible to have an automated script like the following:
$ test_disasterous_query.sh --host 192.168.33.121 --query 'TRUNCATE mydb.processes' --backup-first 1There are many other reasons to upgrade to the latest ClusterControl version, the backup functionality is just one of many exciting new features introduced in ClusterControl v1.4. Do upgrade (or install ClusterControl if you haven’t used it yet), give it a try and let us know your thoughts. New installations come with a 30-days trial.


