blog
MongoDB Tutorial – On-Premises Cluster Management and Monitoring of MongoDB Replica Sets

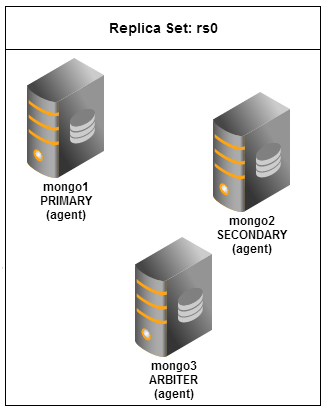
Replica Sets in MongoDB are very useful. They provide multiple copies of data, automated failover and read scalability. A Replica Set can consist of up to 12 nodes, with only one primary node (or master node) able to accept writes. In case of primary node failure, a new primary is auto-elected.
It is advisable to have an odd number of nodes in a Replica Set, so as to avoid vote locking when a new primary node is being elected. Replica Sets require a majority of the remaining nodes present to elect a primary. If you have e.g. 2 nodes in a Replica Set, then one option is to add an arbiter. An arbiter is a mongod instance that is part of a Replica Set, but does not hold any data. Because of the minimal resource requirements, it can be colocated with an application server or the ClusterControl server. The arbiter should not be colocated with any of the members of the Replica Set.
In this post, we will show you how to install and configure a Replica Set, and then manage it using ClusterControl. It is similar to a previous post on how to manage and monitor a Sharded Cluster. Our hosts are running Debian Squeeze 64bit.
Note that you can also deploy a Replica Set using our MongoDB Configurator (not longr available), this will automate the whole process.
Install MongoDB
**Following steps should be performed on mongo1, mongo2 and mongo3.
-
Import the 10gen public GPG Key:
$ apt-key adv --keyserver keyserver.ubuntu.com --recv 7F0CEB10 -
Create a /etc/apt/sources.list.d/10gen.list using following command:
echo ‘deb http://downloads-distro.mongodb.org/repo/debian-sysvinit dist 10gen’ | tee /etc/apt/sources.list.d/10gen.list -
Install MongoDB using package manager:
$ apt-get update && apt-get install mongodb-10gen -
Configure MongoDB for replication by adding following lines into /etc/mongodb.conf. Take note that our replica set name is defined as rs0:
# /etc/mongodb.conf port=27017 dbpath=/var/lib/mongodb logpath=/var/log/mongodb/mongodb.log logappend=true replSet=rs0 rest=true pidfilepath=/var/run/mongodb/mongod.pid -
Restart mongodb service to apply changes:
$ service mongodb restart
Configure Replica Set
-
Initiate replica set by login into mongo in mongo1:
$ mongoAnd run following command:
> rs.initiate() -
Add mongo2 into the replica set:
> rs.add("mongo2"); -
We need at least 3 members in a replica set in order to complete an election if 1 member goes down. Arbiter is a member of a replica set that exists solely to vote in elections. Arbiters do not replicate data. We are going to setup mongo3 as arbiter:
> rs.addArb("mongo3"); -
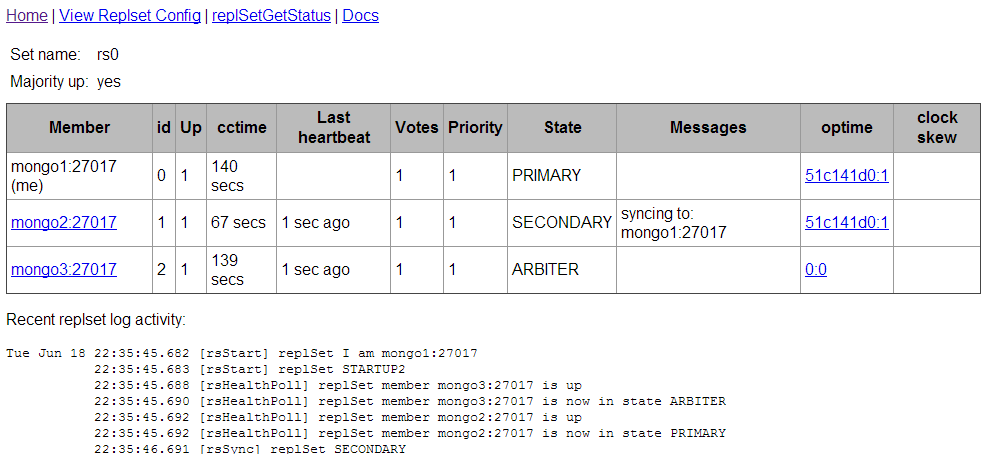
Check replica set status:
> rs.status()You can also use the MongoDB REST interface which available at http://ip_address:28017/_replSet to check your replica set status similar to screenshot below:
Import Data into Replica Set
-
Import some test data into replica set which available at http://media.mongodb.org/zips.json:
$ wget http://media.mongodb.org/zips.json $ mongoimport --host 'rs0/mongo1,mongo2,mongo3' --db mydb --collection zip --file zips.json -
Check the imported data by connecting to mongo console and run following commands:
> use mydb
> db.zip.find()
Install ClusterControl Server – the automatic way
Here is the recommended way to get ClusterControl on top of your existing MongoDB replica set. We have built a collection of scripts available under Severalnines download page which will automate the bootstrapping process. You may refer to this knowledge base article for further details.
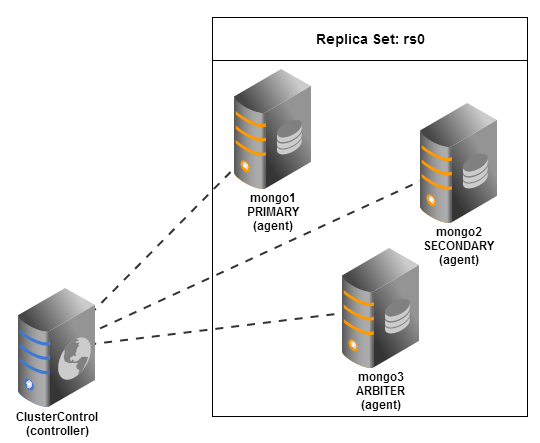
Install ClusterControl Server – the manual way
We will need a separate server to run ClusterControl, as illustrated below:
**Following steps should be performed on ClusterControl host.
-
It is highly recommended to enable passwordless SSH with key authentication between ClusterControl and agents. Generate a RSA key and copy it to all nodes:
$ ssh-keygen -t rsa # just press enter for all prompts $ ssh-copy-id -i ~/.ssh/id_rsa 192.168.197.41 $ ssh-copy-id -i ~/.ssh/id_rsa 192.168.197.42 $ ssh-copy-id -i ~/.ssh/id_rsa 192.168.197.43 $ ssh-copy-id -i ~/.ssh/id_rsa 192.168.197.40 -
Install Apache, PHP, MySQL and other required components:
$ apt-get install apache2 php5-common php5-mysql php5-gd mysql-server mysql-client sudo mailutils -y -
Download ClusterControl for MongoDB from Severalnines download site:
$ wget https://severalnines.com/downloads/cmon/cmon-1.2.4-64bit-glibc23-mongodb.tar.gz -
Extract ClusterControl into /usr/local directory and create symlink to CMON path:
$ tar -xzf cmon-1.2.4-64bit-glibc23-mongodb.tar.gz -C /usr/local $ ln -s /usr/local/cmon-1.2.4-64bit-glibc23-mongodb /usr/local/cmon -
Copy the CMON binary, init and cron files into respective locations:
$ cp /usr/local/cmon/bin/* /usr/bin $ cp /usr/local/cmon/sbin/* /usr/sbin $ cp /usr/local/cmon/etc/cron.d/cmon /etc/cron.d $ cp /usr/local/cmon/etc/init.d/cmon /etc/init.d -
Copy the CMON web apps:
$ cp -rf /usr/local/cmon/www/* /var/www/ -
Disable bind-address and name resolve in MySQL. This will allow us to use IP address only when granting database user. Add following line into /etc/mysql/my.cnf under [mysqld] directive:
skip-name-resolveAnd comment following line:
#bind-address -
Restart MySQL to apply changes:
$ service mysql restart -
Create CMON database and import the schema for CMON:
$ mysql -e “CREATE DATABASE cmon” $ mysql < /usr/local/cmon/sql/cmon_db.sql $ mysql < /usr/local/cmon/sql/cmon_data.sql -
Enter MySQL console and allow CMON database users:
> GRANT ALL ON *.* TO 'cmon'@'192.168.197.120' IDENTIFIED BY 'cmonP4ss' WITH GRANT OPTION; > GRANT ALL ON *.* TO 'cmon'@'127.0.0.1' IDENTIFIED BY 'cmonP4ss' WITH GRANT OPTION; > GRANT SUPER,INSERT,SELECT,UPDATE,DELETE ON *.* TO 'cmon'@'192.168.197.121' IDENTIFIED BY 'cmonP4ss'; > GRANT SUPER,INSERT,SELECT,UPDATE,DELETE ON *.* TO 'cmon'@'192.168.197.122' IDENTIFIED BY 'cmonP4ss'; > GRANT SUPER,INSERT,SELECT,UPDATE,DELETE ON *.* TO 'cmon'@'192.168.197.123' IDENTIFIED BY 'cmonP4ss'; -
Configure MySQL root password:
$ mysqladmin -u root password ‘MyP4ss’ $ mysqladmin -h127.0.0.1 -u root password ‘MyP4ss’ -
Create CMON configuration file at /etc/cmon.cnf:
$ vim /etc/cmon.cnfAnd add following lines:
# /etc/cmon.cnf - cmon config file
# id and name of cluster that this cmon agent is monitoring.
# Must be unique for each monitored cluster, like server-id in mysql
cluster_id=1
name=default_repl_1
mode=controller
type=mongodb

##port of mysql server holding cmon database
mysql_port=3306

##hostname/ip of mysql server holding cmon database
mysql_hostname=192.168.197.120

##password for 'cmon' user on  the 'mysql_hostname'
mysql_password=cmonP4ss
local_mysql_port=3306
local_mysql_password=cmonP4ss

##hostname/ip of the server of this cmon instance
hostname=192.168.197.120
cmon_core_dir=/root/s9s

##osuser - the user owning the cmon_core_dir above
osuser=root
os=debian

##logfile is default to syslog.
logfile=/var/log/cmon.log

##location of cmon.pid file. The pidfile is written in /tmp/ by default
pidfile=/var/run/
nodaemon=0
monitored_mountpoints=/var/lib/mongodb
mongodb_server_addresses=192.168.197.121:271017,192.168.197.122:27017
mongoarbiter_server_addresses=192.168.197.123:27017
mongodb_basedir=/usr

mysql_basedir=/usr
db_stats_collection_interval=10
host_stats_collection_interval=60
ssh_opts=-nqtt
Install ClusterControl Agent
ClusterControl agents must reside in all MongoDB nodes. The agents are responsible for the following:
- Collecting host stats (disk/network/CPU/RAM)
- Reading and parsing log files
** Following steps should be performed on mongo1, mongo2 and mongo3.
-
Download ClusterControl for MongoDB from Severalnines download site:
$ wget https://severalnines.com/downloads/cmon/cmon-1.2.4-64bit-glibc23-mongodb.tar.gz -
Extract ClusterControl into /usr/local directory and create symlink to CMON path:
$ tar -xzf cmon-1.2.4-64bit-glibc23-mongodb.tar.gz -C /usr/local $ ln -s /usr/local/cmon-1.2.4-64bit-glibc23-mongodb /usr/local/cmon -
Copy the CMON binary and init files into locations:
$ cp /usr/local/cmon/bin/* /usr/bin $ cp /usr/local/cmon/sbin/* /usr/sbin $ cp /usr/local/cmon/etc/init.d/cmon /etc/init.d -
Create CMON configuration file at /etc/cmon.cnf and add following lines:
# /etc/cmon.cnf - CMON config file ## id and name of cluster that this cmon agent is monitoring. ## Must be unique for each monitored cluster, like server-id in mysql cluster_id=1 name=default_repl_1 mode=agent type=mongodb # MySQL for CMON ## Port of mysql server holding cmon database mysql_port=3306 ## Hostname/ip of mysql server holding cmon database mysql_hostname=192.168.197.120 ## Password for 'cmon' user on the 'mysql_hostname' mysql_password=cmonP4ss local_mysql_port=3306 local_mysql_password=cmonP4ss ## Hostname/IP of the server of this cmon instance hostname=192.168.197.121 ## osuser - the user owning the cmon_core_dir above osuser=root ## logfile is default to syslog logfile=/var/log/cmon.log ## location of cmon.pid file. The pidfile is written in /tmp/ by default pidfile=/var/run/ nodaemon=0 # MongoDB database path monitored_mountpoints=/var/lib/mongodb -
Repeat above steps for mongo2 and mongo3. Make sure to change the value of “hostname” to the IP address of respective nodes.
Start the Service
** Following steps should be performed on mongo1, mongo2 and mongo3 followed by ClusterControl.
Enable the CMON service on boot and start the service in agent hosts, followed by controller host:
$ update-rc.d cmon start 99 2 3 4 5 . stop 99 0 1 6 .
$ service cmon start
Configure ClusterControl UI
** Following steps should be performed on ClusterControl host.
-
To install the new ClusterControl UI, SSH into the ClusterControl host, download the ClusterControl installation script, change script permissions and execute it:
$ wget https://severalnines.com/downloads/cmon/setup-cc-ui.sh $ chmod +x setup-cc-ui.sh $ ./setup-cc-ui.sh -
To finalize the UI installation, open web browser and go to this URL, http://ClusterControl_IP_address/install and you should see “Install ClusterControl UI and API” page.
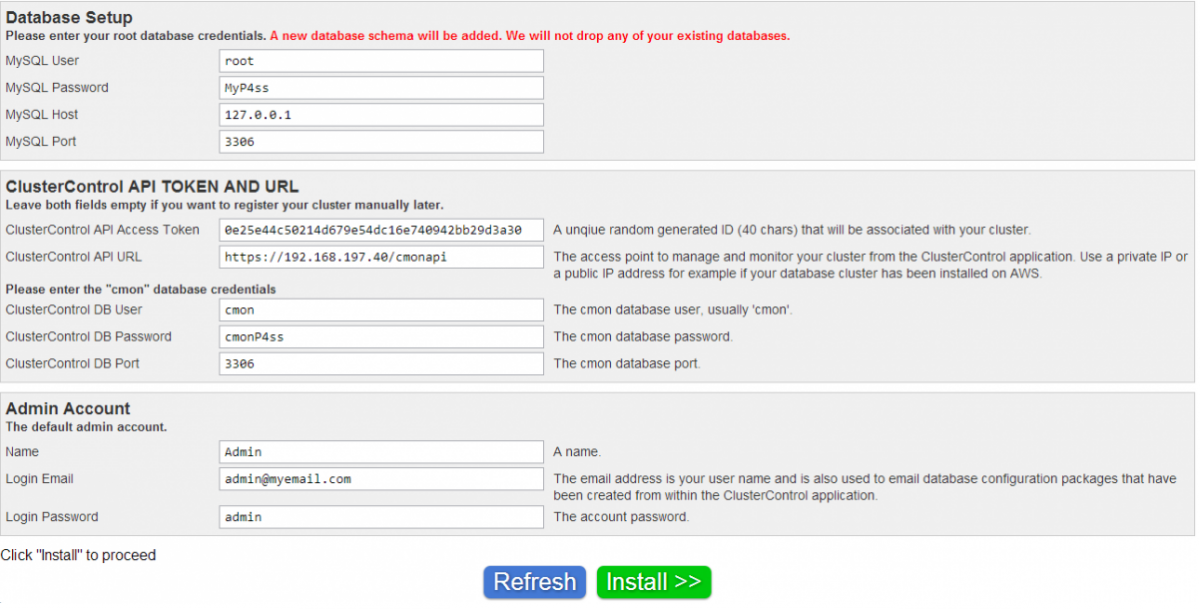
**Please note the ClusterControl API Access Token, ClusterControl API URL, your login email and login password. We will use these later on the cluster registration page.
-
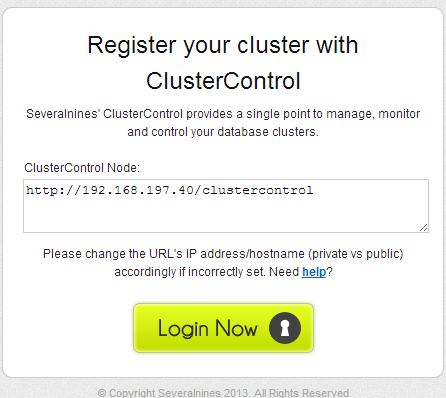
After the installation, click “Click here to automatically register your cluster now!” and you will redirected to cmonapi page similar to screenshot below. Click “Login Now”.
-
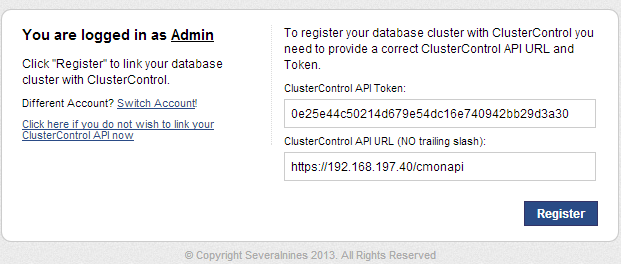
After that, you need to login using the email address you specified in the installation page with respective password. (default is “admin”). You should see the “Cluster Registrations” page similar to screenshot below. Enter the ClusterControl API token and URL:
-
You will be redirected to ClusterControl UI located at https://ClusterControl_IP_address/clustercontrol, your MongoDB Cluster is listed on this page. Click on it to view your cluster:
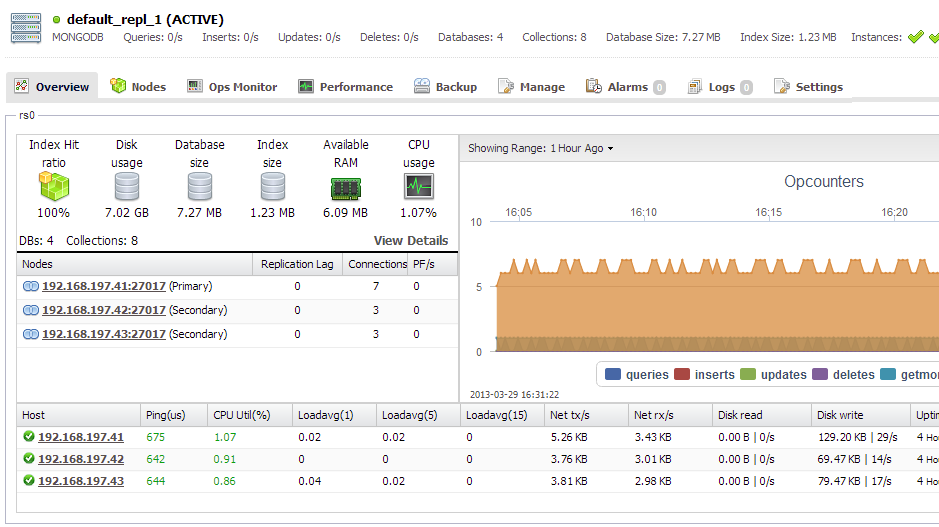
You’re done! You are now able to manage your MongoDB Replica Set using ClusterControl.