blog
Introducing ClusterControl Developer Studio and Creating Your Own Database Advisors in JavaScript

Developer Studio.. JavaScript.. ClusterControl DSL.. database clusters.. huh? what the heck is going on here? This might seem like a mix up of random tech terms, but it’s really a pretty cool feature that we’ve just released.
With ClusterControl 1.2.10, we introduced our new, powerful ClusterControl DSL (Domain Specific Language), which allows you to extend the functionality of your ClusterControl platform by creating Advisors, Auto Tuners, or “mini Programs”. The DSL syntax is based on JavaScript, with extensions to provide access to ClusterControl’s internal data structures and functions. The DSL allows you to execute SQL statements, run shell commands/programs across all your cluster hosts, and retrieve results to be processed for advisors/alerts or any other actions.
Join us for the 1.2.10 release webinar held by Johan Andersson, our CTO, on Tuesday June 9th to see it in action. There’ll be a live demo of the new ClusterControl and a Questions & Answers session.
In the meantime, this blog shows you what our new Developer Studio is all about!
So, you can create these advisors right within your web browser using our Developer Studio. The ClusterControl Developer Studio is a simple and elegant development environment to quickly create, edit, compile, run, test, debug and schedule your JavaScript programs.
What are Advisors?
Advisors in ClusterControl are powerful constructs; they provide specific advice on how to address issues in areas such as performance, security, log management, configuration, storage space, etc. They can be anything from simple configuration advice, warning on thresholds or more complex rules for predictions, or even cluster-wide automation tasks based on the state of your servers or databases.
ClusterControl comes with a set of basic advisors that include rules and alerts on security settings, system checks (NUMA, Disk, CPU), queries, innodb, connections, performance schema, Galera configuration, NDB memory usage, and so on. The advisors are open source under an MIT license, and available on GitHub. Through the Developer Studio, it is easy to import new advisors as a JS bundle, or export your own for others to try out.
Installation
You can install ClusterControl on a dedicated VM using the following:
$ wget https://severalnines.com/downloads/cmon/install-cc
$ chmod +x install-cc
# as root or sudo user
$ ./install-cc
For more information on system requirements, etc., please see https://severalnines.com/getting-started.
Developer Studio interface
Developer Studio is available under Manage -> Developer Studio.
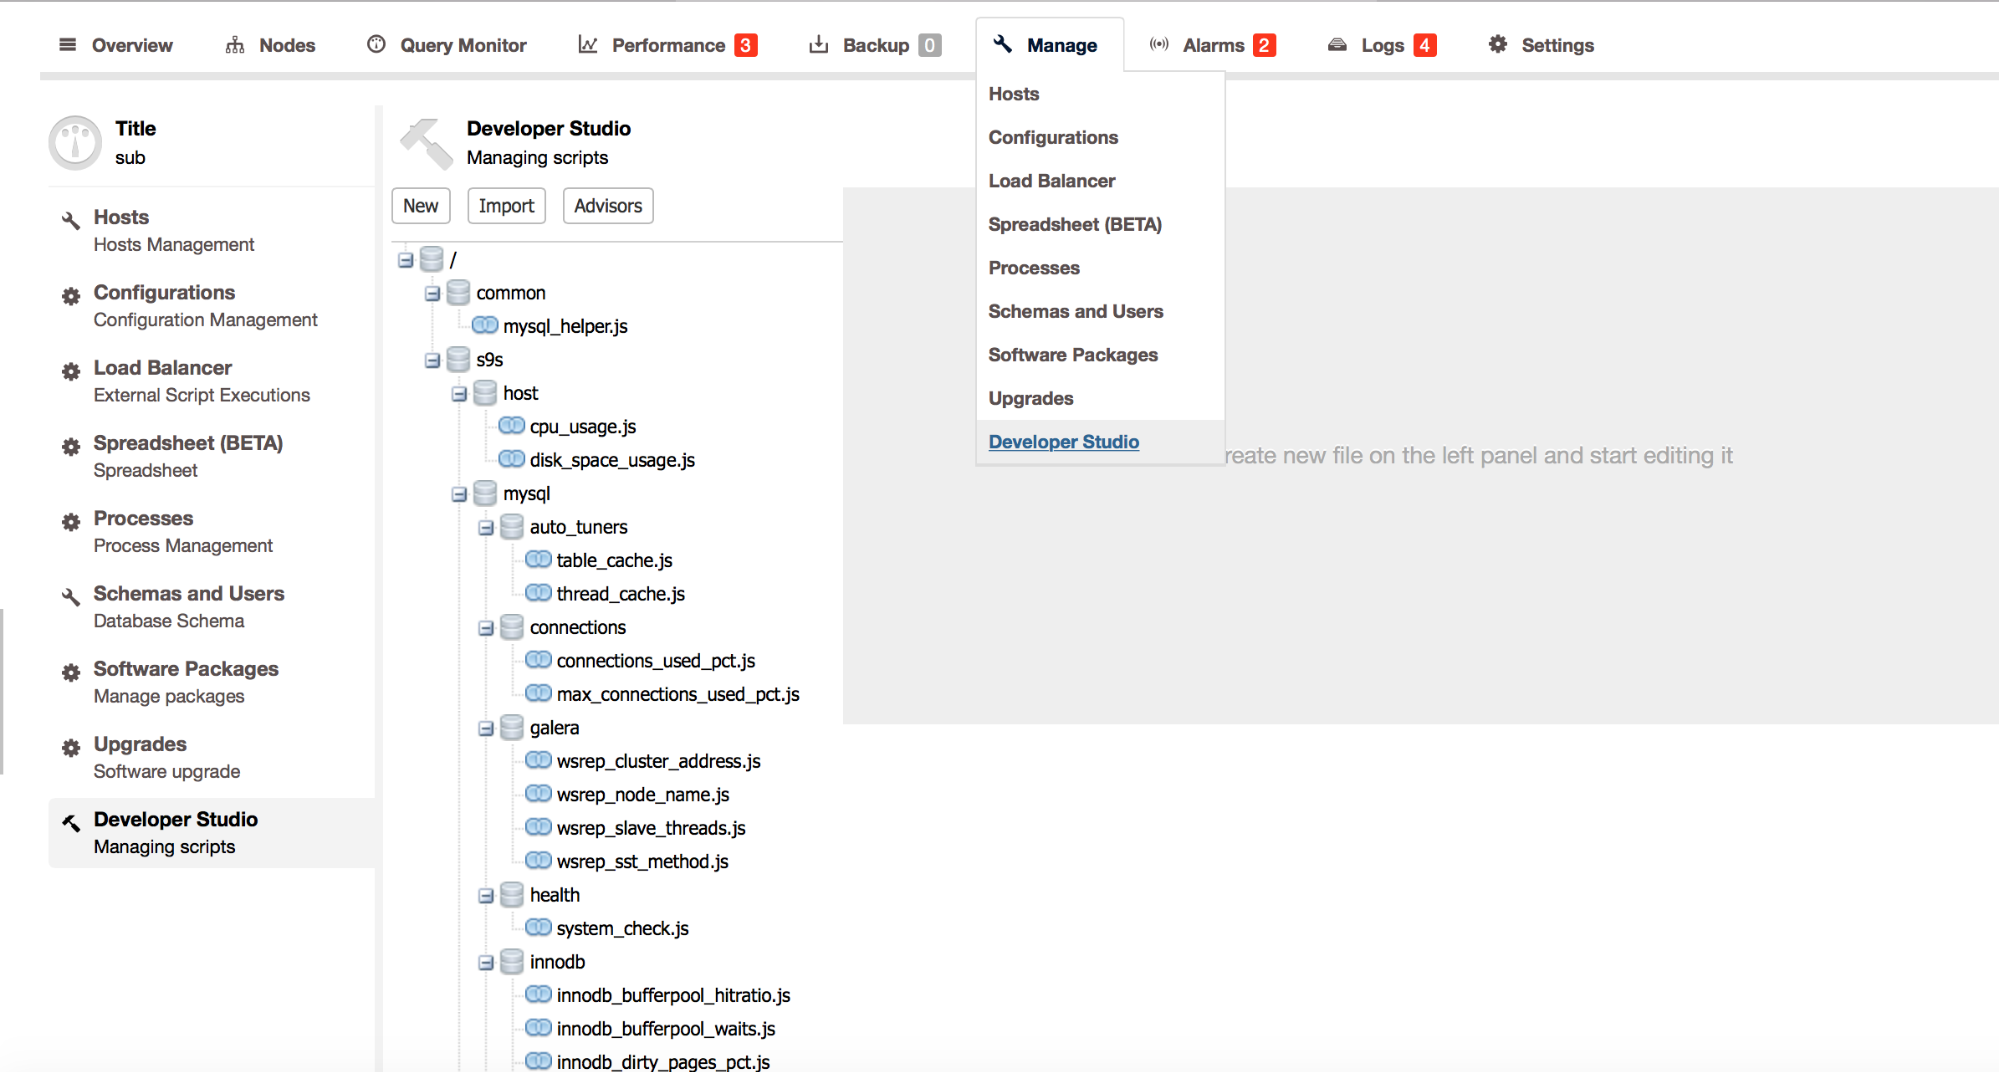
On the left panel, you will see a list of scripts (or Advisors) that are available. These are written in a JavaScript-like language. ClusterControl comes with a default set of Advisors, but you can also create your own Advisors, or import new ones.
Let’s try to open one of the scripts that are bundled with ClusterControl.
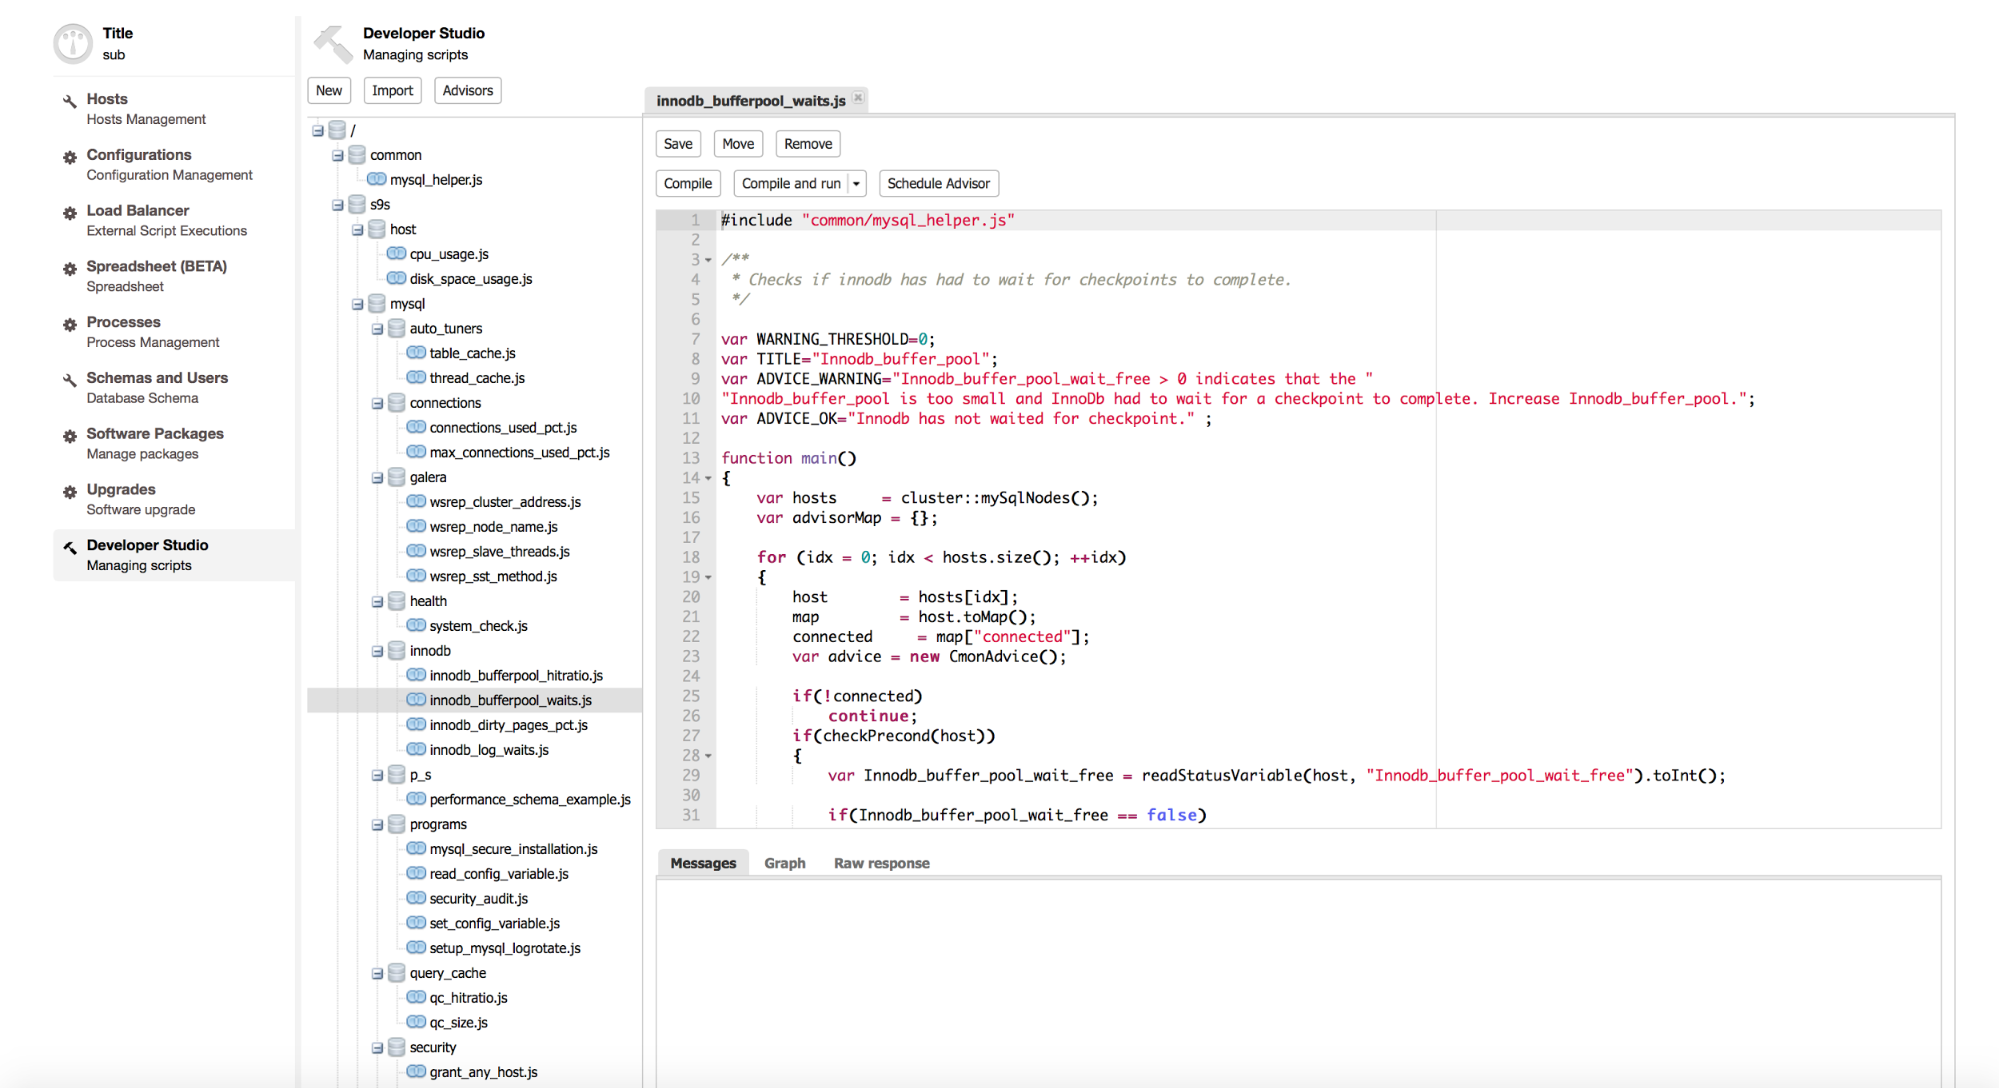
In the right hand panel, you will see a couple of buttons that allow you to:
- save the file
- move it around between different subdirectories
- remove it completely
- compile the script
- compile and run
- schedule it as an advisor.
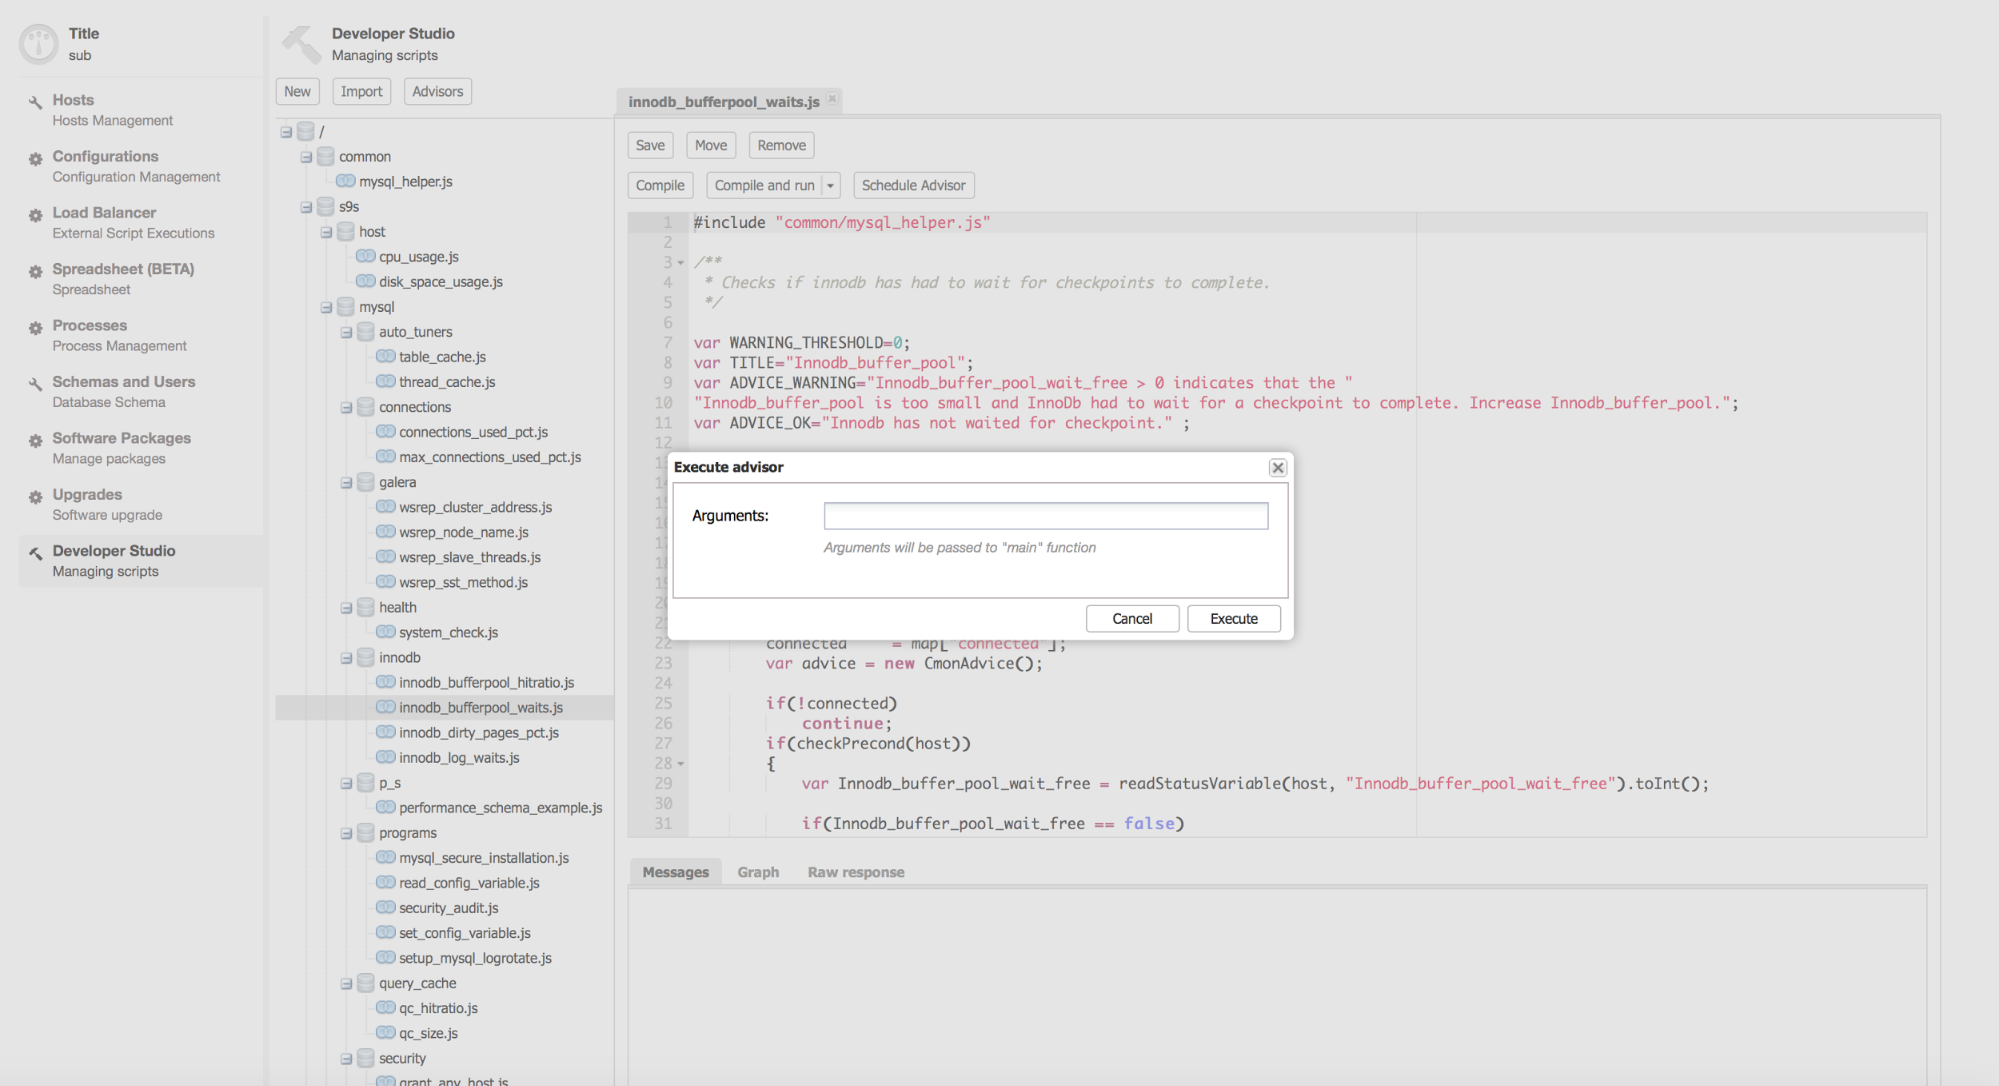
The arrow next to the “Compile and Run” button allows us to change settings for a script and, for example, pass some arguments to the main() function.
What does a script look like?
Now, let’s see what a script looks like. Our example script checks if innodb has had to wait for checkpoints to complete. Once we are happy with the script, we can schedule it as an advisor.
We define a threshold for this check and some messages that will be used by an advisor, depending on whether the check passes or raises a warning.
#include "common/mysql_helper.js"
#include "cmon/alarms.h"

/**
 * Checks if innodb has had to wait for checkpoints to complete.
 */

var WARNING_THRESHOLD=0;
var TITLE="Innodb_buffer_pool";
var ADVICE_WARNING="Innodb_buffer_pool_wait_free > 0 indicates that the"
                   " Innodb_buffer_pool is too small and InnoDb had"
                   " to wait for a checkpoint to complete."
                   " Increase Innodb_buffer_pool.";
var ADVICE_OK="Innodb has not waited for checkpoint." ;
Then we have a main() function, where the main part of the script is located. We get the list of the MySQL nodes from ClusterControl. We also define advisorMap, which will be returned by main() function and used if we schedule this script to run as an advisor.
function main()
{
    var hosts     = cluster::mySqlNodes();
    var advisorMap = {};
Next, iterate through host array and prepare data structures for the main part.
    for (idx = 0; idx < hosts.size(); ++idx)
    {
        host        = hosts[idx];
        map         = host.toMap();
        connected     = map["connected"];
        var advice = new CmonAdvice();
Now, we are reading ‘Innodb_buffer_pool_wait_free’ status from the host and we store it into the variable.
        if(!connected)
            continue;
        if(checkPrecond(host))
        {
            var Innodb_buffer_pool_wait_free = readStatusVariable(host,
                                          "Innodb_buffer_pool_wait_free").toInt();
We need to do a sanity check that we actually managed to get the data correctly, we also prepare another message that will be passed to the advisor.
            if(Innodb_buffer_pool_wait_free == false)
            {
                msg = "Not enough data to calculate";
            }
            justification = "Innodb_buffer_pool_wait_free = " +
                                  Innodb_buffer_pool_wait_free;
Finally, the main check comes in - we test if the value collected passed the defined threshold or not, and set the result of the check accordingly.
            if(Innodb_buffer_pool_wait_free > WARNING_THRESHOLD)
            {
                advice.setSeverity(Warning);
                msg = ADVICE_WARNING;

            }
            else
            {
                advice.setSeverity(Ok);
                msg = ADVICE_OK;

            }
            advice.setJustification(justification);
        }
        else
        {
            msg = "Not enough data to calculate";
            advice.setSeverity(Ok);
        }
At the end, we need to prepare the data for the advisor and return it.
        advice.setHost(host);
        advice.setTitle(TITLE);
        advice.setAdvice(msg);
        advisorMap[idx]= advice;
    }
    return advisorMap;
}
Should you want to use this script as an advisor, as mentioned earlier, you can do so by clicking on the ‘Schedule Advisor’ button. You can setup how often the given script will be executed using a cron job syntax:

The results of the executed advisors can be found by clicking the Advisors button, and also under Performance -> Advisors.
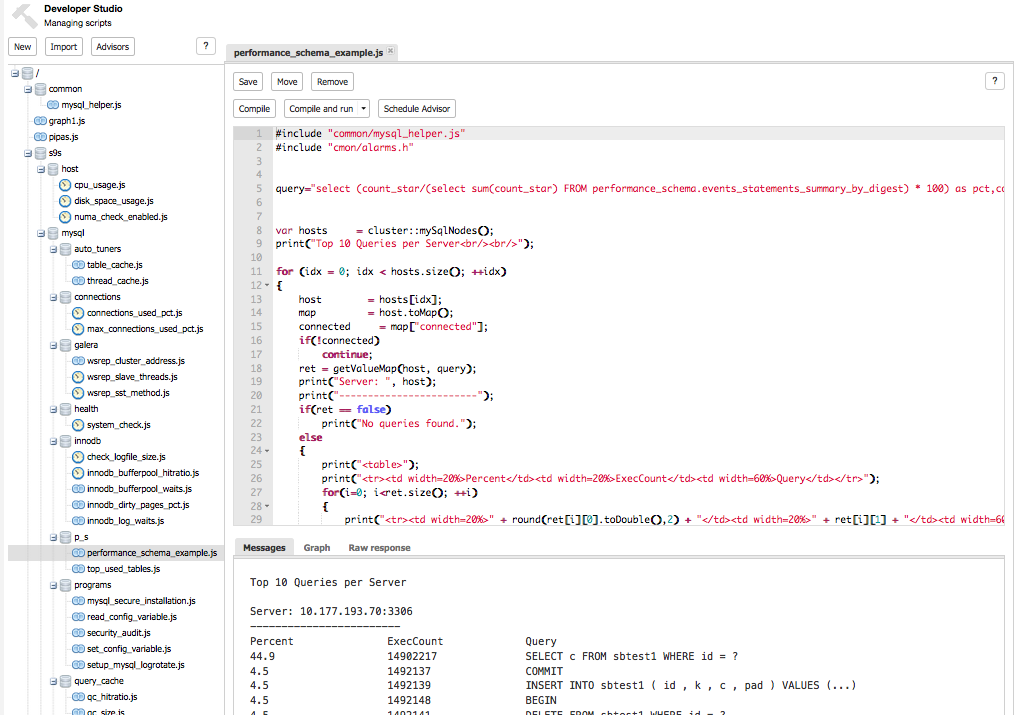
In this example we used the readStatusVariable() method but we can also use SQL to get interesting data directly from the MySQL instances.
The following snippet checks if there are MySQL users allowed to access from any host. This time we use getValueMap() method to run an SQL statement on the given host. Then we can iterate over the result set and do some logic or just print the info as in this example.
        ret = getValueMap(host, "SELECT User,Host FROM mysql.user WHERE host='%'");
        if(ret == false)
            print(host, ": No problem detected.");
        else
        {
            for(i=0; i
Creating a new script
Let’s try to create a new file. First, we click on the “New” button.

In this example, we’ll get access to the ClusterControl statistics to watch the number of selects per second and raise an alert if needed. This script is based on the “Galera template” so once you create a new script, some of the skeleton code will be automatically included.
#include "common/mysql_helper.js"

/**
 * Checks the qps for selects
 *
 */
var WARNING_THRESHOLD=100;
var TITLE="Select QPS check";
function main()
{
    var hosts     = cluster::galeraNodes();
    var advisorMap = {};

    for (idx = 0; idx < hosts.size(); ++idx)
    {
        host        = hosts[idx];
        map         = host.toMap();
        connected     = map["connected"];
        var advice = new CmonAdvice();
        print(host);
        if(!connected)
            continue;
        if(checkPrecond(host))
        {
         // Get the current time
            var endTime   = CmonDateTime::currentDateTime();
            // set the start time to 10s ago
            var startTime = endTime - 10;
          // Get the sql stats
            var stats = host.sqlStats(startTime, endTime);
            // we are interested in COM_SELECT
            var select_arr     = stats.toArray("COM_SELECT");
     // and interval, to calculate per second average
            var interval_arr    = stats.toArray("interval");

            //calculate sum of selects over the samples
            var com_select = sum(select_arr);
            //calculate time period for a sample, ms -> s conversion
            var interval = sum(interval_arr)/1000;
         // calculate selects/s based on the time period length
            var com_select_qps = com_select / interval;


            // uncomment this line to get the output in the Messages section below
            //print(host, ": ", com_select_qps); w


           if( com_select_qps > WARNING_THRESHOLD)
           {
               advice.setJustification("Number of selects per second is larger than "
                                         + WARNING_THRESHOLD + ": " + com_select_qps);
               advice.setSeverity(1);
           }

           else
           {
               advice.setJustification("Number of selects per second is within”
                                       " limits (" + WARNING_THRESHOLD +" qps): " +
                                       com_select_qps);
               advice.setSeverity(0);
           }

        }
        else
        {
            msg = "Not enough data to calculate";
            advice.setJustification("there is not enough load on"
                                    " the server or the uptime is too little.");
            advice.setSeverity(0);
        }
        advice.setHost(host);
        advice.setTitle(TITLE);
        //advice.setAdvice(msg);
        advisorMap[idx]= advice;
    }
    return advisorMap;
}
The new thing here, compared to the scripts we looked at earlier, is the way ClusterControl handles the statistics sampling - we can get them using:
stats = host.sqlStats(startTime, endTime); You can always check the whole data set by using:
print(stats);Then we need to generate an array containing interesting data from the whole statistics, e.g., an array containing data for a particular interval.
            // we are interested in COM_SELECT
            var select_arr     = stats.toArray("COM_SELECT");
            // and interval, to calculate per second average
            var interval_arr    = stats.toArray("interval");
In general, the sampling in ClusterControl is based on intervals. The latest data is by default close to 4000ms, but it may change. As the data ages, it is aggregated and rolled up into intervals of tens of minutes or several hours. There may be multiple samples needed to cover the timeframe we want. Also, those samples may not cover it completely or may cover additional timeframe. That’s why we have to sum all of the data from all of the samples and then sum the interval (timeframe for a given sample). Then, finally, we can divide the sum of selects by the sum of intervals, convert the value from milliseconds to seconds to get the result of average selects per second.
            //calculate sum of selects over the samples
            var com_select = sum(select_arr);
            //calculate time period for a sample, ms -> s conversion
            var interval = sum(interval_arr)/1000;
            // calculate selects/s based on the time period length
            var com_select_qps = com_select / interval;
The rest is what we saw in our earlier example - we compare the result with a defined threshold and build the advisor data accordingly.
How to execute commands on remote hosts?
ClusterControl DSL gives you the ability to execute commands on remote hosts using SSH connection. It shares ClusterControl’s access so it has the same privileges. The example below is not exactly designed to do anything useful, but it gives you an idea of how it works.
#include "common/mysql_helper.js"

function main()
{
    var hosts     = cluster::galeraNodes();

    for (idx = 0; idx < hosts.size(); ++idx)
    {
        host        = hosts[idx];
        map         = host.toMap();
        connected     = map["connected"];
        var advice = new CmonAdvice();

        print("############## Host: " + host.toString() + " ##############");
        // Execute remote command and retrieve results
        retval = host.system("ifconfig  | grep eth0 -A 1 | awk 'match($0, /[0-9]{1,3}.[0-9]{1,3}.[0-9]{1,3}.[0-9]{1,3}/) {print substr($0, RSTART, RLENGTH)}'");
        ip = retval['result'];
        print("IP collected from ifconfig: " + ip);
        print("Echoing ip to /tmp/ssh_js_ipaddr");
        // Create file on the remote host
        retval = host.system("echo '" + ip + "' > /tmp/ssh_js_ipaddr");
        // Check the status of the command
        print("Status of echo: " + retval);
        if (retval['success'] == true)
        {
            retval = host.system("cat /tmp/ssh_js_ipaddr");
            print("Output of cat /tmp/ssh_js_ipaddr: " + retval['result']);
            // Remove the file on remote server
            host.system("rm /tmp/ssh_js_ipaddr");
        }

        retval = host.system("ls -alh /tmp/ssh_js_ipaddr");
        print("We expect error here, /tmp/ssh_js_ipaddr"
              " should not exist by now" + retval);
        print(" ");

    }
}
As you can see, we executed remote ifconfig, stored the result in a variable in our script, used that variable to modify data on the remote servers and finally removed the file on remote hosts.
Such options can be used to build all types of the scripts, starting from creating advisors based on some status counters accessible from the console, to scripts which would perform some kind of maintenance (custom-tailored backups for example). It may also be useful for periodical monitoring of some non-MySQL activity running in the background (let’s say for example, to check if pt-stalk created new files in its log directory or if it’s running at all).
As you can see, ClusterControl DSL and the Developer Studio gives you a significant number of additional options for customizing your monitoring patterns and build new ones, so you can extend ClusterControl to solve some specific challenges in your environment. We’d love to hear your opinion on this.