blog
ARCHIVE – Install ClusterControl on Top of Existing MongoDB Sharded Cluster

**Attention: The instructions in this blog post are outdated. Please refer to ClusterControl Quick Start Guide for updated instructions.
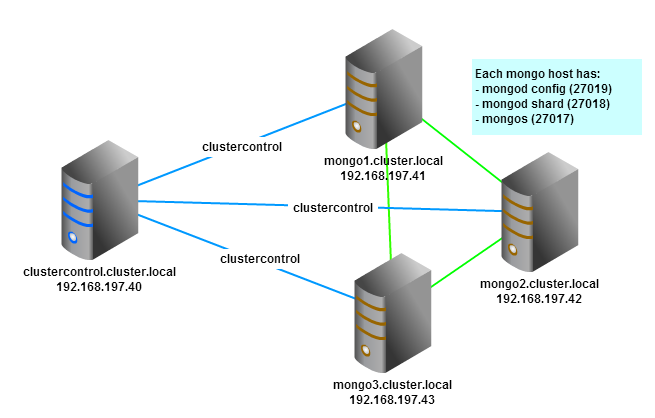
In this post, we are going to show you on how to install and integrate ClusterControl on top of an existing MongoDB Sharded Cluster with a replica set of 3 nodes
MongoDB Sharded Cluster Setup
In a sharded cluster, we need to have three types of server:
- config server (configsvr) – holds metadata of the cluster (minimum 3 servers)
- shard server (shardsvr) – container that holds subset of data, including replica set (minimum 2 servers)
- routing server (mongos) – route operations from applications and clients to the shardsvr instances (minimum 1 server)
The following sequence explains query routing in a sharded cluster:
- Application sends a write query to one of mongos (port 27017)
- mongos connects to configsvr (port 27018) to determine the primary shardsvr
- mongos then connects to a primary shardsvr (port 27019) to write the data
- Data partitioning (sharding) and replication will be automatically handled by shardsvr instance
In our setup, we have 3 servers running CentOS 6.3 64bit. On each server, we have colocated a configsvr, shardsvr and mongos. Each server has 3 MongoDB configuration files:
- /etc/mongodb.config.conf – configsvr configuration
- /etc/mongodb.shard.conf – shardsvr and replSet configuration
- /etc/mongos.conf – mongos configuration
Our MongoDB dbpath is located at /var/lib/mongodb, while configdb is located at /var/lib/mongodb/configdb and all MongoDB logs generated under /var/log/mongodb directory.
We started all MongoDB instances using following commands in each server:
$ mongod -f /etc/mongodb.config.conf
$ mongod -f /etc/mongodb.shard.conf
$ mongos -f /etc/mongos.conf
Install ClusterControl Server
We will need a separate server to run ClusterControl, as illustrated below:
-
SSH into ClusterControl server and make sure that you have IPtables and SElinux turned off:
$ service iptables stop $ setenforce 0 $ sed -i.bak 's#SELINUX=enforcing#SELINUX=disabled#g' /etc/selinux/config -
It is highly recommended to enable passwordless SSH with key authentication between ClusterControl and agents. Generate a RSA key and copy it to all nodes:
$ ssh-keygen -t rsa # just press enter for all prompts $ ssh-copy-id -i ~/.ssh/id_rsa [email protected] $ ssh-copy-id -i ~/.ssh/id_rsa [email protected] $ ssh-copy-id -i ~/.ssh/id_rsa [email protected] $ ssh-copy-id -i ~/.ssh/id_rsa [email protected] -
On the ClusterControl server, install Apache, PHP, MySQL and other required components:
$ yum install httpd php php-mysql php-gd mysql-server mysql cronie sudo mailx -y -
Download ClusterControl for MongoDB and required packages from Severalnines website:
$ wget https://severalnines.com/downloads/cmon/cmon-mongodb-controller-1.2.4-1.x86_64.rpm $ wget https://severalnines.com/downloads/cmon/cmon-mongodb-www-1.2.4-1.noarch.rpm -
Install ClusterControl web apps and create graph directory:
$ rpm -Uhv cmon-mongodb-www-1.2.4-1.noarch.rpm $ mkdir /var/www/html/cmon/graph -
Install the CMON controller:
$ rpm -Uhv cmon-mongodb-controller-1.2.4-1.x86_64.rpm -
Disable name resolve in MySQL. This will allow us to use IP address only when granting database user. Add following line into /etc/my.cnf under [mysqld] directive:
skip-name-resolve -
Enable auto-start on boot of MySQL, start MySQL, create CMON database and import the schema for CMON:
$ chkconfig mysqld on $ service mysqld start $ mysql -e “CREATE DATABASE cmon” $ mysql < /usr/share/cmon/cmon_db.sql $ mysql < /usr/share/cmon/cmon_data.sql -
Enter MySQL console and allow CMON database users:
> GRANT ALL ON *.* TO 'cmon'@'192.168.197.40' IDENTIFIED BY 'cmonP4ss' WITH GRANT OPTION; > GRANT ALL ON *.* TO 'cmon'@'127.0.0.1' IDENTIFIED BY 'cmonP4ss' WITH GRANT OPTION; > GRANT SUPER,INSERT,SELECT,UPDATE,DELETE ON *.* TO 'cmon'@'192.168.197.41' IDENTIFIED BY 'cmonP4ss'; > GRANT SUPER,INSERT,SELECT,UPDATE,DELETE ON *.* TO 'cmon'@'192.168.197.42' IDENTIFIED BY 'cmonP4ss'; > GRANT SUPER,INSERT,SELECT,UPDATE,DELETE ON *.* TO 'cmon'@'192.168.197.43' IDENTIFIED BY 'cmonP4ss'; -
Configure MySQL root password:
$ mysqladmin -u root password ‘MyP4ss’ $ mysqladmin -h127.0.0.1 -u root password ‘MyP4ss’ -
Configure CMON as controller by editing /etc/cmon.cnf:
# CMON config file
## id and name of cluster that this cmon agent is monitoring.
## Must be unique for each monitored cluster, like server-id in mysql
cluster_id=1
name=default_repl_1
mode=controller
type=mongodb

# MySQL for CMON
## Port of mysql server holding cmon database
mysql_port=3306
## Hostname/IP of mysql server holding cmon database
mysql_hostname=192.168.197.40
## Password for 'cmon' user on  the 'mysql_hostname'
mysql_password=cmonP4ss
local_mysql_port=3306
local_mysql_password=cmonP4ss
mysql_basedir=/usr/

# CMON service
## Hostname/IP of the server of this cmon instance
hostname=192.168.197.40
## ouser - the user owning the cmon_core_dir above
osuser=root
os=redhat
## logfile is default to syslog
logfile=/var/log/cmon.log
## Location of cmon.pid file. The pidfile is written in /tmp/ by default
pidfile=/var/run/
nodaemon=0

# MongoDB configdb location
monitored_mountpoints=/var/lib/mongodb/configdb
## All mongodb instances with port (comma separated)
mongodb_server_addresses=192.168.197.41:27018,192.168.197.42:27018,192.168.197.43:27018
mongocfg_server_addresses=192.168.197.41:27019,192.168.197.42:27019,192.168.197.43:27019
mongos_server_addresses=192.168.197.41:27017,192.168.197.42:27017,192.168.197.43:27017
mongodb_basedir=/usr/

# CMON stats options
db_stats_collection_interval=10
host_stats_collection_interval=60
ssh_opts=-nq
Install ClusterControl Agents
ClusterControl agents must reside in all MongoDB nodes. The agents are responsible for the following:
- Restarting failed processes
- Collecting host stats (disk/network/CPU/RAM)
- Reading and parsing log files
-
Login to mongo1 via SSH, download and install CMON MongoDB agent:
$ wget https://severalnines.com/downloads/cmon/cmon-mongodb-agent-1.2.4-1.x86_64.rpm $ rpm -Uhv cmon-mongodb-agent-1.2.4-1.x86_64.rpm -
Configure CMON as agent by editing /etc/cmon.cnf:
# CMON config file ## id and name of cluster that this cmon agent is monitoring. ## Must be unique for each monitored cluster, like server-id in mysql cluster_id=1 name=default_repl_1 mode=agent type=mongodb # MySQL for CMON ## Port of mysql server holding cmon database mysql_port=3306 ## Hostname/ip of mysql server holding cmon database mysql_hostname=192.168.197.40 ## Password for 'cmon' user on the 'mysql_hostname' mysql_password=cmonP4ss local_mysql_port=3306 local_mysql_password=cmonP4ss # CMON service ## Hostname/IP of the server of this cmon instance hostname=192.168.197.41 ## osuser - the user owning the cmon_core_dir above osuser=root ## logfile is default to syslog logfile=/var/log/cmon.log ## location of cmon.pid file. The pidfile is written in /tmp/ by default pidfile=/var/run/ nodaemon=0 # MongoDB config database monitored_mountpoints=/var/lib/mongodb/configdb -
Repeat above steps for mongo2 and mongo3. Make sure to change the value of “hostname” on the respective nodes.
Start the Cluster
-
We will begin by enabling Apache and CMON on boot, followed by starting Apache and CMON service in ClusterControl server:
$ chkconfig httpd on $ chkconfig cmon on $ service httpd start $ service cmon start -
Next, login to mongo1, mongo2 and mongo3 to start CMON agent service:
$ chkconfig cmon on
$ service cmon start
Configure ClusterControl UI
-
To install the new ClusterControl UI, SSH into the ClusterControl host, download the ClusterControl installation script, change script permissions and execute it:
$ wget https://severalnines.com/downloads/cmon/setup-cc-ui.sh $ chmod +x setup-cc-ui.sh $ ./setup-cc-ui.sh -
To finalize the UI installation, open web browser and go to this URL, http://ClusterControl_IP_address/install and you should see “Install ClusterControl UI and API” page.
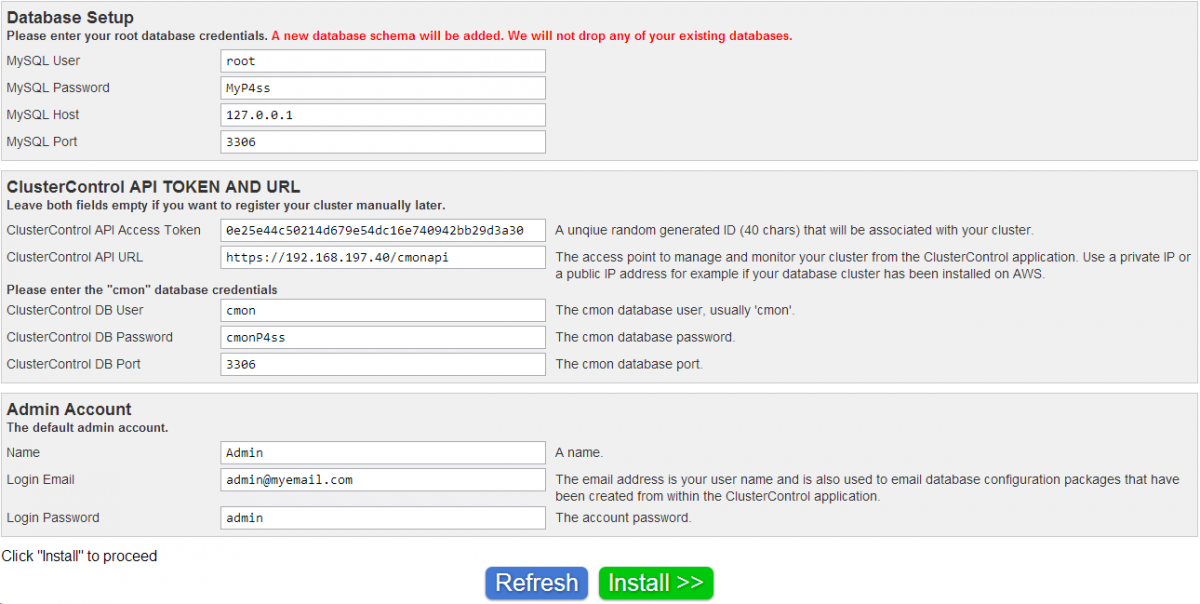
**Please note the ClusterControl API Access Token, ClusterControl API URL, your login email and login password. We will use these later on the cluster registration page.
-
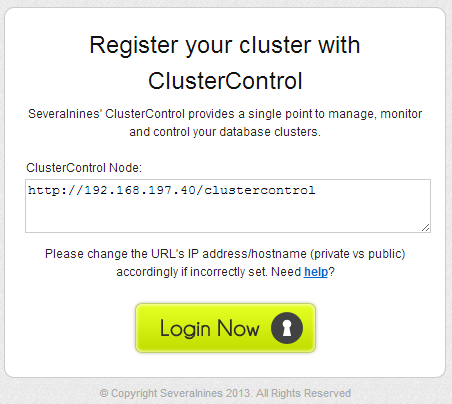
After the installation, click “Click here to automatically register your cluster now!” and you will redirected to cmonapi page similar to screenshot below. Click “Login Now”.
-
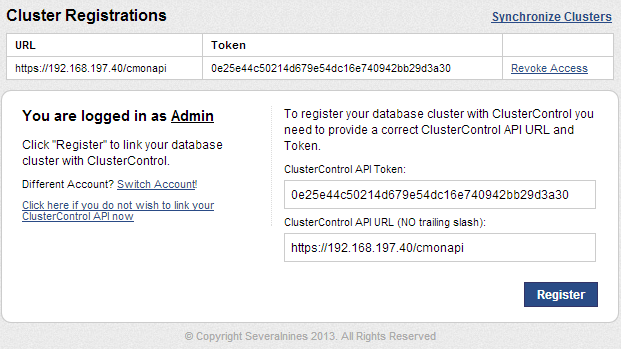
After that, you need to login using the email address you specified in the installation page with respective password. (default is “admin”). You should see the “Cluster Registrations” page similar to screenshot below. Enter the ClusterControl API token and URL:
-
You will be redirected to ClusterControl UI located at http://ClusterControl_IP_address/clustercontrol, your MongoDB Cluster is listed on this page. Click on it to view your cluster:
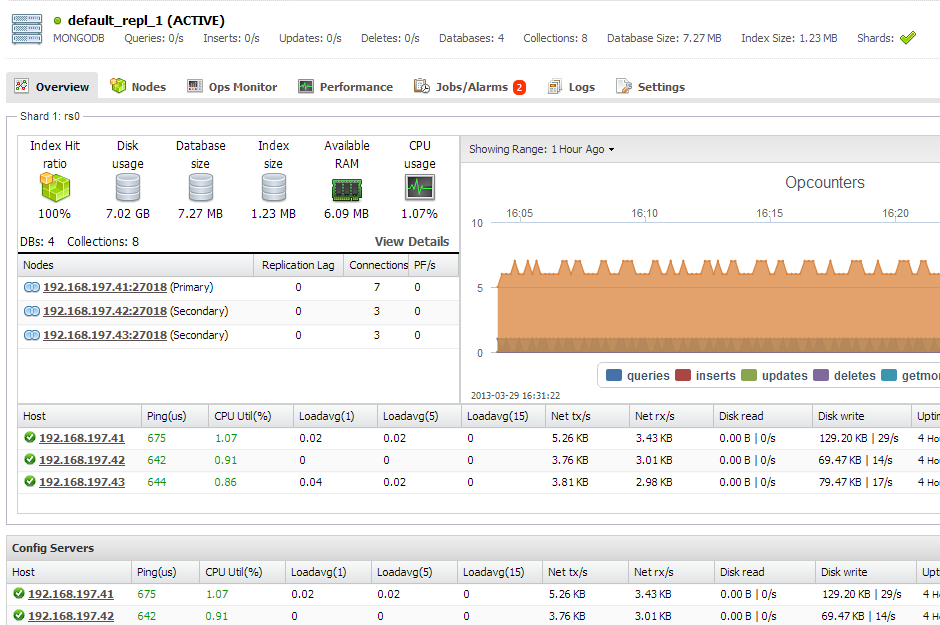
You’re done! You are now able to manage your MongoDB sharded cluster using ClusterControl!