blog
How to Benchmark Performance of Moodle

Moodle, the world’s most popular learning management system (LMS), is commonly being deployed in a rapidly growing and large scale environment. Fortunately, Moodle is built with availability and scalability in mind, with lots of tools, to help us out managing a large infrastructure. Large scale Moodle infrastructures can be set up on different types of machines, from bare metal to compartmentalized virtual containers (or Kubernetes Pods) and would commonly involve multi tiers architecture for separate load balancers, web servers, cache servers, centralized/clustered storage servers and database servers.
In this blog post, we are going to show you how to perform a benchmark of your Moodle site, which will allow us to understand how our Moodle site performs in a given period of time. In a clustered setup, the performance of a Moodle cluster can be influenced by various factors like hardware resources, virtualization overhead, network latencies between servers, firewalls, caching and many more, and performing benchmarks is a solid way to test and estimate the Moodle performance before it goes live in production.
Report Benchmarking Plugin
First of all, it is good to have a ground understanding when our setup is idle and also under a heavy-load environment. It’s highly recommended to install the Report Benchmark plugin for Moodle, which performs various tests to determine the quality of the Moodle platform using a scoring system. This score compares your system and speed with some threshold values (acceptable and critical), just like the following screenshot:
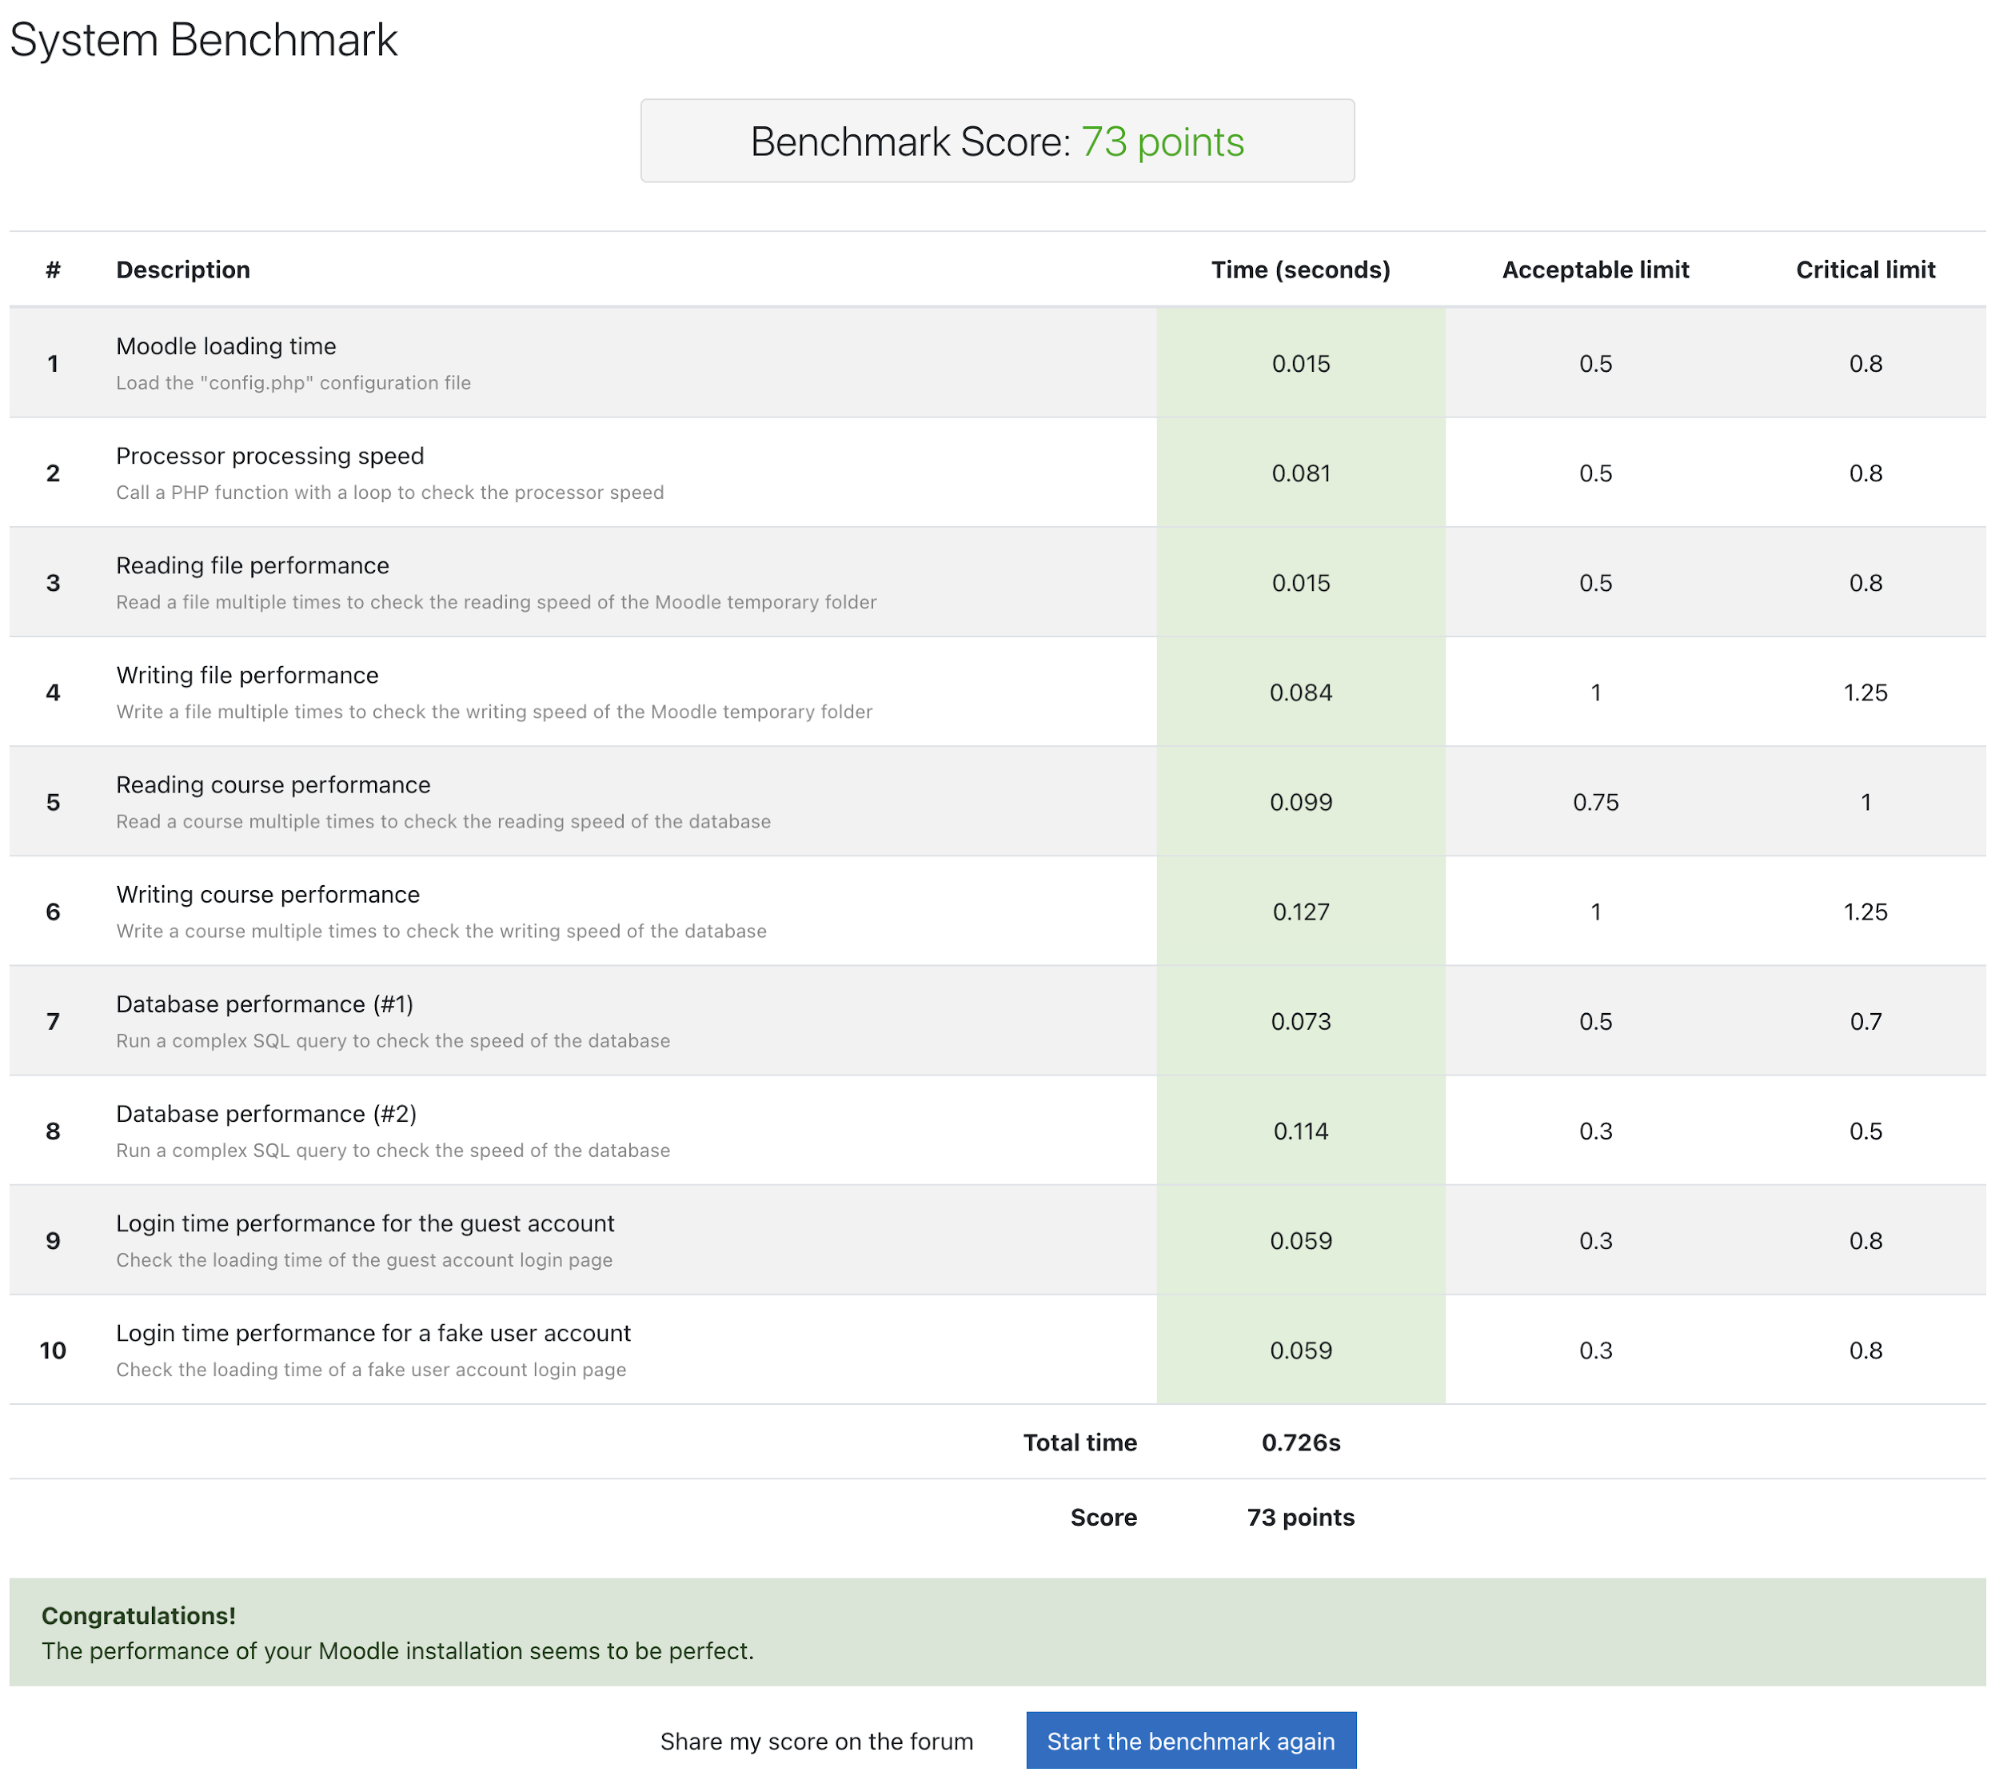
After the plugin is installed, go to Site administration -> Reports -> Benchmark -> Start the benchmark to perform the benchmark. The benchmark tests should last less than 1 minute and will be aborted at 2 minutes regardless, revealing whether there are worries on your platform. The lower the score, the better, and if all is green, it generally indicates that our Moodle site should be in good shape. There are basically 5 test groups:
- Server speed
- Processor speed
- Hard drive speed
- Database speed
- Loading page speed
In the occasions where the Moodle behaves slower than anticipated, you would see some non-green boxes appear in the benchmark report as shown in the following example:
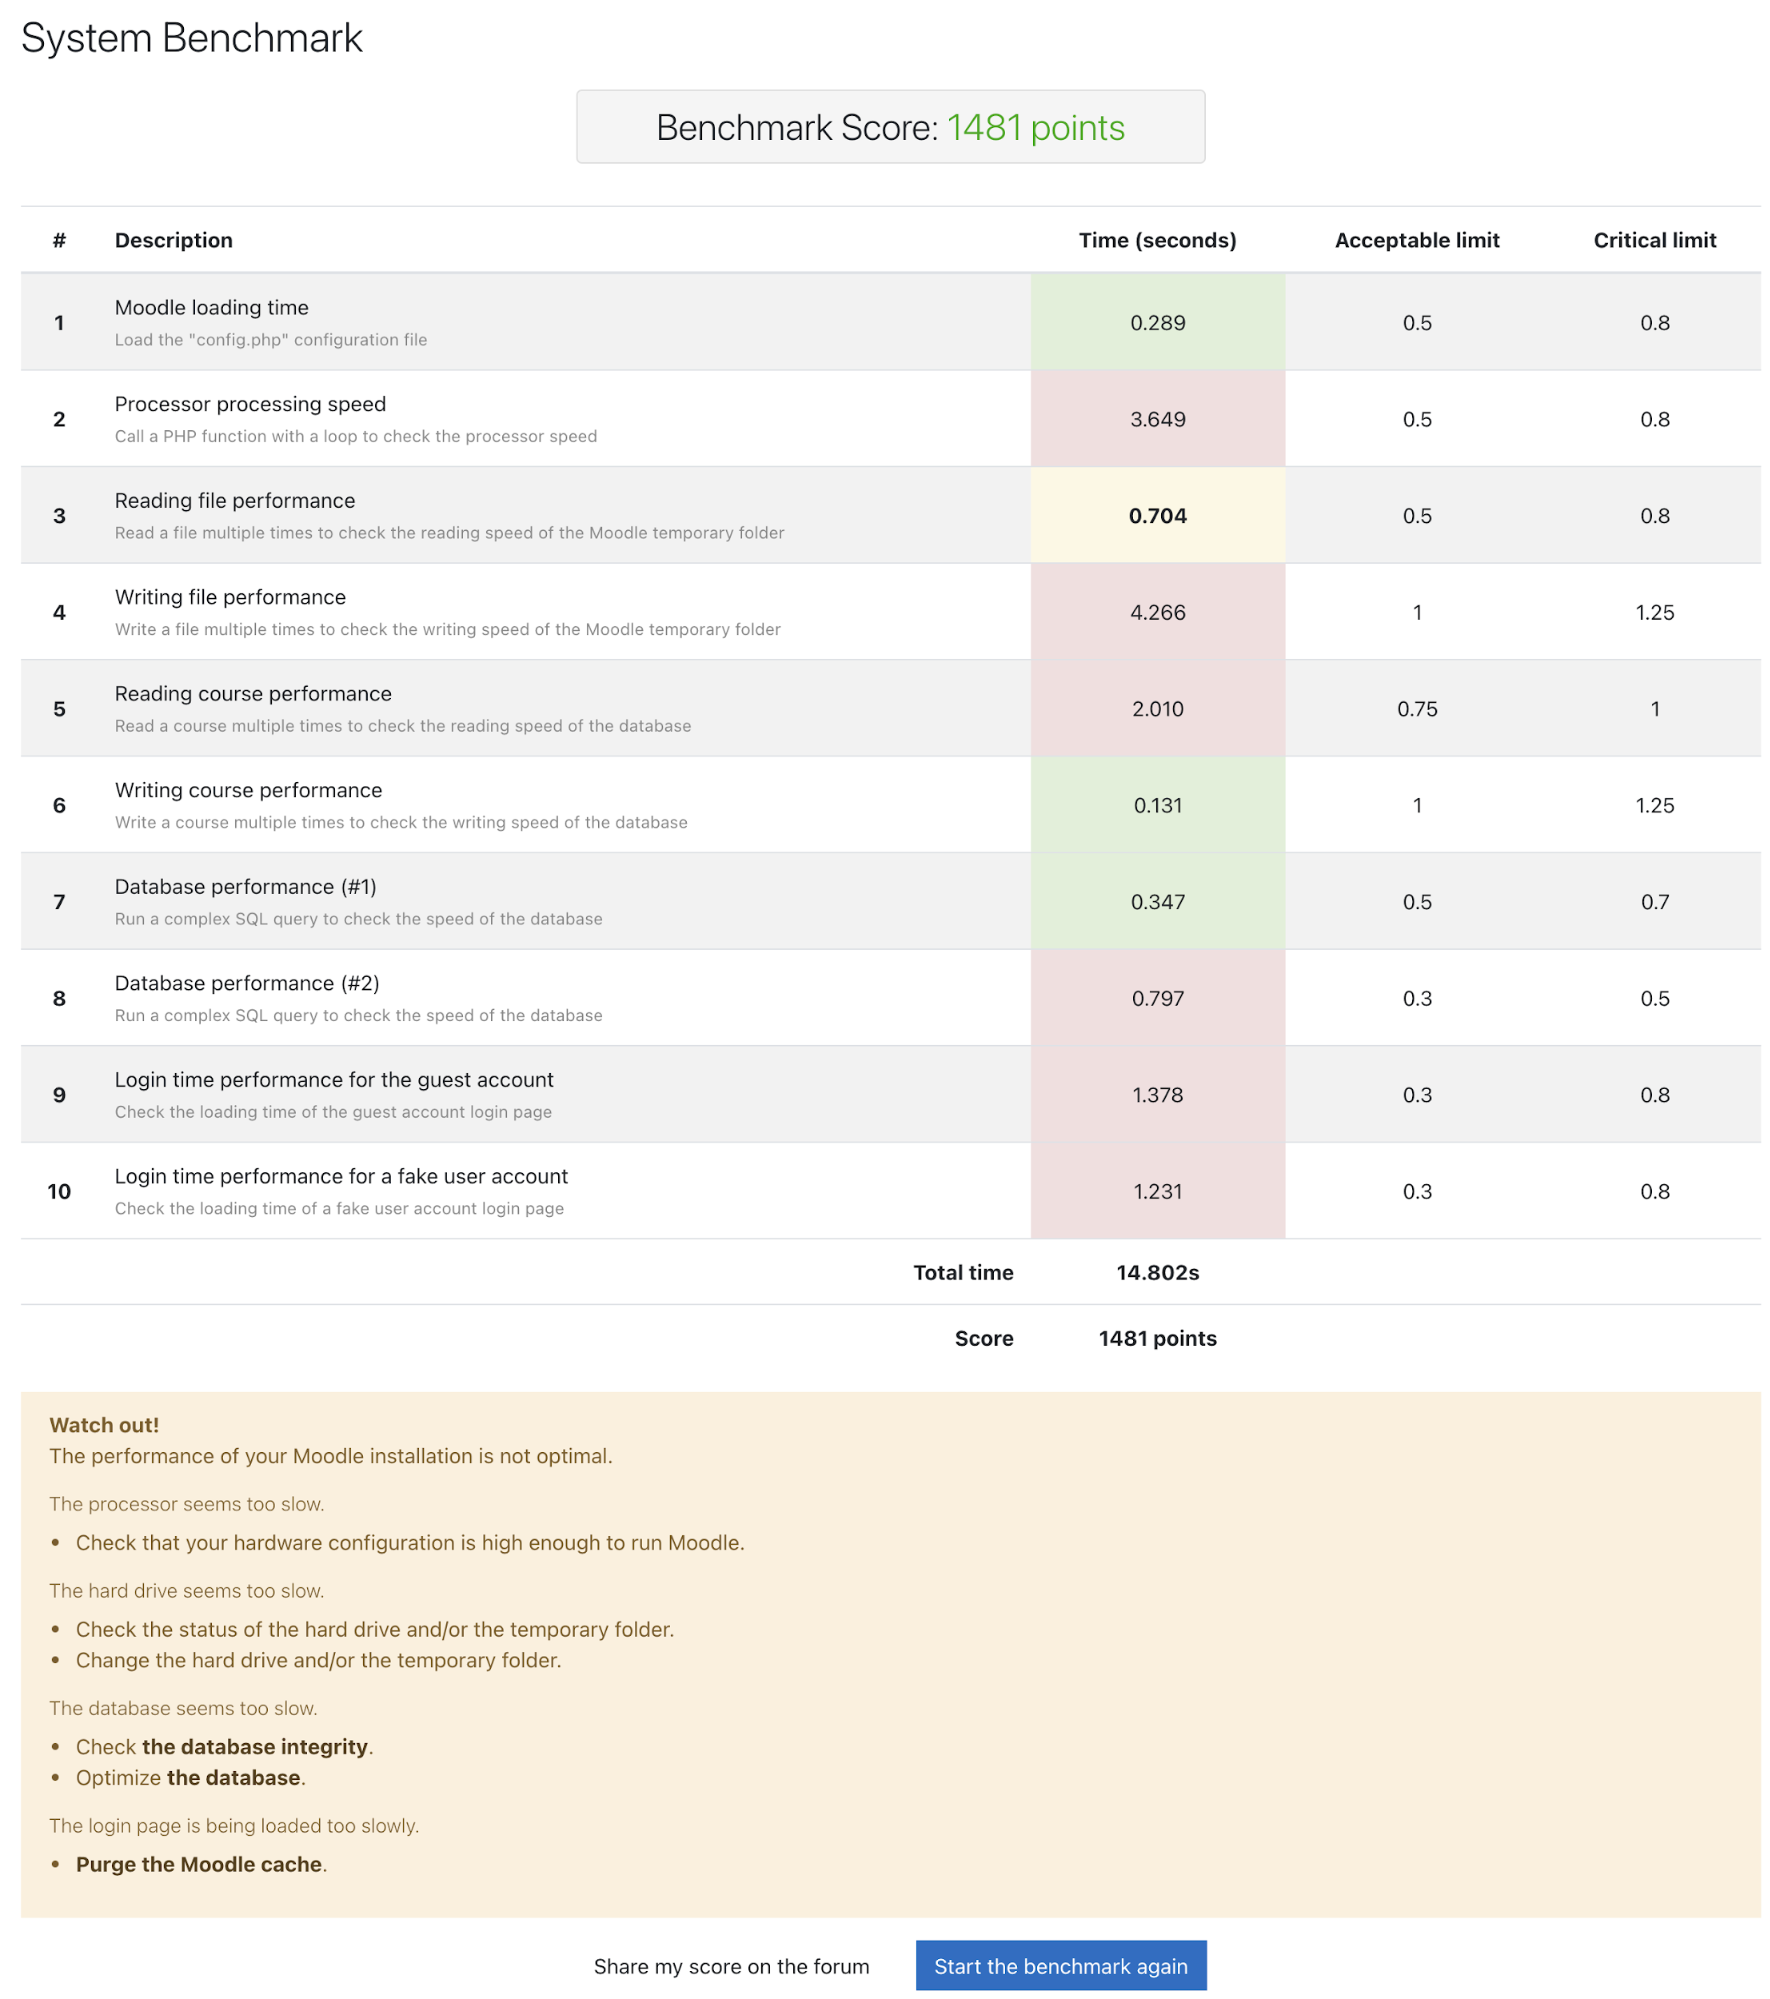
Further down the report, you can get the summary of the benchmark. In the above case, we made an Apache Benchmark (ab) tool to stress test the website with 20 concurrent user connections and simultaneously run this benchmark report and observe the Moodle performance. The summary justification, despite being pretty broad in tuning aspects, could help us narrow down the area that needs improvement like database optimization, Moodle cache and hardware resources.
It is recommended to perform this benchmark test several times to obtain a significant average. If the performance of your installation is not optimal, you will find some recommendations to improve it in the Moodle documentation. Don’t run this benchmark on a production platform during active hours, as it could result in significant performance degradation.
Apache JMeter
Apache JMeter is a Java application designed to load test functional behavior and measure the performance of static and dynamic web applications. It can be used to simulate a heavy load on a server, group of servers, network or object to test its strength or to analyze overall performance under different load types.
Since Moodle v2.5 and later, it comes with a JMeter test plan generator to simplify the process of load testing with JMeter through two built-in scripts – “Make test course” and “Make JMeter test plan”, both available under Site administration -> Development, augmented by a set of add-ons Moodle performance comparison. In order for you to use this feature via the Moodle web interface, you have to switch the Moodle into Developer Mode under Site administration -> Development -> Debugging -> Debug messages -> DEVELOPER: extra Moodle debugs messages for developers. Otherwise, use the CLI tools available under {Moodle}/admin/tool/generator/cli directory.
Note that the JMeter test should not be performed on a production system. The test plan scripts generate data and deliberately load the server to its limit and beyond, often making it overloaded and becoming non-responsive. Don’t even run them on a separate Moodle instance in the production server, connecting to the same production database system since it will affect the performance directly.
Deploying the JMeter Server
To simplify the instructions, we execute all our commands as the root user. On the JMeter server, install all the necessary packages:
$ sudo apt install apache2 mysql-client mysql-server php libapache2-mod-php graphviz aspell ghostscript clamav php7.4-pspell php7.4-curl php7.4-gd php7.4-intl php7.4-mysql php7.4-xml php7.4-xmlrpc php7.4-ldap php7.4-zip php7.4-soap php7.4-mbstringCreate a privileged MySQL user to be used by the Moodle performance comparison tool. There is no need to create a database first:
$ mysql -uroot -p
mysql> CREATE USER 'moodleperformance'@'localhost' IDENTIFIED BY 'mys3cret';
mysql> GRANT ALL PRIVILEGES ON *.* TO 'moodleperformance'@'localhost';
mysql> exit
Create the dataroot and backup directory:
$ mkdir /var/moodledata
$ chmod -R 777 /var/moodledata
$ mkdir /root/backups
Install Java:
$ apt update
$ apt install default-jre
Download Apache JMeter from the official site and store it under /opt directory:
$ wget https://downloads.apache.org//jmeter/binaries/apache-jmeter-5.4.tgz
$ tar -xzf apache-jmeter-5.4.tgz -C /opt
Get the Moodle Performance Comparison tool from Github and put it under the Apache webserver default document root at /var/www/html, and also copy the configuration files from their templates:
$ cd /var/www/html
$ git clone https://github.com/moodlehq/moodle-performance-comparison
$ cd moodle-performance-comparison
$ cp webserver_config.properties.dist webserver_config.properties
$ cp jmeter_config.properties.dist jmeter_config.properties
Open jmeter_config.properties and edit the following line:
jmeter_path=/opt/apache-jmeter-5.4Running the JMeter Test Plan
The simplest way to run a Moodle benchmark by using this tool is to run a local Moodle benchmark, where the scripts will automatically pull the Moodle application from Github, set up the database and set the necessary configurations for a local testing environment. What we need to do is specify the following in the webserver_config.properties:
dbtype="mysqli"
dbhost="localhost"
dbuser="moodleperformance"
dbpass="mys3cret"
wwwroot="http://18.141.187.189/moodle-performance-comparison/moodle"
dataroot="/var/moodledata"
backupsdir="/root/backups"
Where 18.141.187.189 is the public IP address of this JMeter server. The Moodle that will be benchmarked is accessible at http://18.141.187.189/moodle-performance-comparison/moodle . Once the above is configured, navigate to /var/www/html/moodle-performance-comparison:
$ cd /var/www/html/moodle-performance-comparisonThe first thing is to fee the Moodle test site with a set of data. The Moodle site size can be determined by the following:
|
Size |
Test Plan |
|
XS |
1 user, 5 loops and 1 ramp-up period |
|
S |
30 users, 5 loops and 6 ramp-up period |
|
M |
100 users, 5 loops and 40 ramp-up period |
|
L |
1000 users, 6 loops and 100 ramp-up period |
|
XL |
5000 users, 6 loops and 500 ramp-up period |
|
XXL |
10000 users, 7 loops and 800 ramp-up period |
$ ./before_run_setup.sh XS
mysql: [Warning] Using a password on the command line interface can be insecure.
mysql: [Warning] Using a password on the command line interface can be insecure.
mysql: [Warning] Using a password on the command line interface can be insecure.

#######################################################################
Installing Moodle (ec58cefefb2722f61f77c9a2b6a12d40a8c078a0)

Moodle site configuration finished successfully.
Creating Moodle (ec58cefefb2722f61f77c9a2b6a12d40a8c078a0) database and dataroot backups
mysqldump: [Warning] Using a password on the command line interface can be insecure.

Upgrading Moodle (ec58cefefb2722f61f77c9a2b6a12d40a8c078a0) to master

#######################################################################
'Before' run setup finished successfully.

Note the following files were generated, you will need this info when running
testrunner.sh in a different server, they are also saved in test_files.properties.
- Test plan: /var/www/html/moodle-performance-comparison/moodle/testplan.jmx
- Test users: /var/www/html/moodle-performance-comparison/moodle/testusers.csv
- Dataroot backup: /root/backup/dataroot_backup_202101090901
- Database backup: /root/backup/database_backup_202101090901.sql

Now you can:
- Change the site configuration
- Change the cache stores
And to continue with the test you should:
- Run restart_services.sh (or manually restart web and database servers if
  this script doesn't suit your system)
- Run test_runner.sh
Before we start the benchmark, it is recommended to restart the web and database servers so we get a good baseline result:
$ ./restart_service.sh
#######################################################################
Services restarted successfully.

Now you can begin running the tests with test_runner.sh.
Now we are ready to run the JMeter benchmark by using test_runner.sh script:
$ ./test_runner.sh Group1 Run1
#######################################################################
Test running... (time for a coffee?)

Jan 09, 2021 9:03:55 AM java.util.prefs.FileSystemPreferences$1 run
INFO: Created user preferences directory.

Warning: Nashorn engine is planned to be removed from a future JDK release

#######################################################################
Test plan completed successfully.

To compare this run with others remember to execute after_run_setup.sh before
it to clean the site restoring the database and the dataroot.
We have now completed our first run and got a performance on a plain Moodle site. At this point, you may perform any performance tuning and tweaking to your database server, PHP, Apache web server or any other components related to Moodle and run the second run to compare if the tuning applied are making sense. Before we make the second benchmark, we have to execute the after_run_setup.sh script to prepare and clean up the test Moodle site where the script will restore the database and the Moodle dataroot:
$ ./after_run_setup.shNow we are ready to run the second benchmark:
$ ./test_runner.sh Group1 Run2
#######################################################################
Test running... (time for a coffee?)

Jan 09, 2021 9:03:55 AM java.util.prefs.FileSystemPreferences$1 run
INFO: Created user preferences directory.

Warning: Nashorn engine is planned to be removed from a future JDK release

#######################################################################
Test plan completed successfully.

To compare this run with others remember to execute after_run_setup.sh before
it to clean the site restoring the database and the dataroot.
Benchmark Results
The benchmark results should appear and accessible at http://18.141.187.189/moodle-performance-comparison/ . The following whole-page screenshot is an example of results that you would get:
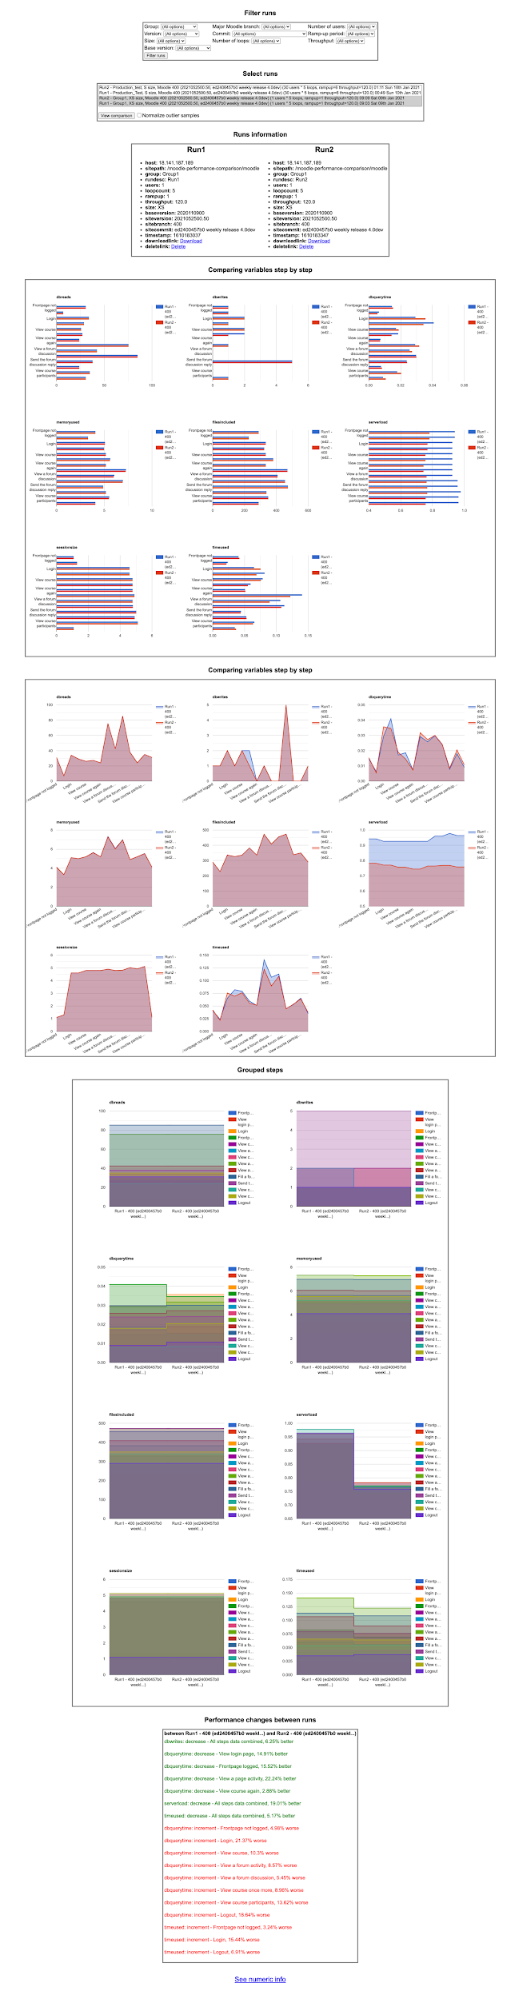
The comparison allows us to understand in which aspects or components of the Moodle site have been improved between runs. It’s good to perform the benchmark multiple times to get a significant average, before ultimately making a decision whether a particular tuning has introduced good or bad results to the Moodle site.