blog
How to Manage Configuration Templates for Your Databases With ClusterControl

ClusterControl makes it easy to deploy a database setup – just fill in some values (database vendor, database data directory, password and hostnames) in the deployment wizard and you’re good to go. The rest of the configuration options will be automatically determined (and calculated) based on the host specifications (CPU cores, memory, IP address etc) and applied to the template file that comes with ClusterControl. In this blog post, we are going to look into how ClusterControl uses default template files and how users can customize them to their needs.
Base Template Files
All services configured by ClusterControl use a base configuration template available under /usr/share/cmon/templates on the ClusterControl node. The following are template files provided by ClusterControl v1.4.0:
| Filename | Description |
|---|---|
| config.ini.mc | MySQL Cluster configuration file. |
| haproxy.cfg | HAProxy configuration template for Galera Cluster. |
| haproxy_rw_split.cfg | HAProxy configuration template for read-write splitting. |
| garbd.cnf | Galera arbitrator daemon (garbd) configuration file. |
| keepalived-1.2.7.conf | Legacy keepalived configuration file (pre 1.2.7). This is deprecated. |
| keepalived.conf | Keepalived configuration file. |
| keepalived.init | Keepalived init script. |
| MaxScale_template.cnf | MaxScale configuration template. |
| mongodb-2.6.conf.org | MongoDB 2.x configuration template. |
| mongodb.conf.org | MongoDB 3.x configuration template. |
| mongodb.conf.percona | MongoDB 3.x configuration template for Percona Server for MongoDB. |
| mongos.conf.org | Mongo router (mongos) configuration template. |
| my.cnf.galera | MySQL configuration template for Galera Cluster. |
| my57.cnf.galera | MySQL configuration template for Galera Cluster on MySQL 5.7. |
| my.cnf.grouprepl | MySQL configuration template for MySQL Group Replication. |
| my.cnf.gtid_replication | MySQL configuration template for MySQL Replication with GTID. |
| my.cnf.mysqlcluster | MySQL configuration template for MySQL Cluster. |
| my.cnf.pxc55 | MySQL configuration template for Percona XtraDB Cluster v5.5. |
| my.cnf.repl57 | MySQL configuration template for MySQL Replication v5.7. |
| my.cnf.replication | MySQL configuration template for MySQL/MariaDB without MySQL’s GTID. |
| mysqlchk.galera | MySQL health check script template for Galera Cluster. |
| mysqlchk.mysql | MySQL health check script template for MySQL Replication. |
| mysqlchk_xinetd | Xinetd configuration template for MySQL health check. |
| mysqld.service.override | Systemd unit file template for MySQL service. |
| proxysql_template.cnf | ProxySQL configuration template. |
The above list depends upon the feature set provided by the installed ClusterControl release. In an older version, you might not find some of them. You can modify these template files directly, although we do not recommend it as explained in the next sections.
Configuration Manager
Depending on the cluster type, ClusterControl will then import the necessary base template file into CMON database and accessible via Manage -> Configurations -> Templates once deployment succeeds. For example, consider the following configuration template for a MariaDB Galera Cluster:
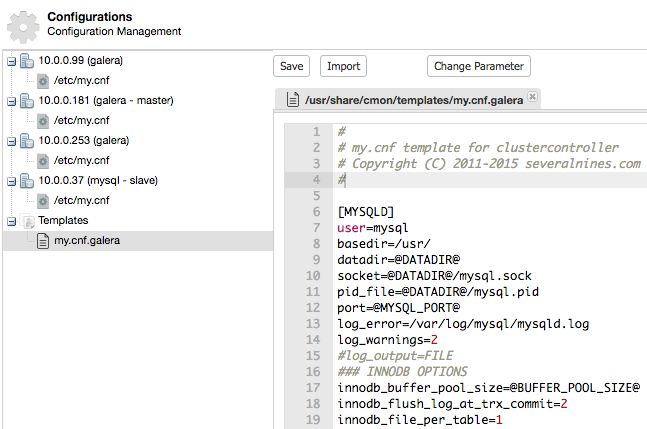
ClusterControl will load the base template content of Galera configuration template from /usr/share/cmon/templates/my.cnf.galera into CMON database (inside cluster_configuration_templates table) after deployment succeeds. You can then customize your own configuration file directly in the ClusterControl UI. Whenever you hit the Save button, the new version of configuration template will be stored inside CMON database, without overwriting the base template file.
Once the cluster is deployed and running, the template in the UI takes precedence. The base template file is only used during the initial cluster deployment via ClusterControl -> Deploy -> Deploy Database Cluster. During the deployment stage, ClusterControl will use a temporary directory located at /var/tmp/ to prepare the content, for example:
/var/tmp/cmon-003862-6a7775ca76c62486.tmp
Dynamic Variables
There are a number configuration variables which configurable dynamically by ClusterControl. These variables are represented with capital letters enclosed by at sign ‘@’, for example @DATADIR@. For full details on supported variables, please refer to this page. Dynamic variables are automatically configured based on the input specified during cluster deployment, or ClusterControl performs automatic detection based on hostname, IP address, available RAM, number of CPU cores and so on. This simplifies the deployment where you only need to specify minimal options during cluster deployment stage
If the dynamic variable is replaced with a value (or undefined), ClusterControl will skip it and use the configured value instead. This is handy for advanced users, where usually have their own set of configuration options that tailored for specific database workloads.
Pre-deployment Configuration Template Example
Instead of relying on ClusterControl’s dynamic variable on the number of max_connections for our database nodes, we can change the following line inside /usr/share/cmon/templates/my57.cnf.galera, from:
max_connections=@MAX_CONNECTIONS@To:
max_connections=50Save the text file and on the Deploy Database Cluster dialog, ensure ClusterControl uses the correct base template file:

Click on Deploy button to start the database cluster deployment.
Post-deployment Configuration Template Example
After the database cluster deployment completes, you might have done some fine tuning on the running servers before deciding to scale it up. When scaling up, ClusterControl will use the configuration template inside CMON database (the one populated under ClusterControl -> Configurations -> Templates) to deploy the new nodes. Hence do remember to apply the modification you made on the database server to the template file.
Before adding a new node, it’s a good practice to review the configuration template to ensure that the new node gets what we expected. Then, go to ClusterControl -> Add Node and ensure the correct MySQL template file is selected:
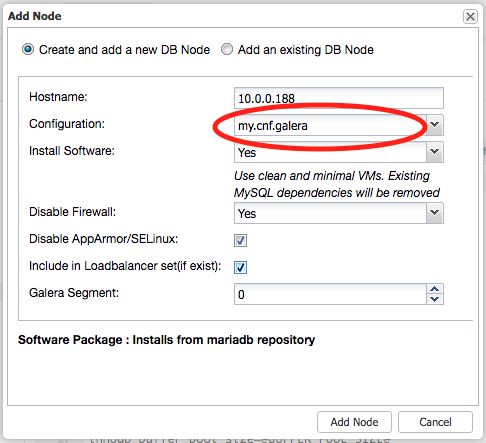
Then, click on “Add Node” button to start the deployment.
That’s it. Even though ClusterControl does various automation jobs when it comes to deployment, it still provides freedom for users to customize the deployment accordingly. Happy clustering!