blog
Data Warehouse in the Cloud – How to Upload MySQL Data Into Amazon Redshift for Reporting and Analytics

The term data warehousing often brings to mind things like large complex projects, big businesses, proprietary hardware and expensive software licenses. With Hadoop came open source data analysis software that ran on commodity hardware, this helped address at least some of the cost aspects. We had previously blogged about MongoDB and MySQL to Hadoop. But setting up and maintaining a Hadoop infrastructure might still be out of reach for small businesses or small projects with limited budgets. Well, perhaps then you might want to have a look at Redshift.
Now, in case you are running e.g. a Galera Cluster for MySQL, why not dedicate one of the cluster nodes for reporting? This is very doable, but if you’ve got reports generating long running queries, it might be advisable to decouple the reporting load from the live cluster. Having an asynchronous slave might help, but depending on the amount of data to be analyzed, a standard MySQL database might not be good enough. The great news is that Redshift is based on a columnar storage technology that’s designed to tackle big data problems.
In this blog post, we’re going to show you how to parallel load your MySQL data into Amazon Redshift.
Loading Data to Amazon Redshift
There are several ways to load your data into Amazon Redshift. The COPY command is the most efficient way to load a table, as it can load data in parallel from multiple files and take advantage of the load distribution between nodes in the Redshift cluster. It supports loading data in CSV (or TSV), JSON, character-delimited, and fixed width format.
After your initial data load, if you add, modify, or delete a significant amount of data, you should follow up by running a VACUUM command to reorganize your data and reclaim space after deletes. You should also run an ANALYZE command to update table statistic.
Using individual INSERT statements to populate a table might be prohibitively slow. Alternatively, if your data already exists in other Amazon Redshift database tables, use SELECT INTO … INSERT or CREATE TABLE AS to improve performance.
So here is what we are going to do:
- Create a Redshift cluster
- Export MySQL data and split them into multiple files
- Upload the load files to Amazon S3
- Run a COPY command to load the table
- Verify that the data was loaded correctly
Creating a Redshift cluster
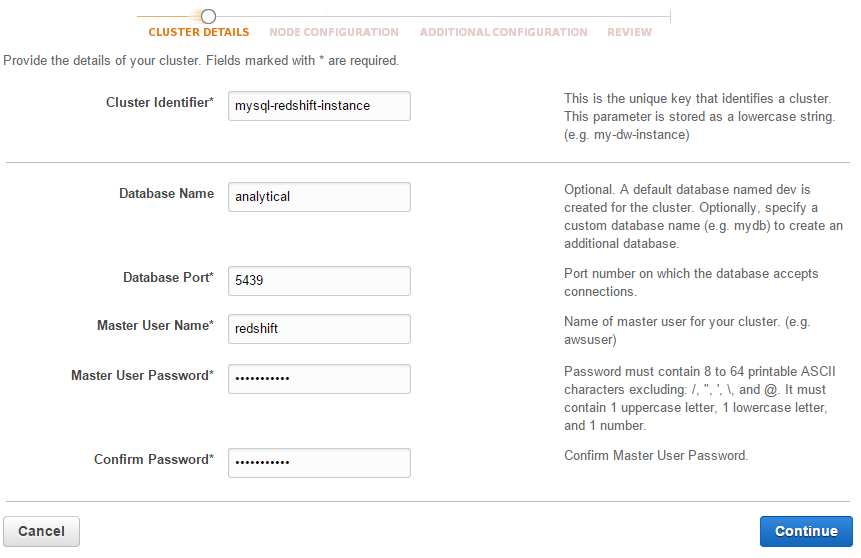
Log into AWS Console > Services > Redshift > Launch Cluster to open the cluster creation wizard. Enter the required cluster details as in the screenshot below:
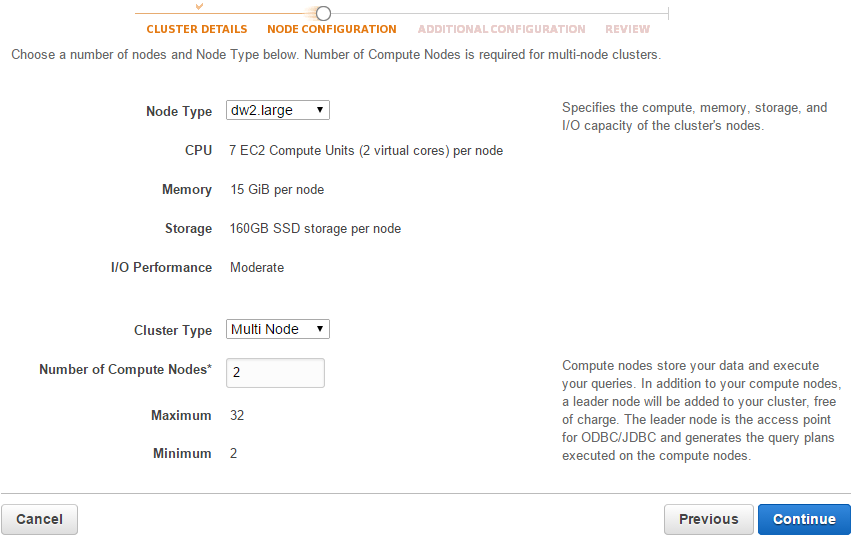
Configure the Node Type, Cluster Type and the number of Compute Nodes on the Node Configuration page:
Choose the default value for the rest of the options and you are good to go. The next thing to configure is the Security Groups to allow hosts access. Go to Redshift > Security > Security Groups > Connection Type > CIDR/IP and add the IP address of host that you want to access. We will be accessing the cluster via a PostgreSQL client.
Exporting MySQL Data to Amazon S3
Assume we have several tables that we want to export to Redshift. In following example we run a statement to select all sales transaction for the past 5 years from tbl_sales and split them over to 1 million rows per file:
mysql> SELECT * FROM shop.tbl_sales
WHERE DATE(created) < '2014-01-01'
AND DATE(created) >= '2009-01-01'
LIMIT 0,1000000
INTO OUTFILE '/tmp/tbl_sales_1.csv'
FIELDS TERMINATED BY ','
ENCLOSED BY '"'
LINES TERMINATED BY 'n';
** Repeat the above step by changing the LIMIT values accordingly. If you want to automate the process, we used following stored procedure to generate them all:
DELIMITER //
DROP PROCEDURE IF EXISTS export_csv_split //

CREATE PROCEDURE export_csv_split (IN table_name VARCHAR(50), IN rows INT)
BEGIN
DECLARE x INT;
DECLARE y INT;
DECLARE total_row INT;

SET x=0;
SET y=1;

-- condition of the select statement
SET @condition = CONCAT('WHERE DATE(created) < ''2014-01-01'' AND DATE(created) >= ''2009-01-01''');

-- count the total rows of the select statement + condition as @total_row
SET @SQLString1 = CONCAT('SELECT COUNT(*) INTO @total_row FROM ',table_name,' ',@condition);
PREPARE test1 FROM @SQLString1;
EXECUTE test1;

WHILE x <= @total_row DO

-- export the rows from select statement + condition with limit
SET @SQLString = CONCAT('SELECT * FROM ',table_name,' ',@condition,' LIMIT ',x,',',rows,' INTO OUTFILE "/tmp/',table_name,'-',y,'.csv" FIELDS TERMINATED BY '','' OPTIONALLY ENCLOSED BY ''"'' LINES TERMINATED BY ''n''');
PREPARE test2 FROM @SQLString;
EXECUTE test2;

SET x=x+rows;
SET y=y+1;

END WHILE;

END //
DELIMITER ;
Then, call the procedure:
mysql> call export_csv_split('tbl_sales', 1000000);
mysql> call export_csv_split('tbl_order', 500000);
Move the generated CSV files into a directory called s3-redshift:
$ mkdir ~/s3-redshift
$ mv /tmp/*.csv ~/s3-redshift/
Install s3cmd, a command line tool to manage Amazon S3 remotely which is available in epel-testing repository:
$ rpm -Uhv http://dl.fedoraproject.org/pub/epel/6/x86_64/epel-release-6-8.noarch.rpm
$ yum --enablerepo epel-testing install s3cmd
** If you are on Debian/Ubuntu see, http://s3tools.org/repo/deb-all/stable/
Configure S3 credentials:
$ s3cmd --configureCreate a new bucket for Redshift:
$ s3cmd mb s3://s3-rshiftStart syncing the CSV data directory into S3 bucket:
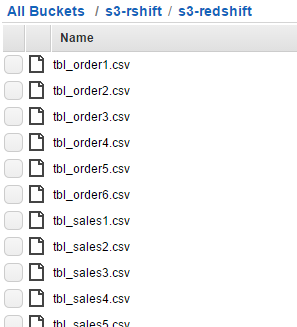
$ s3cmd sync s3-redshift s3://s3-rshiftEnsure the data files exist in S3’s bucket as shown in the following list:
Loading the Data into Redshift
Redshift runs on PostgreSQL 8.x as the backend. We can use the standard PostgreSQL client to access the Redshift cluster with provided endpoint and credentials.
-
Install the PostgreSQL client package:
$ yum install -y postgresql #Redhat/CentOS $ sudo apt-get install -y postgresql #Debian/Ubuntu -
Use psql program to access the Redshift cluster:
$ psql --host=mysql-redshift.cd23imcbfhbd.ap-southeast-1.redshift.amazonaws.com --port=5439 --username=redshift --dbname=analytical -
Create a table similar to the one we have in MySQL:
CREATE TABLE tbl_sales (
	id BIGINT PRIMARY KEY NOT NULL,
	trx_id CHARACTER VARYING(16) NOT NULL,
	p_id INTEGER NOT NULL,
	created TIMESTAMP,
	quantity INTEGER NOT NULL,
	price NUMERIC(13,2) DEFAULT 0,
	subtotal NUMERIC(13,2) DEFAULT 0,
	discount DOUBLE PRECISION DEFAULT 0,
	total NUMERIC(13,2) DEFAULT 0
);
Note that Redshift only supports certain data types as listed here. Also take note of the unsupported data types. You may need to alter some of your data types to fit the Redshift environment.
-
Run the COPY command to access the CSV files in our S3 bucket and parallel load them into the table:
copy tbl_sales FROM 's3://s3-rshift/s3-redshift/tbl_sales' credentials 'aws_access_key_id=your_aws_access_key;aws_secret_access_key=your_aws_secret_key' delimiter ',' removequotes;
INFO:  Load INTO TABLE 'tbl_sales' completed, 6715947 RECORD(s) loaded successfully.
Repeat the above step for the other tables.
-
After your initial data load, if you add, modify, or delete a significant amount of data, you should follow up by running a VACUUM command to reorganize your data and reclaim space after deletes. You should also run an ANALYZE command to update table statistic:
VACUUM tbl_sales;
ANALYZE tbl_sales;
At this point, your data should exist in the Redshift cluster and is immediately available for query processing.
Verify the Data
From the psql client console, verify the table structure:
analytical=# d tbl_sales;
              TABLE "public.tbl_sales"
  Column  |            TYPE             | Modifiers
----------+-----------------------------+-----------
 id       | bigint                      | NOT NULL
 trx_id   | character varying(16)       | NOT NULL
 p_id     | INTEGER                     | NOT NULL
 created  | TIMESTAMP without TIME ZONE |
 quantity | INTEGER                     | NOT NULL
 price    | numeric(13,2)               | DEFAULT 0
 subtotal | numeric(13,2)               | DEFAULT 0
 discount | double precision            | DEFAULT 0
 total    | numeric(13,2)               | DEFAULT 0
To verify that each table loaded correctly, execute the following commands:
analytical=# SELECT COUNT(*) FROM tbl_sales;
  COUNT
---------
6715947
All executed queries on the cluster can be seen from the Queries tab:
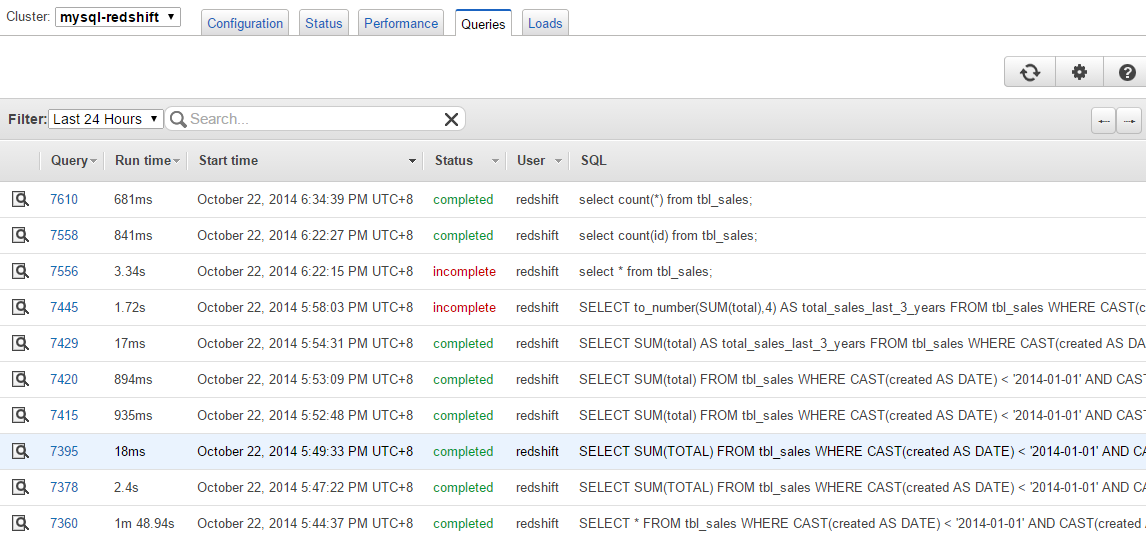
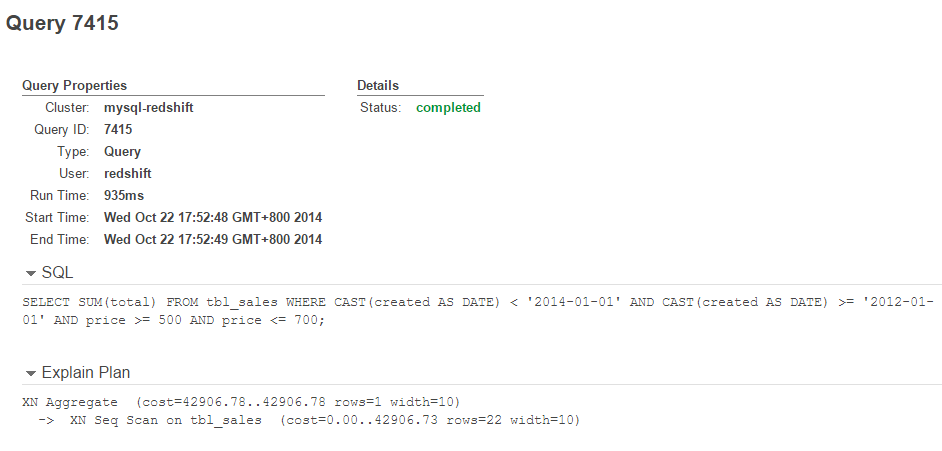
Click on the Query ID to get in-depth details on the query plan and status:
That’s it. Your data is now in Redshift. Welcome to big data analytics!


