Whitepapers
DIY DBaaS: A guide to building your own full-featured DBaaS

More so than ever, businesses need to ensure that their databases are resilient, secure, and always available to support their operations. Database-as-a-Service (DBaaS) solutions have become a popular way for organizations to manage their databases efficiently, leveraging cloud infrastructure and advanced set-and-forget automation.
However, consuming DBaaS from providers comes with many compromises. In this guide, we’ll show you how you can build your own flexible DBaaS, your way. We’ll demonstrate how it is possible to get the full spectrum of DBaaS capabilities along with workload access and portability, and avoid surrendering control to a third-party.
From architectural and design considerations to operational requirements, we’ll take you through the process step-by-step, providing all the necessary information and guidance to help you build a DBaaS solution that is tailor-made to your unique use case. So get ready to dive in and learn how to build your own custom DBaaS solution from scratch!
We created this guide to help developers understand:
- Traditional vs. Sovereign DBaaS implementation models
- The DBaaS environment, elements and design principles
- Using a Day 2 operations framework to develop your blueprint
- The 8 key operations that form the foundation of a complete DBaaS
- Bringing the Day 2 ops framework to life with a provisional architecture
- How you can abstract the orchestration layer with Severalnines solutions
Section I: DBaaS as an implementation model
Although DBaaS is traditionally thought of as a business model whereby end-users consume databases from 3rd-party providers who manage their operations, DBaaS is an implementation concept at its core. Concepts, platforms and tooling have continued to evolve, giving organizations more choices over how to implement their DB ops.
Traditional DBaaS implementation
model
In a Traditional DBaaS model, the provider is responsible for the entire lifecycle
of the data stack, including provisioning, configuration, monitoring, backup
and recovery, and patching. It is useful for teams that are responsible for
underlying products or projects, such as software applications, websites, or
online services, and whose primary goal is to ensure that their business-critical
services are managed and always fully operational.
The core characteristic of this model is its transfer of CAPEX to OPEX, i.e.
customers can avoid the upfront capital expenses associated with buying and
maintaining their data stack. Instead, they use metered services scaling up or
down as needed. There are three general categories of provider: DB, cloud, and
independent service vendors.
- DB vendor DBaaS refers to services provided by the creators and maintainers of the database software, such as MongoDB and Elastic. These providers offer fully managed services that are specifically designed to work with their own database software, making them a good choice for organizations that want to use those specific databases without the added complexity of managing the underlying infrastructure.
- Cloud vendor DBaaS, on the other hand, are services provided by cloud platform providers like Amazon Web Services (AWS), Google Cloud Platform, and Microsoft Azure. These services provide organizations with fully managed database services that run on their respective cloud platforms. Cloud vendor DBaaS offers a high degree of scalability, flexibility, and reliability, as well as easy integration with other cloud services.
- Independent service vendor (ISV) DBaaS refers to services provided by third-party vendors such as Severalnines, Instaclustr, Aiven, and others. These vendors offer fully managed services that support a variety of database engines, usually across multiple clouds (typically the big 3), providing organizations with more flexibility in their choice of database software and infrastructure provider.
Sovereign DBaaS implementation model
A Sovereign DBaaS model differs from its counterpart in that it offers organizations complete control over their database layer operations, enabling internal DevOps or Infrastructure teams to automate their database layer operations using their own code, open-source tooling, and/or off-the-shelf solutions in a vendor-neutral environment.
The DBaaS platform still provides a self-service model for developers, enabling them to create, configure, and manage their own databases independently, enforcing security policies, backup and recovery procedures, and other governance and compliance requirements, ensuring that developers adhere to best practices and policies. It allows developers to deploy and consume databases efficiently while providing the infrastructure team with the ability to enforce policies and ensure compliance.
The infrastructure can be hosted on-premises, in a colocation facility, or in a hyperscale cloud provider facility as infrastructure-as-a-service (IaaS), giving organizations the flexibility to choose where their data is stored and to change their choices at any time for any reason. In this model, the primary goal of DBaaS is to give developers autonomy, enforce processes, and allow them to deploy persistent resources with ease.
A Sovereign DBaaS implementation offers ultimate control over all business risks related to data — it mitigates vendor, environment, and ecosystem lock-in, managed license instability, key person dependencies, data regulation changes, and cost unpredictability. By rendering organizations less reliant on external providers, it reduces the business risks associated with traditional DBaaS, such as regulatory compliance.
Below we will briefly describe the markers and principles of a Sovereign DBaaS implementation. For more detail on these concepts, read our Sovereign DBaaS Guide.
Markers of a Sovereign DBaaS
Control
You are able to own and assert control over the data pipeline according to your needs through your DBaaS implementation — from the underlying infrastructure, databases and their operations, to workload location.
Access
You have the level of access your use case requires to your data and the technologies that handle that data. You can access the data plane, the underlying infrastructure, and the data management system. You get root access, allowing you to install, configure, and manage your stack components.
Portability
The traditional approach to DBaaS inevitably leads to organizations becoming wholly dependent on a service, effectively trapping them in a particular ecosystem. Conversely, being data sovereign means you aren’t married to a specific vendor or environment. You can efficiently and cost-effectively move databases from one cloud environment to another, or from an on-prem to a cloud environment and vice versa with minimal difficulty.
Licensing stability
A fundamental principle of sovereign data is the ability to roll your own optimized DBaaS solutions without being subject to vendors’ licensing restrictions. You can include source-available options like licensed MongoDB and Elasticsearch that third-party service providers cannot.
Budget efficiency
Third-party costs are difficult and sometimes impossible to model, not to mention expensive at scale. With Sovereign DBaaS, you can form a clear understanding of costs because you have greater visibility into and control over inputs, e.g. infrastructure, databases, and tools. You can better manage and track them because you can consolidate your database layer into a true single pane of glass. And you can implement FinOps practices and tools into your stack more precisely to help you better model and predict your spend.
Principles of Sovereign DBaaS
First principle: End-user independence
The first condition of end-user independence is full visibility into the database layer, including end-to-end visibility into the tech and software the DBaaS uses. Sovereign DBaaS can offer complete data transparency with no intermediaries (e.g., vendors) withholding information about the components and processes being used to implement the stack. Traditional DBaaS is a veritable black box — you can’t see into it, i.e. the data management software, security configurations, or privacy protocols, etc., just the output.
From visibility, comes the second condition, control, which requires the following:
DB and infrastructure access
You can modify the database / infra configuration and everything that the configuration entails. This is made possible by the direct use of open-source software, unmediated by a vendor’s implementation, enabling you to better tune your databases to support your workloads.
Location choice
You decide where and how data is processed and stored. For instance, you can place workloads with stringent requirements in one environment, such as on-premises, and those with fewer in another, such as public cloud. These requirements don’t just have to revolve around compliance and security, but performance, cost, and other variables that influence your workloads as well.
Second principle: Environment / ecosystem agnosticism
Sovereign DBaaS enforces the idea of environment agnosticism and extends it to the ecosystem. It means that end users have the freedom to choose different infrastructure environments and the ability to combine multiple underlying environments into a unified control plane. They get environment agnosticism – which enables location control. You can choose one environment or select from a mix of environments such as private cloud (e.g., VMware, Nutanix, OpenStack), public cloud (e.g. AWS, GCP, Azure, etc.), on-premises, co-location, and hybrid.
Sovereign DBaaS means having the freedom to go beyond any one ecosystem. For example, AWS Outposts lets you run on-premises. However, this setup is not truly Sovereign DBaaS because, aside from the managed service aspect, you’re locked into the AWS ecosystem.
Third principle: Embracing Open-Source Software (OSS)
A crucial principle of Sovereign DBaaS is the unrestricted use of open-source software. OSS allows you to avoid many of the issues you see with proprietary cloud vendor solutions, such as vendor lock-in. You have the ability to freely utilize the best OSS databases available, without worrying about managed providers’ APIs, nomenclature and semantics, e.g. interacting with managed PostgreSQL from one provider is a different experience than another, or license changes that render a database unavailable for third-party offering, such as Elasticsearch.
Open-source software also potentially unlocks cost efficiency because, a) it’s free, b) it decouples the database from the infrastructure, enabling you to place them where you want, and c) you have full access to be able to tune and optimize their configuration. You are buying a packaged solution from vendors that is more open-source adjacent, it’s tied to the infrastructure which they determine, often only available in one environment (often a handful of clouds), and you aren’t given full access to the database because of their SLA requirement.
DIY DBaaS options: independent or interdependent
There are several ways to approach creating a DBaaS, each with its own trade-offs. Below, we delve into each option with recommendations and technical details to help you make the right choice for your organization.
Option 1: independent
This option involves procuring your own infrastructure, building custom software to handle each job within the DBaaS framework, and building a custom management layer to act as a control plane. You have complete control over your infrastructure and software but requires expertise and significant investment in time and resources.
Pros:
- Full control: You can tailor your solution to meet specific requirements and preferences.
- Sovereignty: You own your data, end-to-end.
- Intellectual property: Any custom software developed in-house remains your intellectual property.
Cons:
- Complexity: This approach requires widely varied expertise in hardware, networking, software development, and database management.
- Key-person risk: Because of the internal expertise required, you increase the risk of creating points of failure around key personnel.
- Full responsibility: You’re completely responsible for managing, securing, and updating your infrastructure.
- Capital commitment: The upfront investment, especially in infrastructure, can be substantial.
Option 2: interdependent
This option offers a middle ground between buying a solution and building everything from scratch. In this approach, you would combine your choice of infra, code, and tooling, with off-the-shelf software to act as the control plane.
Pros:
- Flexibility: Choose between cloud, on-premises, or hybrid infrastructure deployments.
- Simplified control plane management: Rather than building your own control plane, you can leverage existing software to provide a centralized interface for managing your database resources.
- Vendor-agnostic: The software can manage various database technologies, allowing you to mix and match as needed.
- Sovereignty: You own your data, end-to-end.
Cons:
- Partial lock-in: As always, introducing off-the-shelf components poses lock-in, however partial.
- Learning curve: You’ll need to become familiar with the features and capabilities of your stack and its components.
- Shared responsibility: While off-the-shelf components greatly simplify DBaaS management, the shared responsibility model continues.
The independent route entails procuring your own infrastructure, developing the software and managing the entire solution yourself giving you full control, but also all that it entails. The interdependent one gives you greater flexibility and time to value by allowing you to incorporate off-the-shelf infra and components but still presents some lock-in and can require additional knowledge in handling the components themselves.
Now that we understand that DBaaS is an implementation model, the differences between the traditional and Sovereign models, and the pros and cons of going the independent or interdependent route when choosing the latter, let’s get to the actual building of your platform, starting with environment, elements and design principles.
Section II: DIY DBaaS in practice
Creating a Do-It-Yourself Database as a Service (DIY DBaaS) platform is a significant endeavor that can provide a scalable and flexible solution for managing databases. There are more choices to be made here than in a “choose your own adventure” book.
In our Developers Guide to Sovereign DBaaS, we cover each point with recommendations and technical details. Here, we will discuss the actual building of your own Sovereign DBaaS from the ground up, from the fundamental points you need to consider when building a DBaaS to system design considerations (using Dapr to illustrate) and what a provisional architecture will actually look like when developed.
To determine our architectural choices, we will consider this prospective DBaaS through the lens of Day 2 operations so that we are left with a reliable and scalable DBaaS.
Foundation points: DBaaS environment, elements and design principles
Environment
Where your DBaaS will live breaks out into three categories that can be selected for use as mono-environments or as hybrid ones:
Physical (owned)
Physical locations offer more control over the infrastructure but are often implemented regionally due to cost and may require additional maintenance and security measures.
Co-location (leased)
Leasing space in one (or more) data centers allows you to own, provide and configure your own hardware as well as benefit from the management of the hardware by experienced staff.
Public Cloud (PAYG)
Cloud-based solutions provide scalability and lower upfront costs, but you’ll need to trust a third-party provider with your data, as well as a higher likelihood of using proprietary technologies.
Choosing your environment is no easy decision, as each has its own up- and downsides. For instance, your own data centers give you maximum control, but the capital and operational expenses can be prohibitively substantial, especially if you have a geographically spread customer base. Going with a public cloud environment provides maximum flexibility and transfers CAPEX to OPEX but then the providers’ shared responsibility model may represent an intolerable risk profile, not to mention potential regulatory issues that are constantly shifting, especially with regard to data sovereignty.
And then there is the co-location facility, which could represent the ideal middle ground because you’re mitigating CAPEX while enjoying some of the control features of the on-prem environment along with the management and elasticity benefits of the public cloud. Either way, it is likely that you will be best served implementing a hybrid model.
Elements
The environment you ground your DBaaS in and the components you use to actually animate it influence one another, so it’s important to consider the latter while you are determining where you want to host it. Ultimately, you want to weave in sovereign principles so that you are environment agnostic, i.e. you want to ensure that whatever elements you choose and however you implement them are not absolutely dependent on the environment/s. Let’s make a quick pass over the fundamental elements you’ll use to actually create and operationalize the service itself:
Platform
The platform, e.g. Kubernetes and OpenStack, will not only dictate how you design your DBaaS but influence how you manage and orchestrate its underlying components.
Kubernetes continues to increase in adoption and is available on almost every public cloud provider and all have the same core APIs available as the open-source tool. This also allows K8s to be installed on-prem or even on developer machines for reproducible environments.
The growth of Kubernetes in the past decade makes it a fairly common skill among developers; ensuring that organizations can grow their experienced engineering teams with the right skills, instead of asking for experience with a particular cloud or subset of features that are inconsistently named and not equally implemented between providers.
Compute
Bare Metal
These are physical servers dedicated entirely to your DBaaS, offering maximum performance and control. However, they can be more expensive and harder to scale.
Virtual Machines (VM)
VMs run on shared hardware, offering a balance between performance and cost. They are popular because they are a standard compute resource in public clouds and leased data centers, which helps in avoiding vendor lock-in. Additionally, VMs can be easily scaled but their performance may be affected by other VMs running on the same host.
Containers
Containers are lightweight and fast, making them ideal for quickly scaling and deploying new instances. They can be easily managed using platforms like Kubernetes but may have limitations in terms of isolation compared to VMs.
Storage
- Storage types
- Attached: This refers to storage directly connected to the server or VM, offering high performance but limited scalability.
- Network: Network storage is accessed over a network, providing greater scalability but potentially lower performance due to network latency.
- Hot/Cold/Warm: These terms refer to the speed and accessibility of data. Hot storage is readily accessible and offers high performance, while cold storage is slower and more cost-effective for long-term data storage. Warm storage is a middle ground between the two.
- Storage configuration options
- Clustered Access filesystems: Clustered filesystems allow multiple servers to access the same storage simultaneously, improving redundancy and fault tolerance.
- Single-access filesystems are the most common option and are designed to be accessed by one server at a time.
Networking
- Public/Private: Public networks are accessible to anyone, while private networks are restricted to specific users or devices. Your choice depends on the level of security and access control you require.
- VPN/VPC: These are different methods of creating secure connections between networks or devices. VPNs (Virtual Private Networks) and VPCs (Virtual Private Clouds) create secure connections between networks, while Wireguard is a modern VPN protocol that offers improved performance and security.
Design principles
To build a system that aligns with Day 0 requirements and user objectives, we need a high-level system architecture that encapsulates a set of crucial architectural decisions, which will serve as the cornerstones of our design, fostering a platform that is agile, responsive, and efficient. While we will not delve deeply into every aspect, these principles will guide the architectural choices we make to build a modern system:
Cloud native
Embrace cloud-native principles, leveraging the inherent advantages offered by cloud computing. Prioritize scalability, resilience, agility, and the concept of immutable infrastructure. By harnessing cloud services, we can optimize performance and cost-efficiency.
Event-driven
Adopt an event-driven architecture to ensure loose coupling, scalability, and real-time responsiveness. This approach empowers us with the flexibility to construct and maintain distinct services, enhancing modularity and facilitating seamless communication through events.
Independently deployable services
Clearly define the responsibilities and boundaries of each service to foster agility, isolation, and straightforward development and deployment of new features.
Service discovery
Implement service discovery mechanisms to enable services to dynamically locate and communicate with one another. Eliminate the need for hardcoding network addresses or specific locations, promoting adaptability and flexibility in the system.
Agent-based
Embrace an agent-based approach to infuse the system with autonomous edge intelligence and decentralized decision-making. This may involve the integration of AI and other intelligent agents, which can operate independently to enhance system performance and adaptability.
Monitoring and observability
Prioritize comprehensive monitoring and observability by implementing continuous and systematic data collection and metrics tracking. This data-driven approach is essential for gaining insights into the behavior and performance of the platform, facilitating issue identification, resource optimization, and reliability assurance.
DevOps and CI/CD
Seamlessly integrate DevOps practices and continuous integration and continuous deployment (CI/CD) pipelines into the development and deployment workflows. This streamlined approach ensures rapid development cycles, rigorous testing, and efficient delivery of new features and updates.
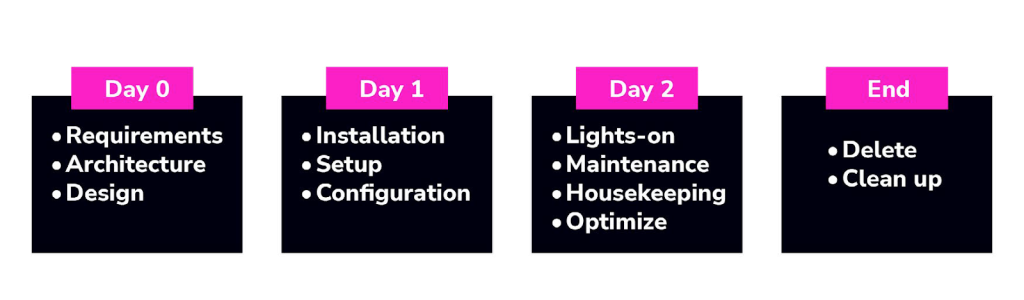
Now that we understand the environment, elements and underlying principles that you will use to inform your architectural decisions, you need a rubric for making the practical decisions while you build. We will start with the end state, what does day 2 look like?
To determine that, we need to know the purpose of what we’re trying to build. Implementation details will vary, but there is usually a fundamental ground truth that every implementation builds off of. For a DBaaS, we’re ultimately trying to achieve efficient, reliable database operations at scale through the use of automation.
Utilizing a Day 2 approach is practical as it allows you to focus on automating operational tasks and gradually build a comprehensive, robust, extensible platform.
DBaaS routines and blueprint: The Day 2 framework
What are Day 2 operations? They are the ongoing and challenging aspects of maintaining the reliability, performance, and security of your databases in a production environment. Here’s a closer look at some of the essential ‘Day 2’ routines:
Day 2 ops routines
Scaling and high availability
As your data and workload grow, scaling is necessary to ensure performance. Implement mechanisms for horizontal scaling (adding more nodes or instances) and vertical scaling (increasing resources on existing nodes). Ensure database high availability by leveraging monitoring and alerting tools alongside automated failover and recovery mechanisms.
Monitoring and alerting
Continuous monitoring of your databases is crucial to identify performance issues, bottlenecks, and potential security threats. Implement monitoring agents that collect data on various aspects of database health and performance.
Set up alerts and notifications to proactively detect and respond to potential issues. Alerts should be configured for specific thresholds and critical events.
Backups for onsite and offsite storage
Regular backups are essential to protect your data. Implement automated backup processes with options for both onsite and offsite storage to ensure data recovery in case of data loss or disasters.
Point-in-time recovery (PITR)
Point-in-time recovery allows you to restore a database to a specific moment in time. Develop mechanisms to support this, especially for databases with stringent recovery point objectives (RPOs).
Upgrading and patching
Stay up-to-date with the latest patches and upgrades for your database software. Develop a process for testing and rolling out updates, ideally with minimal downtime.
Access control / user access
Control and manage user access to databases by implementing robust access control measures. This includes user authentication, authorization, and role-based access controls.
Data migration (on-premises to cloud)
If your databases need to migrate from on-premises to the cloud or between cloud providers, a strategy is needed and tools for efficient data migration while minimizing downtime and data loss.
‘Day 2’ operations require ongoing attention, and it’s advisable to use automation wherever possible to streamline them. Additionally, documenting processes and creating runbooks will help ensure clear procedures to follow in various scenarios.
Day 2 ops blueprint
Here’s a high-level blueprint for developing a DBaaS from a Day 2 operational aspect:
Platform Architecture
Beginning with the overall vision for what type of system we want to build starts with “Day 0” requirements and user objectives, as serviced by the following components:
Control plane
The central management and orchestration layer.
Data plane
The layer responsible for hosting and managing the actual databases.
Agents
Agents installed on database nodes for monitoring, patching, and management.
Authentication and authorization
Implement user access controls and security measures.
Database provisioning
Develop a provisioning system that allows users to create new database instances and use various vendors.
Monitoring and alerting
Implement monitoring agents that collect data on database performance, resource utilization, and security. Set up alerts to notify administrators or users of potential issues.
Backup and recovery
Create a backup and recovery system that automates regular backups, retention policies, and restoration processes.
Scaling and high availability
Design mechanisms for horizontal scaling and high availability to ensure database performance and uptime.
Upgrade and patch management
Develop a system for managing database software updates and patches, including rolling upgrades.
Security
Implement security measures, such as access controls, encryption, and vulnerability assessments, to protect data and ensure compliance.
API integration
Consider integrating your platform with other tools and services, such as container orchestration platforms, identity management systems, and monitoring solutions.
Self-service user portal
Create a user-friendly web portal or API that allows users to provision and manage databases, set configurations, and access performance metrics.
Lastly, because we are proposing a loosely decoupled event-driven services architecture, we will leverage a Dapr runtime (profiled below), which provides building blocks that are designed to simplify common challenges in application development and services architecture.
Solution spotlight — abstracting the event-driven architecture with Dapr
Dapr, which stands for Distributed Application Runtime, is a versatile and event-driven runtime designed to simplify the development of applications. Originally incubated by Microsoft, it has since become a part of the Cloud Native Computing Foundation (CNCF), underscoring its relevance and adoption in the cloud-native ecosystem.
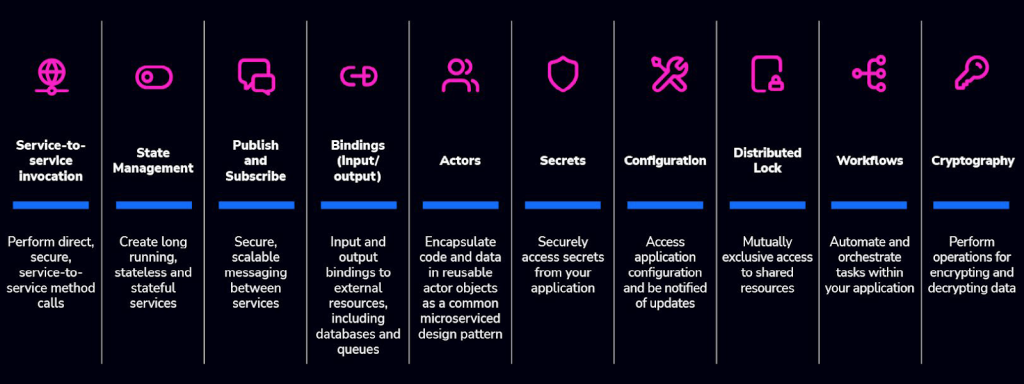
Dapr offers a collection of building blocks that empower developers to create resilient, stateless, and stateful applications more easily. The blocks are fundamental components that streamline various aspects of application development and include:
Service invocation
Simplifies the process of invoking services, whether they are running locally or remotely, without having to deal with complex service discovery or network communication logic.
State management
Offers a straightforward and consistent way to manage application state, regardless of where it’s stored (e.g., databases, caches, or file systems). This makes building stateful applications more intuitive
Publish-subscribe messaging
Enables seamless communication between application components using publish-subscribe patterns, enhancing event-driven architecture and loose coupling.
Resource bindings
Abstracts the integration with external resources such as databases, message queues, and storage systems. This allows developers to access these resources without worrying about the underlying specifics.
Secret management
Provides a secure and unified approach to manage application secrets, ensuring that sensitive information like API keys and passwords remains protected.
Actors
Implements the actor model to simplify the development of stateful applications by offering a higher-level, object-oriented abstraction for managing state and processing.
Virtual actors
Extends the actor model by introducing the concept of virtual actors, which can be used to build stateful, distributed, and scalable applications with automatic sharding and activation.
Observability
Enhances application monitoring and debugging by offering built-in instrumentation and observability features that facilitate the collection of metrics, traces, and logs.
Bindings for external systems
Provides a variety of pre-built bindings for popular external systems, enabling easy integration with services like Azure Functions, AWS Lambda, and more.
Middleware
Offers middleware components that can be used to enhance request and response processing in the application, supporting features like authentication, retries, and tracing.
By using Dapr components, developers can focus on building application logic rather than dealing with the intricacies of distributed systems, making it easier to create robust, cloud-native applications that can scale and adapt to changing requirements.
Dapr is platform-agnostic, allowing you to run your applications in various environments, including local development machines, Kubernetes clusters, and other hosting platforms where Dapr is installed — this versatility gives you the flexibility to create adaptable services that can operate seamlessly in both cloud and edge computing scenarios.
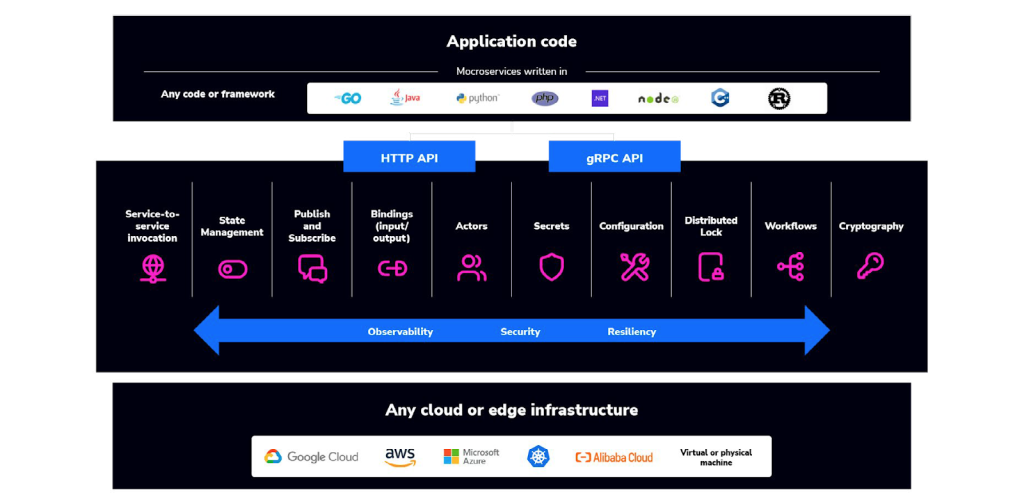
Naturally, you don’t have to incorporate any particular solution into your stack and you could build everything from scratch; but, that is not feasible for most or even preferable for any. The goal is not to remove all dependencies, which is impossible, but to weave sovereignty into your stack so you can configure and move your workloads at will.
Therefore, pick and choose off-the-shelf solutions where and when they make sense. Now that you understand the Day 2 Ops framework and what the high-level blueprint looks like when building from it, we can look at implementing the specific ops in detail.
The Day 2 ops framework: operational guidelines
The operational routine that kicks off the DBaaS ops milieu is provisioning and deployment. At its most essential, it involves provisioning the infrastructure resources that your database will live on and deploying your database atop them.
Op 1 — Database provisioning and deployment
Provisioning can be performed in on-prem, cloud and hybrid environments, and should include:
Resource allocation
Determining and assigning the necessary hardware resources (such as servers, storage, and networking equipment) and software resources (such as operating systems and databases) to support a specific application or service.
Configuration
Defining the configuration settings, security policies, and performance parameters required for the infrastructure components. This may involve setting up virtual machines, configuring network devices, and tuning hardware to meet specific requirements.
Software installation
Installing and configuring the necessary software components, including application software, middleware, and system software. This step ensures that all required software dependencies are in place.
Network configuration
Configuring network connectivity, including IP addresses, subnets, firewall rules, load balancers, and other network-related settings to ensure that applications and services can communicate effectively.
Security setup
Implementing security measures such as access control, encryption, authentication, and auditing to protect the infrastructure and data from unauthorized access and potential threats.
Monitoring and management
Integrating tools and systems for monitoring and managing the infrastructure. This includes setting up monitoring agents, alerts, and performance tracking to ensure the infrastructure operates efficiently.
Scaling and elasticity
Depending on the requirements, provisioning may include configuring the infrastructure for scalability and elasticity, enabling it to handle changing workloads and resource demands effectively.
Automation
In modern IT operations, automation plays a significant role in infrastructure provisioning. Tools like configuration management systems and infrastructure as code (IaC) scripts enable automated, repeatable provisioning processes.
User interfaces
Interfaces fall under three types: CLIs, APIs, and GUIs. Including all three is standard for retail DBaaS. For an internal DBaaS, your customers will be your own engineering teams, so providing an API-first approach when developing the platform will be key.
The ‘Infrastructure Service’ is primarily responsible for provisioning virtual machines or “system containers” that form the basis for the database nodes. These virtual machines are created from preconfigured image templates preinstalled with the exact software versions of database vendor packages and agents that provide features such as backups and restore, automatic failover, upgrades, monitoring, and more. Additionally, the Infrastructure Service handles the provisioning and management of other resources in private or public cloud infrastructure, which includes virtual private networks, storage volumes, and their continued maintenance.
The ‘Service Catalog Service’ provides a range of preconfigured and user-generated image templates used for launching a “Database Service.” Its primary aim is to maintain consistency in the deployment and management of database services.
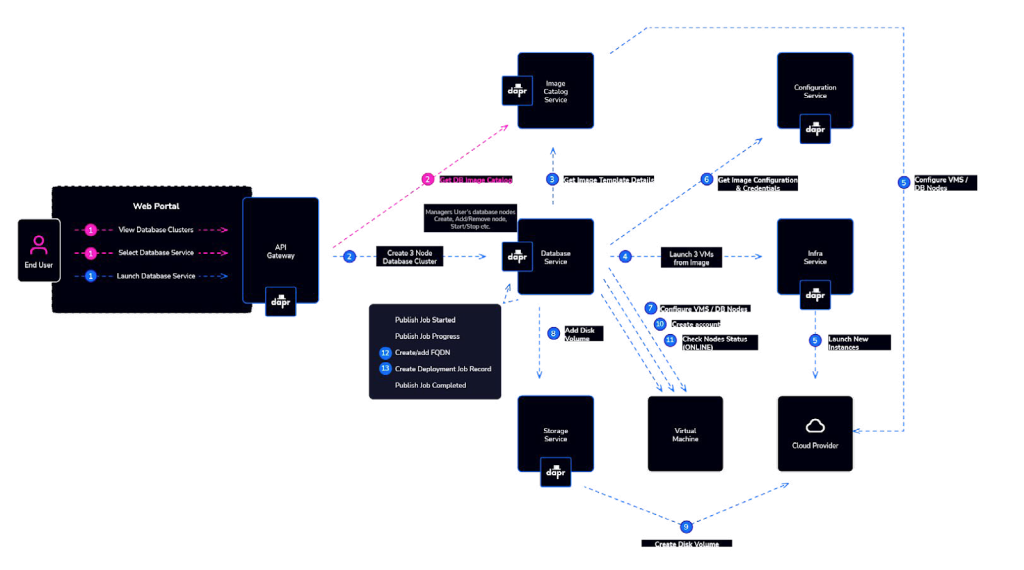
A prospective, developer-friendly provisioning workflow could look like this: Infrastructure teams can integrate their DBaaS with existing Git workflows, which means no additional users to manage, no additional interfaces to develop or services to deploy.
Developers would request a new resource by creating, or modifying, a Terraform plan that is reviewed by a member of the Infrastructure team and deployed, once approved. Monitoring is automatically set up and automated rules are put in place for teams and projects to ensure the correct hardware, regions and security rules are used.
Op 2 — Lifecycle management and high availability using an autopilot pattern
Utilizing a default “Autopilot” pattern with a set of generic handlers is a structured and flexible approach to managing the lifecycle and health of database servers, for example with MySQL primary-replica deployments. Below is breakdown of the key handlers and their functions:
preStart
This handler is invoked before starting the targeted service or application. It serves as a preparatory phase, allowing for any necessary actions or configurations to be applied in advance of service initiation.
health
The health handler performs periodic health checks on the service or application. It assesses the system’s well-being, ensuring that it is in a good and operational state. Health checks can include checks for database connectivity, resource availability, or other crucial factors.
onChange
The onChange handler is called when changes occur in a subscribed state. This handler is instrumental in maintaining real-time responsiveness and adaptability. It can trigger actions in response to dynamic changes in the environment, such as failover events in a primary-replicas cluster.
preStop
Before stopping the service or application, the preStop handler is executed. It provides an opportunity to perform any cleanup or finalization tasks to ensure a graceful shutdown.
postStop
After the service or application has been successfully stopped, the postStop handler is invoked. This phase can be used for additional cleanup or post-shutdown activities.
The beauty of this approach is its flexibility. Each handler can be configured to run any external application or script, and this configuration is simplified through the use of YAML. This means that your system can adapt and evolve by defining custom actions or processes for each handler, tailoring them to your specific needs.
Classic primary-replica deployments, grouped into clusters with unique global names, ensures that the approach is well-suited for managing database service replication, high availability, and dynamic changes.
Bootstrapping a database node
The subsequent steps provide an overview of what the agents undertake to determine their roles in a cluster setup.
Upon startup, the agent will do the following actions:
- Subscribe to state changes for the cluster
- Get the latest stored cluster state and check if there is a primary node
- Start the database node as a primary if there is no cluster state or if there is no active primary
- Attain a lock to update the cluster state so no other nodes can update it until this node has become the primary
- Check if there is a backup that should be used to restore/rebuild the node otherwise just initialize as new primary
- Update the cluster state again with new updated state, i.e., the primary node and replication info
- Unlock the cluster state so that other nodes can write to it
- Write a ‘lock file’ on the host which indicates that it has been initialized / bootstrapped
- Mark the node as primary and post a cluster state change event for the cluster
- Primary node is now active and running
Replicas will bootstrap with similar process as the primary:
- Subscribe to state changes for the cluster
- Get the latest stored cluster state and check if there is a primary node
- Wait until the cluster state lock is unlocked. Wait for a new cluster state change event
- Get the primary node and replication info from the cluster state
- Check if there is a backup that should be used to restore/rebuild the node otherwise just initialize as new replica
- Start the database node as a replica and setup up the replication with primary node
- Mark the node as replica, lock and update the cluster state with the replica node info
- Write a ‘lock file’ on the host which indicates that it has been initialized / bootstrapped
- Unlock the cluster state so that other nodes can write to it
- Replica node is now active and running
Health checks
The health handler plays a pivotal role in determining whether the node should undergo the bootstrapping process or proceed with standard health checks.
- Check if this node has been bootstrapped/initialized by searching for the ‘lock file’ on the host:
- If not found, initiate the node bootstrap as previously demonstrated.
- Perform regular health checks at specified intervals:
- Monitor the node’s health by assessing its process status, connection status, and replication status.
- Update the cluster and node’s state with a Time-to-Live (TTL) of, for example, 10 seconds:
- POST requests to update the state, including cluster state and individual node state.
- If I am the primary node, update the primary state before the TTL expires:
- POST request to update the primary state of the node.
- If I am the primary node, publish any state changes that may affect the replicas:
- POST request to broadcast state changes that could impact replica nodes.
- If I am a replica node, regularly check the primary node state at TTL intervals for any signs of failure:
- If there is no available primary state to retrieve, initiate a failover procedure.
- If I am a replica node, monitor primary state event changes with a locally cached version:
- If changes are detected, trigger a failover procedure to address the evolving state of the primary node.
Automated failover
The agents running on the replicas continuously monitor the primary node for any changes by subscribing to state changes. In the event of a change on the primary node, such as an IP address modification, the ‘onChange handler’ is triggered to execute a failover procedure.
Given that all replica nodes will be notified of the state change, it becomes crucial to establish a mechanism for coordination to ensure that only one node initiates the failover. A straightforward solution is to employ a global or distributed lock for synchronization purposes. This lock ensures that only a single node is authorized to execute the failover, preventing conflicts and ensuring a smooth transition in the event of primary node changes.
The first replica node that is able to acquire the lock will become the primary.
- Marks the node that has the lock as primary and update the cluster state
- After trying and failing to acquire the primary lock, the other replica nodes will wait until a new primary state event is received
- The agent then changes the replication source to the new primary node
Primary and replica node and cluster state examples:
Primary
primary {
  "id": "1",
  "name": "db-node-1",
  "hostname": "mysql01.example.com",
  "ip_address": "192.168.1.101",
  "port": 3306,
  "database_name": "biling",
  "status": "Online",
  "uptime": "14 days, 6 hours",
  "version": "MySQL 8.0.26",
  "replication": {
    "role": "Primary",
    "replica_count": 2,
    "replica_status": "Synced"
  },
  "connections": {
    "current_connections": 25,
    "max_connections": 100
  },
  "performance_metrics": {
    "query_cache_hits": 7500,
    "query_cache_misses": 500,
    "innodb_buffer_pool_size": "2 GB"
  },
  "storage": {
    "total_size": "100 GB",
    "used_space": "60 GB",
    "free_space": "40 GB"
  },
  "last_updated": "1696494655",
  "ttlseconds": "10",
}
Replica
replica {
  "id": "2",
  "node_id": "db-node-2",
  "hostname": "mysqlreplica01.example.com",
  "ip_address": "192.168.1.102",
  "port": 3306,
  "database_name": "my_database",
  "status": "Online",
  "uptime": "7 days, 12 hours",
  "version": "MySQL 8.0.26",
  "master": {
    "master_node_id": "db-node-1",
    "master_hostname": "mysql01.example.com",
    "master_ip_address": "192.168.1.101",
    "master_port": 3306,
    "replication_status": "Connected",
    "seconds_behind_master": 10
  },
  "connections": {
    "current_connections": 15,
    "max_connections": 50
  },
  "last_updated": "1696494655",
  "ttlseconds": "10",
}
Cluster
cluster {
  "id": "1",
  "namespace": "production",
  "project": "bluebird",
  "cluster_name": "mybillingapp",
  "last_updated": "1696494655",
  "ttlseconds": "10",
  "nodes": [
    {
      "id": "1",
      "name": "db-node-1",
      "status": "Online",
      "ip_address": "192.168.1.101",
      "role": "Primary"
    },
    {
      "id": "2",
      "name": "db-node-2",
      "status": "Online",
      "ip_address": "192.168.1.102"
      "role": "Replica"
    },
    {
      "id": "3",
      "name": "db-node-3",
      "status": "Offline",
      "ip_address": "192.168.1.103",
      "role": "Replica"
    }
  ],
  "services": [
    {
      "id": "1",
      "name": "mybillingapp-service",
      "type": "ClusterIP",
      "port": 3306,
      "replicas": 3,
      "status": "Running"
    }
  ]
}
Op 3 — Observability
Observability (O11y) is a crucial aspect of building a DBaaS solution because it enables organizations to effectively monitor, understand, and optimize their database infrastructure. Observability goes beyond basic monitoring and alerting and focuses on understanding the behavior and performance of your systems, services, and applications in real-time and through historical analysis.
It can be broadly classified into two main areas: Compute and Software.
- Compute o11y concerns the performance of the underlying hardware infrastructure, such as CPU, RAM and disk usage.
- Software o11y concerns the performance and behavior of the services and applications running on your hardware. Metrics of interest here might include memory consumption by various processes and the number of open network connections.
By implementing a robust observability framework, businesses gain valuable insights into their database’s performance, identify and troubleshoot issues quickly, and make data-driven decisions to enhance the overall efficiency, reliability, and security of their DBaaS. Embracing observability principles ensures that organizations can maintain a high-quality database service, ultimately contributing to improved application performance and end-user experience. O11y practices span from basic best practices (logging, metrics, alerting) to more advanced options specific to each type of database.
Logs (syslog)
Logging is a fundamental aspect of observability. Syslog is a widely-used standard for message logging in DBaaS solutions, providing a consistent format for log messages and enabling the efficient management and analysis of log data.
Metrics and events (Telegraf, other exporters)
Metrics are essential for monitoring the performance and health of a DBaaS solution. Collecting and storing various metrics at regular intervals, such as resource utilization, throughput, etc., provides ongoing insights into the entire system’s overall performance.
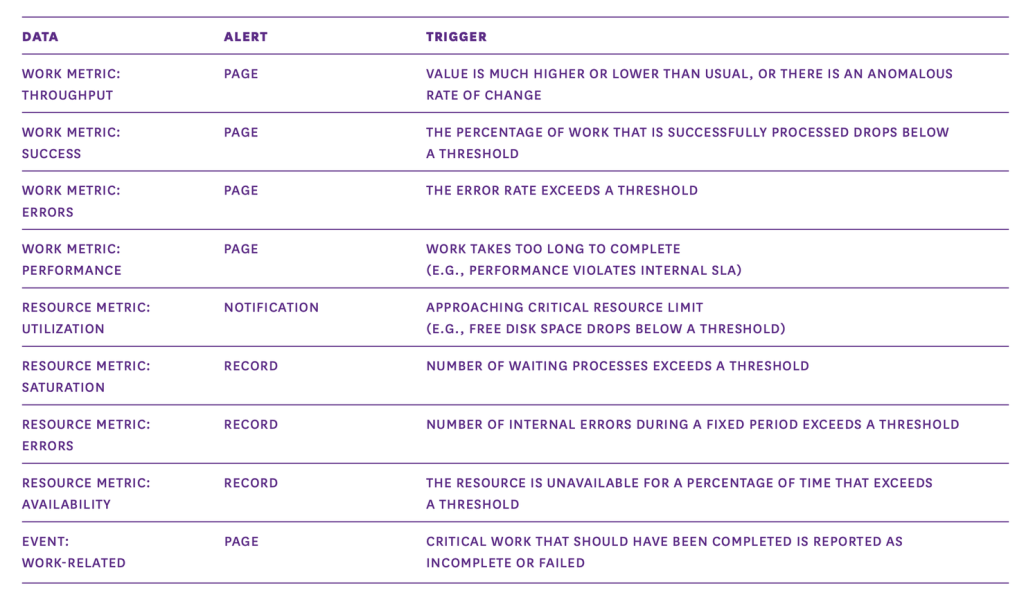
Metrics
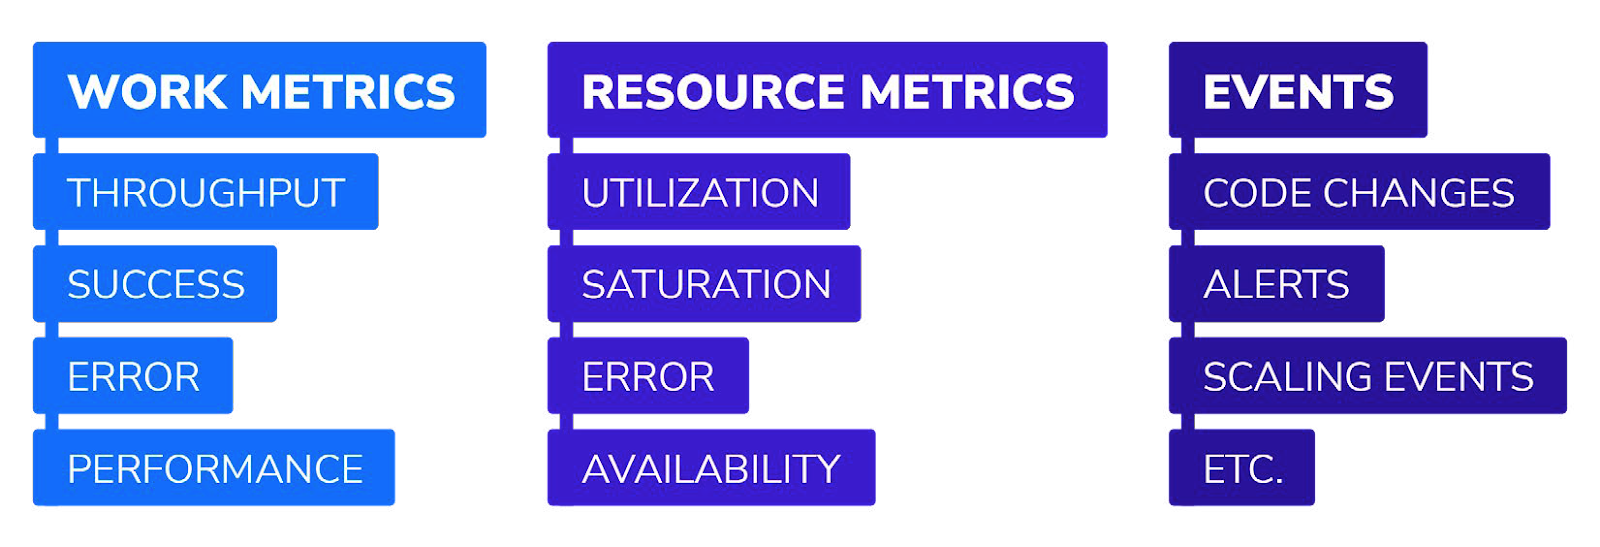
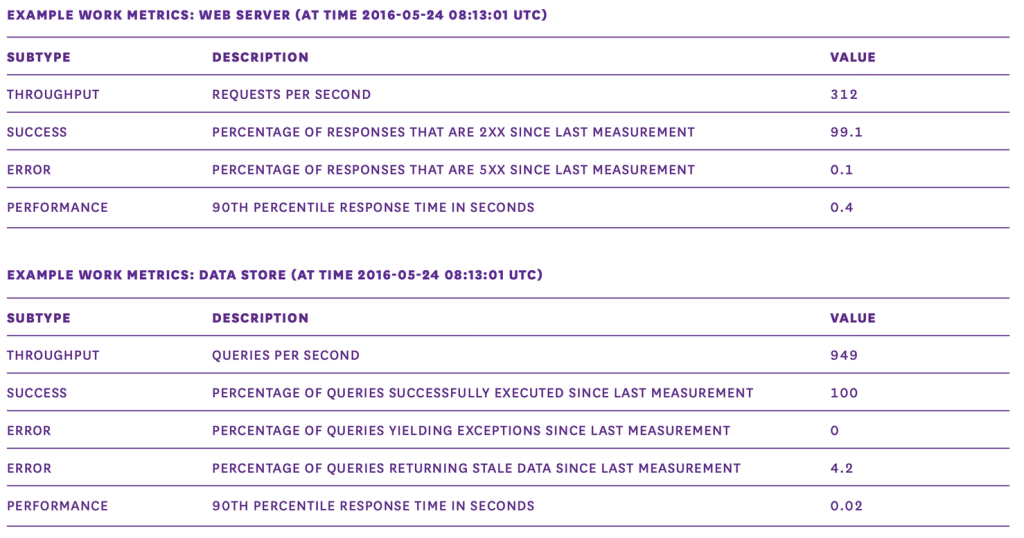
Datadog for example taxonomizes metrics out into two types: work and resource metrics. The former help teams assess and intervene on the performance and reliability of the system. They are broken out into four subtypes:
Throughput
A measure of capacity, this measures how much work a system can execute within a specified amount of time.
Success metrics
A measure of reliability, these measure the proportion of work that was executed successfully without errors or issues.
Error metrics
Another measure of reliability, these are measured separately from success metrics to help isolate, diagnose and intervene on problems.
Performance metrics
A measure of system responsiveness and efficiency, these are various metrics, such as latency, which can be presented as an average or percentile.
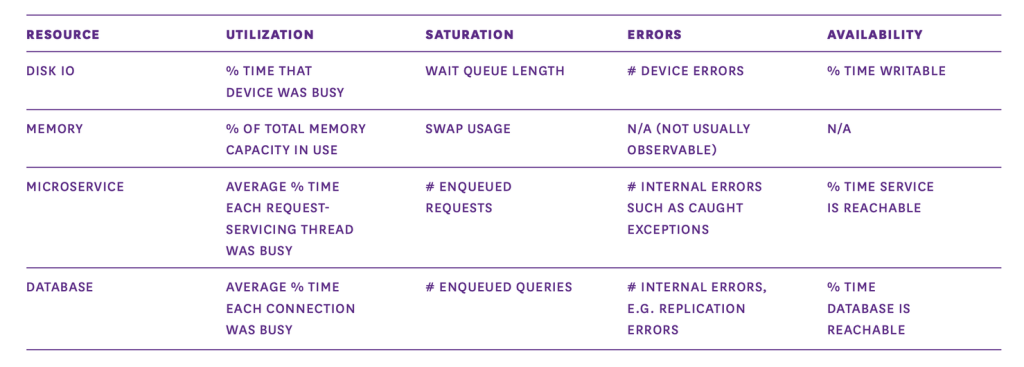
On the other hand, resource metrics focus on the underlying infrastructure’s health and efficiency. Here are the key areas to consider when collecting resource metrics:
Utilization
A time or capacity-based reliability measurement, these metrics can indicate whether or not a resource is operating near or at its limits.
Saturation
Measuring back-pressure, or the amount of requests that haven’t been serviced yet, these can indicate constraints and scalability issues.
Errors
These measure internal errors that may not be immediately observable in the resource’s output, allowing for proactive intervention.
Availability
An accessibility measurement, these show the percentage of time that a resource is responsive and able to fulfill requests.
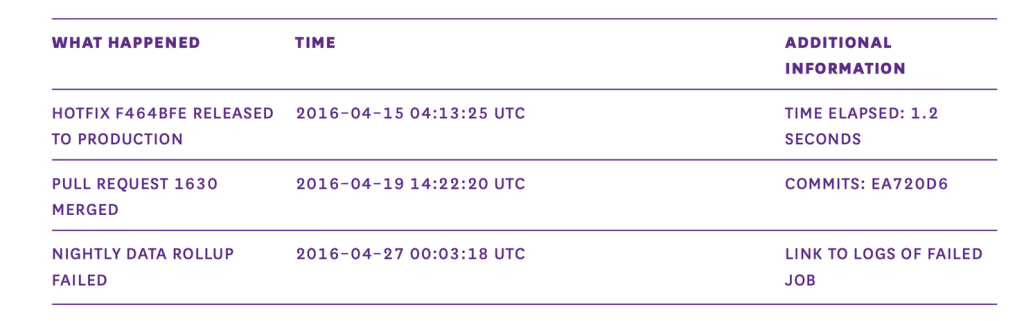
Events
Unlike continuous metrics, events capture notable points in time, such as changes and anomalies, that can provide essential context for diagnosis and response. They are especially valuable because they pinpoint what happened at a specific point in time and can be interpreted on their own. Here are some examples of noteworthy events:
Changes
Events related to code releases and builds provide insights into the evolution of
your software and can help track the impact of changes on system behavior.
Alerts
Alerts notify relevant parties when something requires immediate attention.
Scaling events
These help track resource provisioning and scaling activities.
Alerting
Implementing automated alerting helps monitor the DBaaS solution continuously, detecting and notifying the relevant personnel of any anomalies or issues that may require immediate attention. The key principles for effective alerting are as follows:
Page on symptoms, rather than causes
Alerts are meant for intervention, not diagnosis. An example of a useful alert is, “Two MySQL nodes are down.”
Alert liberally; page judiciously
Not all alerts should result in immediate intervention, you should create a tiered system based on their severity.
Following these principles will ultimately prevent alert fatigue and increase their utility.
Authoring your monitoring solution is unnecessary. Instead, we will opt for a specialized performance monitoring vendor, which could be an open-source or commercial provider offering an agent-based solution. This approach allows us to include a monitoring agent with each node on our platform.
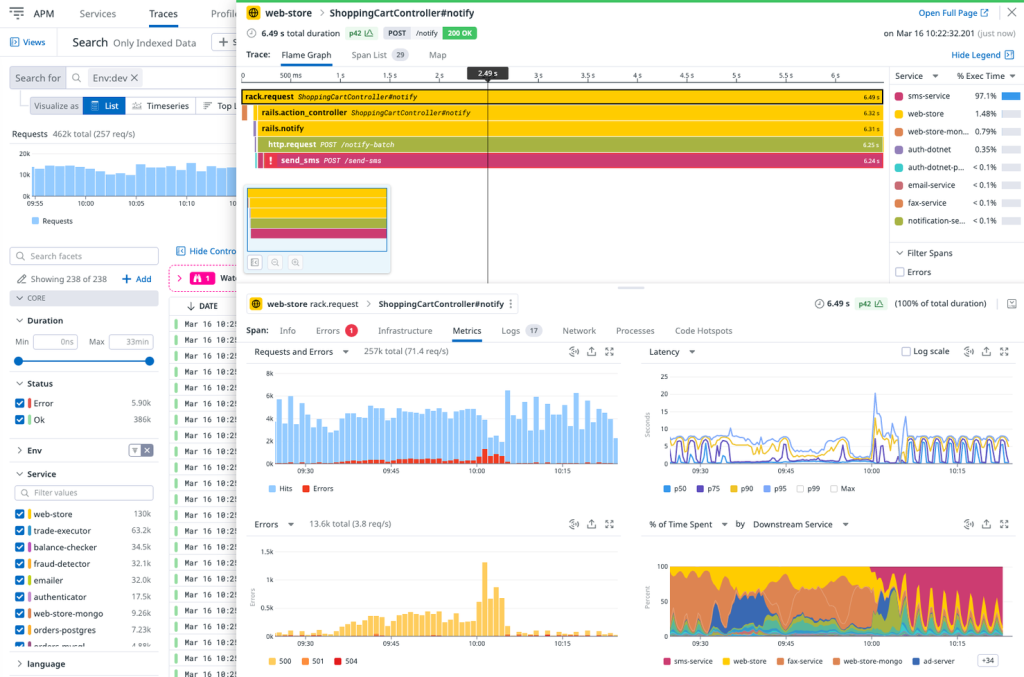
For instance, Datadog is a suitable example as it supports the OpenTelemetry framework. It can be seamlessly integrated with Dapr to transmit telemetry data to a Datadog backend while also monitoring key metrics for hosts and databases.
Observability spotlight: database query performance
Database queries are a key influencer of database and resource performance; therefore you should not forget to include their tracking in your observability plan. To get you started, we’ve included a selection of common databases and their tooling here:
MySQL
MySQL’s query performance can be monitored using the Performance Schema that provides detailed statistics on performance and resource usage. It helps in identifying and troubleshooting performance bottlenecks. Another useful tool is MySQL Enterprise Monitor, which offers real-time monitoring, performance analysis, and security features specific to MySQL. Additionally, the open-source Percona Monitoring and Management (PMM) tool can be leveraged to gain insights into MySQL’s performance and resource utilization.
MariaDB
MariaDB’s query performance can be monitored using tools like the Performance Schema and the Slow Query Log. These tools help identify slow queries, track query execution times, and gather other performance-related metrics. MariaDB also offers advanced observability features and tools to ensure optimal database performance.
PostgreSQL
PostgreSQL provides tools like pg_stat_statements and the built-in extension pg_stat_activity for monitoring query performance. These tools track query execution times, slow queries, and other performance metrics. PostgreSQL also provides advanced observability tools and practices tailored to its specific architecture. For example, pgBadger analyzes PostgreSQL log files and generates detailed reports on database performance.
MongoDB
MongoDB offers a variety of tools to monitor query performance, like the built-in MongoDB Database Profiler, which provides detailed information about the execution of database operations. The MongoDB Management Service (MMS) is also available and provides a web interface for monitoring performance metrics in real-time. It allows users to visualize slow queries and aids in identifying potential bottlenecks in the system.
Redis
Redis offers the MONITOR command and the INFO command with various sections like commandstats and latency for monitoring query performance. These commands offer insights into command execution, latency, and other performance-related metrics. Furthermore, Redis Monitor, a built-in command, provides real-time insights into Redis commands being executed, enabling users to detect performance issues and bottlenecks.
Op 4 — Backup and recovery
Implementing a robust backup and recovery solution is of paramount importance for any database infrastructure. An agent-based backup solution, designed to be self-sustainable and independent, exhibits key principles and decisions to ensure its resilience. Here’s a breakdown of the decisions to achieve this:
Local persistent storage
Storing backup schedules and backup job configurations locally ensures that your backup agent can function autonomously, even if the central control plane becomes unavailable. This local storage provides resilience and allows scheduled backups to continue without interruption.
Encrypted credentials
Encrypting and storing credentials locally on the host is a security measure that minimizes external dependencies. This approach mitigates the risk associated with a remote secrets management solution and enhances data security. In the event of a security breach on the control plane, only the database credentials stored locally are potentially exposed, limiting the impact of such an incident.
Dedicated backup database user
The use of a dedicated backup database user with appropriate permissions is crucial for the agent to execute backup and restore operations. This user should have the necessary access to perform these tasks while minimizing potential security risks.
Flexibility in backup methods
The backup agent is designed to be flexible and versatile, capable of supporting a range of different backup methods and parameters. This adaptability allows it to cater to the diverse backup requirements of various database technologies and open-source alternatives.
Domain knowledge
In some cases, the agent might need to possess domain knowledge of the specific database technology being backed up or restored. This expertise ensures that the backup process is tailored to the intricacies of the database system, optimizing the integrity and efficiency of the backups.
Local embedded database (e.g., SQLite)
The use of a local embedded database, such as SQLite, for storing schedules, job configurations, logs, and backup records, further enhances the autonomy and resilience of the agent. This database provides a reliable repository for critical information, even when the control plane is unavailable.
Data synchronization
To ensure data integrity and facilitate collaboration with other clients and services in the platform, the agent periodically sends logs and records back to the control plane. This synchronization process enables other components of the system to access and utilize the collected data for various purposes.
The backup agent achieves a level of self-sufficiency and independence that is crucial for robust backup and recovery processes. It ensures that backup operations continue seamlessly, even in the face of potential control plane disruptions.
Data structures examples
A backup job for the agent could have the following structure:
Backup job schema:
Job name: # A unique name for the backup job.
Description: # An optional description of the job.
Schedule:
Frequency: # How often the backup job runs (e.g., daily, weekly, monthly).
Timing: # Specific time or timing window for the job (e.g., 2:00 AM UTC).
Retention policy: # How long backups are retained (e.g., 7 days, 30 days, indefinitely).
Source:
Data source type: # Type of data or resource being backed up (e.g., file system, database, virtual machine).
Source location: # Path or location of the data/resource to be backed up.
Destinations:
Backup destination: # Where the backups are stored (e.g., local disk, network storage, cloud storage).
Credentials: # Database or cloud credential name
Backup Method:
Backup type: # Type of backup (e.g., full, incremental, differential).
Compression: # Whether data should be compressed before backup.
Encryption: # Whether data should be encrypted during backup.
Schemas: # List of databases/schemas to backup (e.g., all or individual)
Backup tool:
Path: # Path to the binary / tool
Program: # Name of the backup tool
Parameters: # List of default backup parameters
Credentials: # A list of user credentials with permissions to execute backups and upload to cloud storage
Backup Credential: # Database backup user credentials
Cloud credentials: # Cloud user storage credentials
Actions:
Pre-backup script: # Optional script or actions to execute before starting the backup.
Post-backup script: # Optional script or actions to execute after completing the backup.
Notifications:
On Success: # Who to notify (e.g., email addresses) when the backup job succeeds.
On Failure: # Who to notify when the backup job fails.
===
A backup user credentials could have the following format:
===
Database credentials schema:
Credential name: # A unique name or identifier for these credentials (e.g., MyProdCluster)
Database type: # Type database (e.g., MySQL, PostgreSQL, MongoDB).
Database name: # Name of the specific database.
Hostname or IP: # Hostname or IP address of the database server.
Port: # Port number for the database connection.
Username: # Database username for authentication.
Password: # Database password for authentication.
SSL/TLS configuration: # Configuration options for secure connections (if applicable).
Additional parameters: # Additional connection parameters or options (if applicable).
Description: # Optional description or notes about these credentials.
===
A cloud user storage credentials could have the following format:
===
Cloud Credentials Schema:
Cloud provider: # Name or identifier of the cloud service provider (e.g., AWS, Azure, GCP).
Credential name: # A unique name or identifier for these credentials (e.g., MyAWSAccount).
Access key ID: # Access Key ID or Access Key.
Secret access key: # Secret Access Key or Secret Key.
Session token: # Optional session token for temporary security credentials (for AWS STS).
Region: # Region or location where these credentials should be used.
Service-specific config:
Service 1:
Configuration key 1: # Service-specific configuration, if applicable.
Configuration key 2: # Service-specific configuration, if applicable.
Service 2:
Configuration key 1: # Service-specific configuration, if applicable.
Configuration key 2: # Service-specific configuration, if applicable.
Permissions:
Role or policy name: # The IAM role or policy associated with these credentials.
Permissions summary: # A brief summary of the permissions granted by these credentials.
Expiration:
Valid from: # Date and time when the credentials become valid (if applicable).
Valid until: # Date and time when the credentials expire.
Description: # Optional description or notes about these credentials.
===
Backup service architecture
An authentication and authorization process for agent services using a sound approach is critical to ensuring the security of the platform while maintaining extensibility for future service additions. It should provide a structured method for verifying the identity of users and agent services and controlling access to various endpoints. Here’s a breakdown of the process:
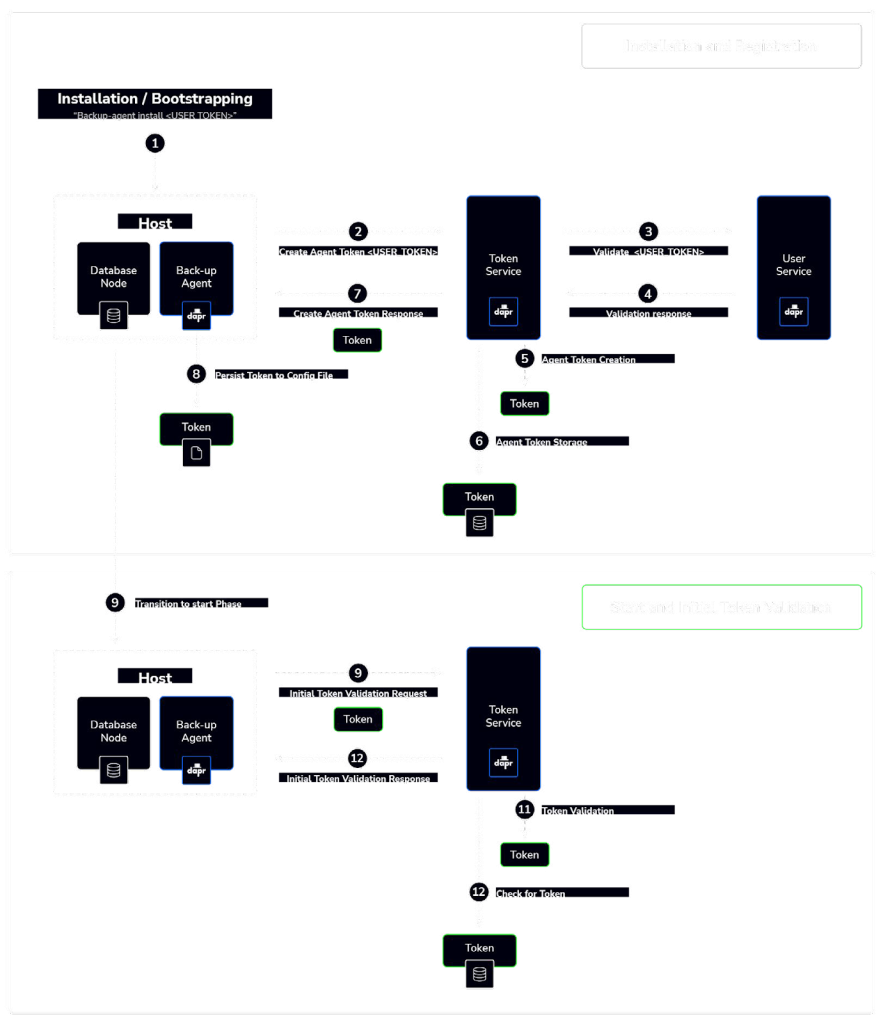
User token generation
A unique USER_TOKEN is generated for each end-user. This token is associated with an individual and can be used with multiple agent services.
Agent service registration
When an agent-based service is set up or started, it initiates a validation process with a “Token Service” on the platform. During this registration phase, the service presents the USER_TOKEN for validation.
Token validation by token service
The “Token Service” validates the USER_TOKEN presented by the agent service. To do this, it checks the token against an existing user record through a “User Service.”
Agent token generation
If the USER_TOKEN is found to be valid, the “Token Service” generates a unique AGENT_TOKEN. This AGENT_TOKEN is returned to the agent service and becomes the basis for subsequent requests to the platform.
Service endpoint access
- Any call to a service endpoint by a client, such as accessing a “Job Service” endpoint, requires a token validation phase with the “Token Service.”
- For example, a client requesting access to a specific endpoint must provide the AGENT_TOKEN for validation.
- If the AGENT_TOKEN is successfully validated, the service endpoint URL is returned to the agent service, granting access to the requested functionality.
This authentication and authorization process aligns with best practices for securing services and ensuring that only authorized users and agent services can access specific resources. By having a dedicated “Token Service” and a “User Service,” you can centralize and streamline token validation, user management, and authorization processes.
Additionally, this architecture allows for extensibility by accommodating different services, such as database provisioning, as your platform grows. By adhering to this structured approach, you can maintain a robust and secure authentication and authorization framework that provides controlled access to platform resources while supporting future service expansion.
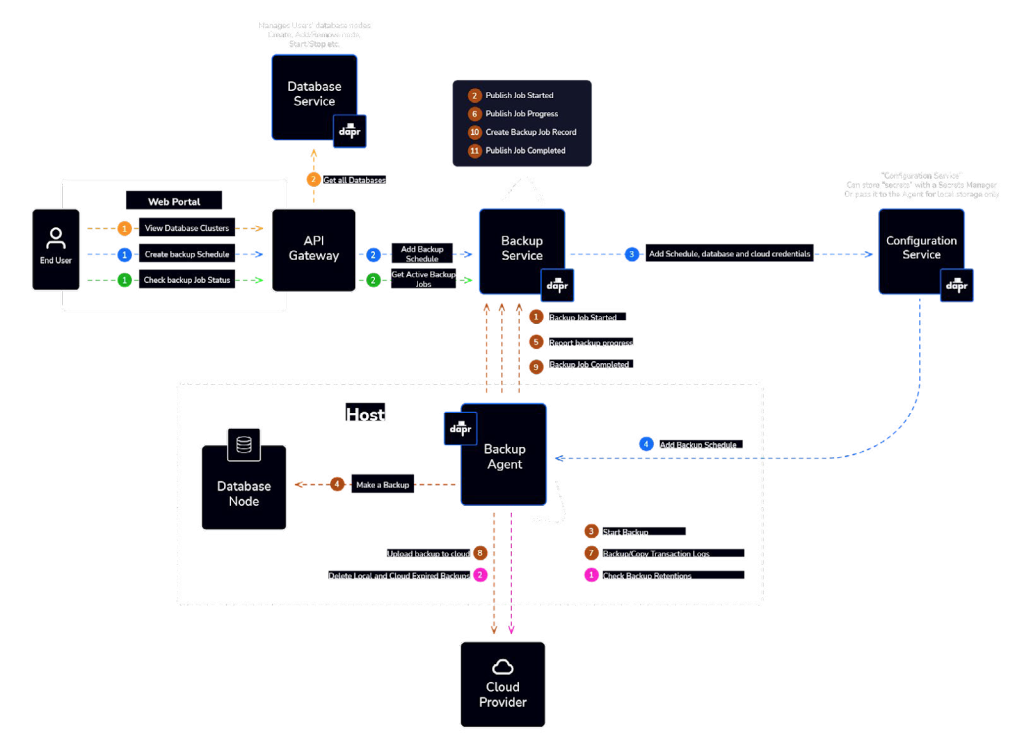
The backup function comprises a well-structured set of services, each with specific roles and responsibilities. This service-oriented architecture ensures efficient and secure backup and recovery processes. Here’s a breakdown of the running services within the application:
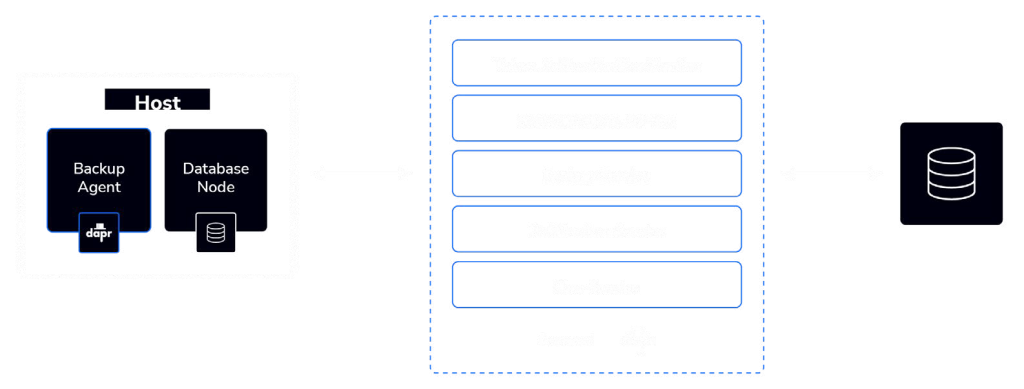
Backup agents:
These agents run on the database nodes and are equipped with a Dapr sidecar. Their primary role is to perform backups and restores of the database. They also handle the uploading and downloading of data to and from cloud object storage.
Token authentication service:**
The Token Authentication Service is responsible for authentication and authorization across the platform. It verifies the USER_TOKEN for a specific end-user and generates a unique AGENT_TOKEN for agent services to use in subsequent requests on the platform.
Configurations service
The Configurations Service manages service configurations, which may include credentials, license keys, and other settings. Additionally, it handles the reporting of agent and service states, providing a central location for managing and monitoring configurations.
Backup service
The Backup Service is dedicated to managing backup jobs, creating backup records, storing logs, and reporting backup progress. It plays a central role in the backup and recovery process.
Notification service
The Notification Service is responsible for providing notifications, which can be delivered through various channels, such as email or incident management services like PagerDuty. These notifications are essential for keeping stakeholders informed about the status of backup operations and other critical events.
User service
The User Service focuses on authenticating agent and service access for users of the platform. It validates the USER_TOKEN, ensuring that only authorized users can interact with the platform’s services and resources.
This service architecture demonstrates a clear separation of concerns, which is crucial for efficient and secure backup and recovery operations. Each service is responsible for its specific domain, ensuring that tasks are performed reliably and securely.
The design of the backup application’s services promotes scalability, maintainability, and the ability to expand or adapt to evolving backup and recovery requirements.
Backup agent initialization and registration
The co-location of an agent with the database nodes at provision time, along with the exchange of essential information during the initialization and registration phase, sets the foundation for the backup agent’s effective operation within the platform. Here’s an overview of the information received by the backup agent during this phase:
AGENT_TOKEN
The AGENT_TOKEN is a unique token generated by the Token Authentication Service during the agent’s registration. This token serves as the agent’s identity and is used for subsequent requests to the platform. It ensures that the agent has authenticated access and authorization to perform specific tasks within the platform.
Backup job configuration
The backup agent receives the backup job configuration, which includes the parameters and settings necessary to perform backup operations. This configuration outlines details such as what data to back up, backup schedules, retention policies, and any additional specifications related to the backup process.
Database credentials
Database credentials are critical for the backup agent to establish a connection to the database nodes. These credentials typically include information like database usernames, passwords, connection strings, and any other necessary details to access the database. They are essential for performing database backups and restores securely.
Cloud credentials
Cloud credentials are required for the backup agent to interact with cloud object storage. These credentials include access keys, secret keys, or other authentication tokens specific to the cloud storage service being used. They enable the agent to upload and download backup data to and from cloud storage efficiently and securely.
The receipt of these components during the initialization and registration phase equips the backup agent with the necessary tools and access rights to perform its role effectively. With the AGENT_TOKEN, it can authenticate its requests to other platform services. The backup job configuration guides the agent in executing scheduled backups and ensuring data protection. Database credentials enable database access, while cloud credentials enable seamless interaction with cloud storage.
This approach ensures that the backup agent has the essential resources and permissions to fulfill its responsibilities in securely backing up and restoring data within the platform.
The backup process
The backup process carried out by the agent is a crucial component of a data protection strategy. Here’s an outline of the steps involved in executing a backup job:
Authentication with database node
The agent begins the backup job by authenticating itself with the database node using the database credentials obtained during the initialization and registration phase. This ensures that the agent has the necessary access rights to perform backup operations.
Running the backup
With a successful authentication, the agent proceeds to run the backup using the backup tool specified in the configuration. The type of backup (e.g., full, incremental, differential) is defined in the configuration and guides the backup process. The agent initiates the backup process, capturing the required data.
Storing the backup
Once the backup is completed, the agent stores the backup in designated destinations. These destinations can include both local storage, typically on the same database node, and cloud storage. Storing backups in multiple locations enhances data redundancy and recovery options.
Reporting backup progress
The agent periodically reports the progress of the backup job at intervals. These progress reports help keep stakeholders informed about the status of the backup operation, making it easier to monitor and manage the process.
Uploading backup logs
In addition to reporting progress, the agent uploads backup logs. These logs contain detailed information about the backup process, including any issues or errors encountered. This data is invaluable for troubleshooting and auditing purposes.
Reporting success or failure
At the conclusion of the backup job, the agent reports whether the job was successful or encountered any failures. This status report is crucial for identifying issues and ensuring the integrity of the backup process.
A significant outcome of the backup job is the creation of a backup record. This metadata contains essential information about the backup, such as its creation timestamp, included data, storage locations, and relevant configuration settings. Backup records play a pivotal role in tracking and managing backups over time. They provide the means to locate and restore data when needed, serving as a vital component of data recovery and maintenance efforts.
By following this structured backup process and maintaining backup records, your organization can ensure the security and recoverability of critical data, safeguarding against data loss and system failures.
The specific contents of a backup record can vary depending on what your requirements are but common elements may include:
Backup set ID
An identifier that can be used to group different backups as one set, e.g., a full with a number of incremental backups.
Backup ID
A unique identifier for the backup, which is used to distinguish between different backups.
Node ID
A unique identifier for the database node where this backup was taken on.
Cluster ID
A unique identifier for the database cluster where this backup was taken on.
Database credentials ID
A unique identifier for the database credentials that were used.
Cloud credentials ID
A unique identifier for the cloud credentials that were used.
Timestamp
The date and time when the backup was created.
Schemas
A list schemas that have been backed up, e.g., ‘all’ or individual schema names for partial/differentials.
Data directory
The path of the database node’s data directory.
Storage location
The location where the backup is stored, e.g., a cloud storage like ’s3://production/backups’ or a directory folder for local storage.
Backup name
A name of the backup file.
Backup type
Indication of whether the backup is a full backup, incremental backup, differential backup, or another type.
Backup method
The backup method/tool used for the backup.
Backup method configuration
Information about the parameters/configuration used with the backup tool.
Backup size
The size of the backup in terms of data volume. This information helps in estimating storage requirements and monitoring backup growth.
Backup status
Information about the success or failure of the backup operation, including any error messages or warnings.
Backup duration
The duration of the backup operation.
Retention policy
The duration for which the backup should be retained before it can be safely deleted or overwritten by newer backups.
Backup schedule
If the backup is part of a regular schedule, the record may include information about the backup frequency and timing.
Backup user
The user who created the backup.
Description
General information about the backup job, e.g., daily full backup of production database.
Incorporating the Autopilot pattern into the backup agent’s functionality enhances the system’s reliability and automation capabilities, particularly with respect to database management and high availability. Here’s how the Autopilot pattern can benefit a backup agent and the database infrastructure:
Role awareness
Capability to discern the role of a database node (primary vs. replica) without manual intervention. This role awareness is crucial for orchestrating backups effectively. For instance, you can configure backups to be taken only on replica nodes to minimize the impact on the primary database’s performance.
Service discovery
Automatically locate and connect to the appropriate database nodes, simplifying configuration and improving flexibility.
Replication topology awareness
Understanding the replication topology within the database cluster is essential for backup strategies. Be aware of the replication setup, making it easier to ensure that backups are executed in a way that aligns with specific requirements like taking backups on the least lagging replica for example.
Automated failover and recovery
Streamlines the failover and recovery processes. In the event of a primary node failure, trigger automatic failover to a replica, ensuring minimal downtime and data loss. This is especially critical for maintaining data integrity and continuity.
Decentralized control
Unlike the Kubernetes Operators, it operates without relying on a centralized control plane. This decentralized approach is advantageous in terms of scalability, reliability, and robustness.
External tools integration
Additionally, external solutions like MySQL Orchestrator or ClusterControl can complement the ‘Autopilot pattern’ by providing automated failover support and more advanced features. Integrating both solutions can further enhance a database cluster’s stability and automation capabilities.
The combination of the Autopilot pattern, service discovery, role awareness, and automation features like failover and recovery aligns well with modern approaches to database management in distributed systems. It simplifies the administration of databases, improves service resilience, and facilitates more effective backup strategies, making your platform more robust and self-sufficient.
Restoring backups
Restoring backups, combined with the structure of an API gateway and client interaction, provides an efficient and user-friendly means of data recovery. Here’s how the process works:
Backup record retrieval
Users, typically through a UI, can search and locate a specific backup record containing details about a previously performed backup. This record includes information such as when the backup was taken, the backup type, and the method used for the backup. These details are crucial for identifying the appropriate backup to restore.
Restoration request
Once a suitable backup record is identified, users can initiate a restoration request. This request is processed through the UI and subsequently passed to the API gateway.
API gateway
The API gateway serves as the front end for API requests, offering several key functions:
- Enforcing Throttling: It can limit the rate at which requests are processed, preventing overloads and ensuring fair resource allocation.
- Security Policies: The gateway can enforce security policies, verifying that the user initiating the restoration request has the necessary permissions.
- Request Routing: It routes the request to the appropriate backend service responsible for restoration.
Backend services
The API gateway aggregates and directs the request to backend services that specialize in the restoration process. These services can interact with the backup agent and manage the complex task of actually restoring the data.
Restoration process
The restoration process itself, which involves interacting with the backup agent, may include steps such as determining the appropriate backup file, coordinating with the backup agent to initiate the restoration, and monitoring the process to ensure its successful completion.
This is highly effective as it abstracts the complexity of the restoration process from end-users and centralizes it within the backend services and the backup agent. Users interact with a user-friendly UI to initiate the restoration, while the API gateway ensures that the request is handled securely and efficiently by directing it to the appropriate services. The backup agent’s intrinsic knowledge of how to restore backups is utilized to ensure data integrity and successful recovery.
The clear separation of concerns in this approach simplifies the user experience, enhances security, and promotes robust data recovery capabilities within your platform.
Key functions of an API gateway may include:
Request routing
It receives incoming API requests and routes them to the appropriate service based on a defined set of rules. This routing can be based on the URL, HTTP headers, or other parameters.
Load balancing
API gateways can distribute incoming requests across multiple instances of a microservice to ensure high availability, fault tolerance, and optimal performance.
Authentication and authorization
They enforce authentication and authorization checks, ensuring that only authorized users or systems can access specific APIs. This can include token validation, OAuth integration, or other authentication mechanisms.
Rate limiting and throttling
API gateways control the rate at which clients can make requests to prevent abuse and ensure fair usage of resources.
Caching
They can cache API responses to reduce the load on backend services and improve response times.
Response compression
API gateways can compress API responses before sending them to clients, reducing bandwidth usage and improving latency.
Request/response transformation
They can modify request and response payloads, headers, or other parts of the communication, allowing clients to receive data in a format they expect or converting requests into a format that backend services can handle.
Logging and monitoring
API gateways can log request and response data, making it easier to diagnose issues and monitor API usage. They may also integrate with monitoring and analytics tools.
Security
API gateways often provide an additional layer of security by protecting against common web application threats, such as SQL injection and cross-site scripting (XSS).
Analytics and reporting
They can collect data on API usage, including traffic patterns, response times, and error rates, which can be used for reporting and performance optimization
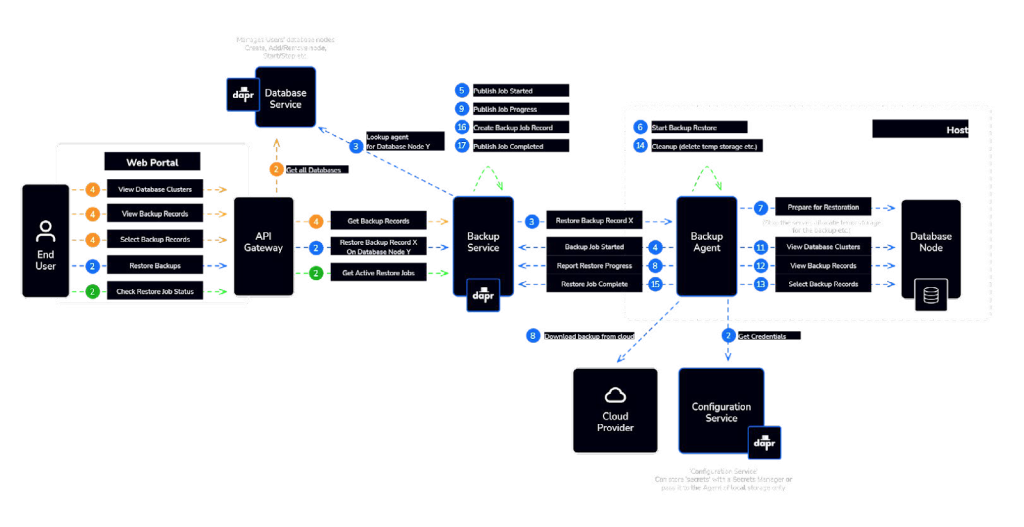
The use of a web portal to facilitate backup restoration by end users provides a user-friendly and intuitive interface for initiating the restore process. Here’s how this process typically unfolds:
User login
An end user accesses a web portal and logs in, using their credentials to authenticate and gain access to the platform.
Backup selection
Within the web portal, the user interacts with a user interface that allows them to select a specific backup they wish to restore. This selection is typically made based on information contained in backup records, such as the timestamp, type, and method of the backup.
Restore job creation
Once the user has chosen a backup to restore, a restore job is created. This job is associated with the selected backup record, effectively specifying the data to be restored.
Initiating restore
The restore job invokes the ‘restore’ endpoint on the ‘Backup Agent’ that is running on the target node where the restoration is to be performed.
Backup agent Interaction
The ‘Backup Agent’ on the node receives the restore job request. It leverages its knowledge and capabilities to restore the selected backup. This process may involve tasks such as locating the appropriate backup files, ensuring data consistency, and executing the restoration.
Monitoring and reporting
Throughout the restoration process, monitoring and reporting mechanisms can be in place to track the progress and status of the operation. This information can be relayed back to the web portal for user visibility.
Completion and confirmation
Once the restoration is completed, the user is typically provided with a confirmation of the successful restoration. This confirmation ensures that the user is aware of the outcome.
The use of a web portal simplifies the restoration process for end users, allowing them to navigate and select backups with ease. The initiation of the restore job, along with the subsequent interaction with the ‘Backup Agent,’ is abstracted from the end user, ensuring that the complexities of the restoration process are handled seamlessly and reliably.
The ‘Backup Agent’ serves a dual purpose as it can also function as a command-line client directly on the host for backup restoration. For instructions on how to perform this task, you can access the web portal, click on a specific backup record, and choose the “manual restore” option, for instance.
# Create working directory
$ mkdir restore-backup && cd restore-backup

# Get the backup
$ backupagent get-backup-with-id 2304 -o mariabackup_all_202310121100.xbstream

# Restore into a new directory first
$ mkdir basebackup
$ cat mariabackup_all_202310121100.xbstream | mbstream -x -C basebackup

# Perform recovery on the backup files
$ mariabackup --prepare --target-dir=basebackup

# Stop the database service and erase the data directory content
$ mysqladmin -uroot -p shutdown

# If you have a binary logs enabled and stored in /var/lib/mysql then move them prior to erasing the data directory
# The binary logs are required if you want to perform PITR after the backup has been restored
$ rm -rf /var/lib/mysql/*

# Restore the backup following the steps outlined below
# Move (--move-back) or copy (--copy-back) the files into the directory
$ mariabackup --copy-back --target-dir=basebackup --datadir=/var/lib/mysql

# Change data directory owner to mysql
$ chown -R mysq:mysql /var/lib/mysql

# Start the database service
$ systemctl start mariadb
The manual steps described are essentially automated when an end user chooses to perform an automatic backup restore from the web portal.
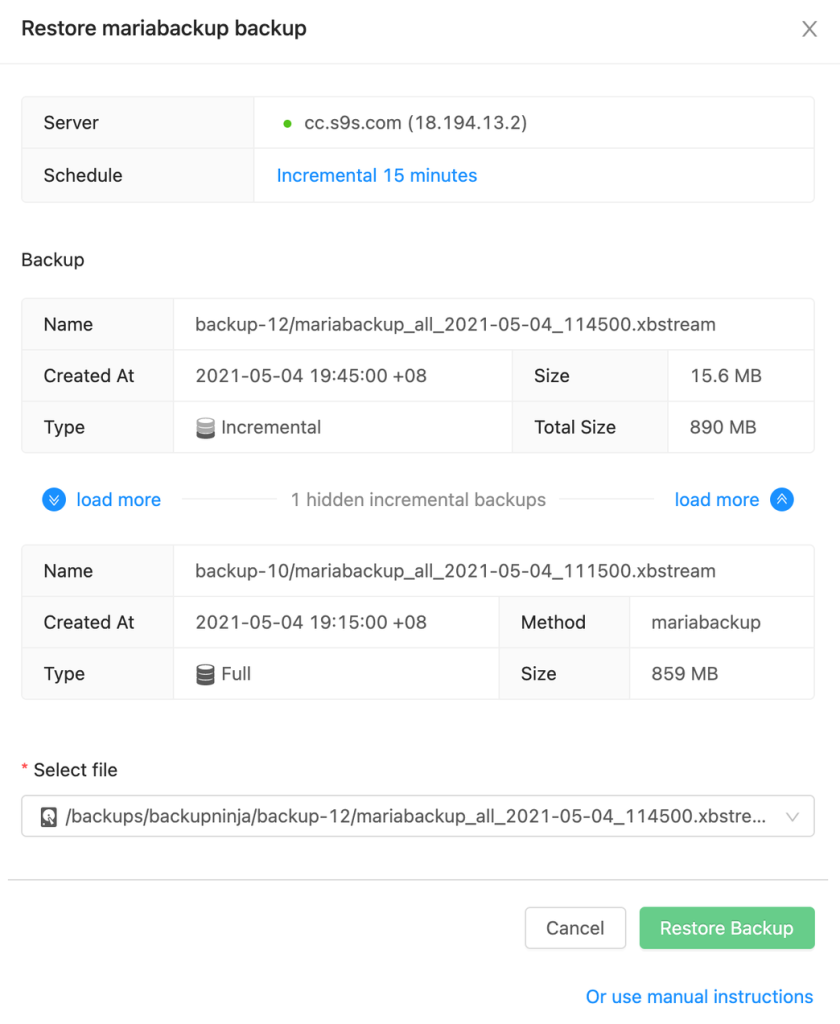
Verifying backups
Backup verification is the process of confirming that the data contained in backups is accurate, complete, and can be successfully restored when needed. This verification is a critical component of any data backup and recovery strategy to ensure that backups are reliable and can be relied upon in the event of data loss or disasters.
Checksums and cryptographic hashes, such as MD5, SHA-256, and SHA-3, can be employed to generate unique codes for backup files. By comparing these checksums or hashes with backup copies, for example those stored in cloud storage, you can validate the integrity of the data. When they match, it provides a strong indication that the data is unaltered and remains in its original, undamaged state.
One of the most effective ways to verify a backup is to periodically perform test restores. This involves selecting a backup and attempting to restore it on a newly created database node to ensure it can be successfully recovered. Testing restores for large datasets in the 100s GB range can be time-consuming and resource-intensive. In such cases, it may not always be practical to perform full test restores.
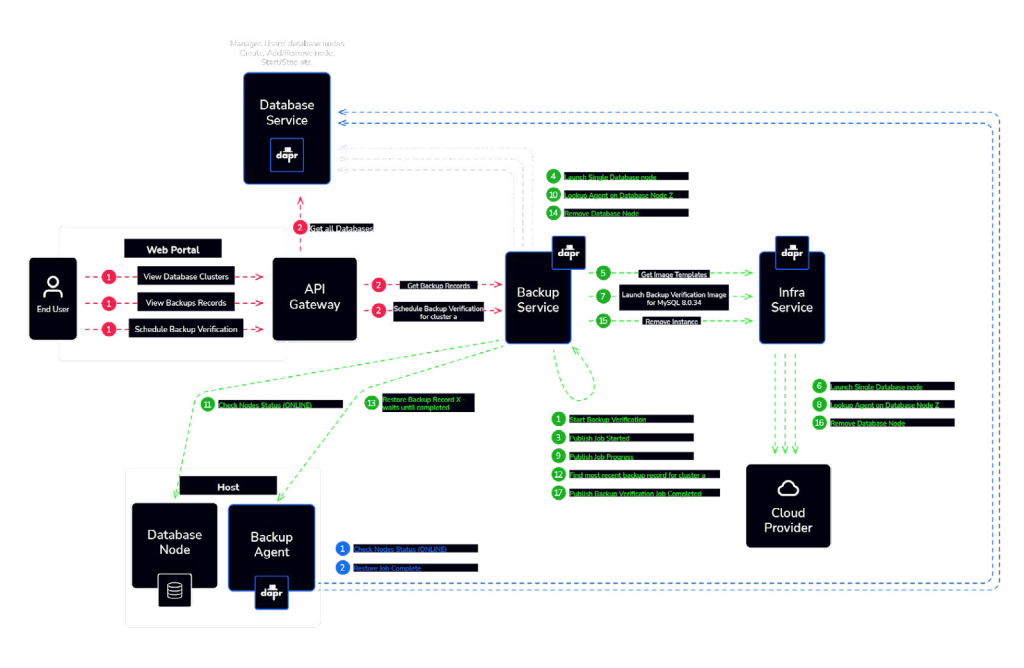
Op 5 — Scaling
Scaling a database is the process of adding or removing database nodes to increase or decrease the capacity and performance of a database system. This is a fundamental operation in managing the performance and capacity of a database to meet the demands of applications and users. Database node scaling can be categorized into two primary approaches:
- Vertical scaling (up-scaling)
- This involves adding more resources (such as CPU, RAM, or storage) to an existing database node to enhance its performance. It typically involves upgrading the hardware of the database server or adjusting the virtual machine (VM) resources in a cloud-based environment. Vertical scaling is a straightforward way to handle increased workloads up to the limits of the hardware or cloud VM configuration.
- Key benefits of vertical scaling:
- Relatively simple to implement.
- No significant changes to the database architecture or application code required.
- Immediate performance improvement.
- Limitations of vertical scaling:
- Eventually, hardware limitations may be reached, limiting further scalability
- Can be costly if hardware upgrades are frequent.
- Key benefits of vertical scaling:
- This involves adding more resources (such as CPU, RAM, or storage) to an existing database node to enhance its performance. It typically involves upgrading the hardware of the database server or adjusting the virtual machine (VM) resources in a cloud-based environment. Vertical scaling is a straightforward way to handle increased workloads up to the limits of the hardware or cloud VM configuration.
- Horizontal scaling (out-scaling)
- In horizontal scaling, additional database nodes (servers) are added to distribute the workload across multiple instances. This approach is often used in distributed databases or database clusters to improve both capacity and performance.
- Key benefits of horizontal scaling:
- Improved scalability since new nodes can be added as needed.
- Load distribution helps prevent overburdening a single node, improving reliability.
- Enhanced fault tolerance since the failure of one node doesn’t lead to complete downtime.
- Limitations of horizontal scaling:
- Requires database sharding or partitioning to distribute data effectively.
- May necessitate more complex application design to work with a distributed database.
- Initial setup and maintenance of a cluster can be more challenging.
- Key benefits of horizontal scaling:
- In horizontal scaling, additional database nodes (servers) are added to distribute the workload across multiple instances. This approach is often used in distributed databases or database clusters to improve both capacity and performance.
Scaling a database is a critical consideration for organizations that experience fluctuating workloads or expect their data storage and processing needs to grow over time. The choice between vertical and horizontal scaling depends on the specific use case, budget, and existing infrastructure. In many cases, a combination of vertical and horizontal scaling, known as “elastic scaling,” is used to optimize database performance and capacity based on demand.
Horizontal scaling operations are initiated by the ‘Database Service,’ which, in turn, requests a new resource from the ‘Infrastructure Service’ using the same image template employed by the other nodes in the cluster.
A new node is configured for the cluster by using the ‘cluster name’ and the ‘autopilot pattern’ simplifies the process of adding more replicas due to the streamlined manner in which nodes are initialized.
Op 6 — Upgrades and patching
To manage upgrades and patching effectively, an additional agent can be employed. This agent is responsible for monitoring a set of software packages, periodically updating the software repository on the host, and comparing newly available versions with the installed packages. This ensures that the latest patches and updates are applied to maintain the security and stability of the database and other agents.
Here are some key points to consider in this regard:
Patch management
Database vendors regularly release critical patch updates to address software bugs, vulnerabilities, and security issues. Keeping the database software up to date is crucial for protecting against known threats. The patch management process may involve cluster upgrades, but these can often be executed without requiring database downtime.
Agent updates
The agents responsible for managing the database also require updates to address bugs, improve functionality, and enhance security. Keeping these agents up to date with upgrades and fixes is vital to ensure that they can effectively monitor and manage the database.
Rolling upgrades
When performing upgrades, particularly in a clustered environment, a common approach is to execute rolling upgrades. In a rolling upgrade, one node at a time is taken offline, patched with software updates, and then brought back online. This approach minimizes downtime and allows for the gradual application of upgrades.
Fallback mechanism
In the event of an unsuccessful upgrade on a node, it’s essential to have a well-defined fallback mechanism. This mechanism involves rolling back the changes to the previous state, ensuring that the database remains operational and secure.
By implementing these measures, you can enhance the security and reliability of your database system, ensuring that it remains resilient against emerging threats and vulnerabilities. Continuous monitoring, proactive patch management, and a well-structured upgrade process are essential components of a robust and secure database infrastructure.
Op 7 — Access control and multi-tenancy
Data is a critical asset, and it’s essential to integrate strong access control and multi-tenancy features within a database service because they ensure data security, resource efficiency, and the ability to meet diverse operational needs while complying with national and international regulations and organizational governance.
Here are some key considerations in the context of access control and multi-tenancy:
Access control
User authentication
Ensuring that data access is restricted to authorized users involves implementing robust authentication mechanisms. These may include traditional methods like username and password, advanced security with multi-factor authentication, or seamless integration with enterprise identity management systems.
Role-based access control (RBAC)
A well-established framework for managing access to services. Administrators assign specific roles to users or groups, thereby defining what operations (e.g., read, write, execute) they are permitted to perform.
Data-level access control
In scenarios involving multiple tenants, data-level access control becomes indispensable. This approach ensures that users can only interact with data they have explicit permission to access, thus mitigating the risk of unauthorized data exposure or manipulation.
Audit trails
Detailed audit logs, meticulously recording who accessed the data, their actions, and timestamps, play a pivotal role in security monitoring and compliance. These logs offer insights into the system’s integrity and any irregularities that may arise.
Multi-tenancy
Isolation
Logical or physical separation of data and configurations for various organizational units or tenants. This isolation prevents potential issues related to cross-tenant data exposure and conflicts.
Resource segregation
Multi-tenancy extends to the effective allocation of computing resources, encompassing CPU, memory, and storage. This practice ensures that each tenant enjoys equitable and predictable performance, regardless of the shared environment.
Customization
Acknowledging the unique needs of different tenants, multi-tenant database services should offer flexibility for tenant-specific configurations, schema adjustments, and access policies. This adaptability caters to the diversity of requirements among tenants.
Scaling
As the IT organization grows, the services must demonstrate the capability to seamlessly scale to accommodate additional tenants and the accompanying surge in data volumes. Scalability is paramount to preserving consistent performance.
Efficiency
A shared resource model contributes to cost efficiency. It enables multiple tenants to pool and share resources, resulting in cost savings in both hardware and operational expenses, as opposed to maintaining separate databases for each tenant.
Multi-tenancy presents several challenges, making it a complex aspect of software design and management. By opting for Kubernetes as our runtime environment for our platform, we gain access to various features, such as namespaces, which can be utilized for multi-tenancy.
Namespace isolation is the practice of allocating a separate namespace to each tenant, and it can be categorized into two distinct implementations:
Soft multi-tenancy
This approach is typically used in scenarios where there’s a high level of trust among all the tenants in your cluster. It’s commonly applied when a cluster is shared among various teams or departments within a single organization. Soft multi-tenancy is relatively easy to implement because it relies on trust as its core principle, and there’s a minimal need for stringent restrictions.
Hard multi-tenancy
In contrast, hard multi-tenancy involves imposing multiple restrictions and consequently comes with several limitations. While soft multi-tenancy is straightforward to implement, hard multi-tenancy is often considered the best practice. It’s suitable for situations where trust levels vary, and a high level of separation is necessary.
Within a hard multi-tenancy framework, networking rules must be defined to prevent communication between namespaces. Permissions must be configured with precision and a strict approach. Essentially, all aspects of the Kubernetes cluster need to be meticulously organized within namespaces.
However, it’s worth noting that implementing hard multi-tenancy does present its own set of challenges.
Implementing multi-tenancy from the ground up is a challenging task that demands substantial effort, time, and precision to achieve the desired results accurately.
As an alternative, our platform is adopting a third party open-source solution, for example vCluster, which is introducing the concept of virtual clusters.
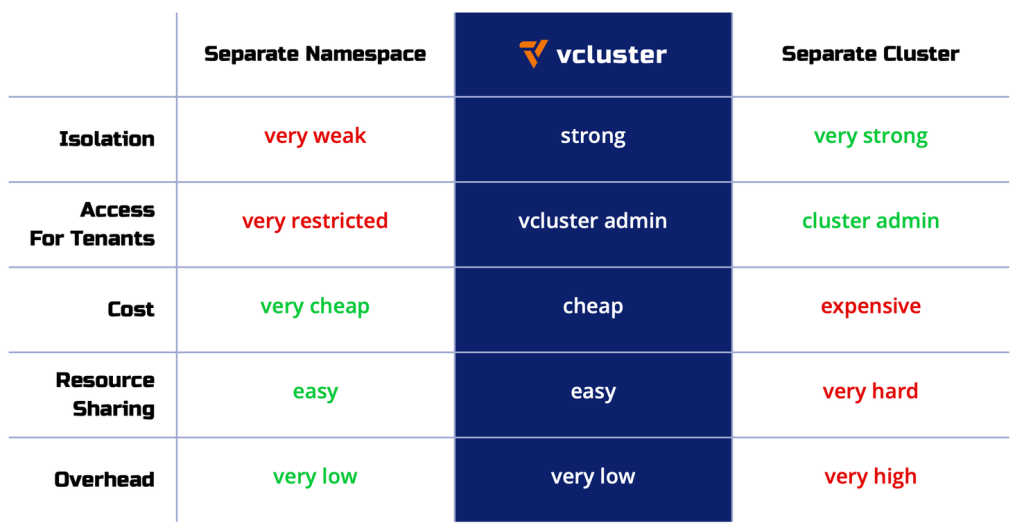
The data plane, i.e., the database nodes will operate on a non-shared model. In this setup each tenant is assigned their own dedicated set of virtual machines, ensuring that resources are not shared with other tenants
The control plane and all other related services for each tenant operate within their respective, independent virtual clusters.
Op 8 — data migration
Data migration to another environment such as a public cloud is a process of moving data and workloads from one environment to another. This may be done for various reasons, such as cost optimization, improved performance, compliance requirements, or to take advantage of specific services or features offered by a new cloud provider.
There are two methods for migrating a database: live migration, which allows the database to continue operating during the migration, or an offline migration during a maintenance window where changes to the database are temporarily halted.
A live migration is a complex operation and typically includes establishing replication between two database clusters. The new database cluster is initially restored from the most recent backup taken on the original database cluster before replication is configured between them.
During the transition phase when switching to the new database cluster, read traffic can be directed to both database clusters. At a certain point, write traffic is halted on the original database cluster. Wait until the replication on the new database cluster catches up before finalizing the transition.
An offline migration is simpler because it depends on a clearly defined maintenance window during which no changes are permitted in the original database cluster. Once the maintenance window has begun and all changes are completed, a backup is created on the original database cluster, which is then used to seed a database cluster in the new environment.
In our platform, offline migration is a straightforward process. A new cluster is created where the initial primary node is seeded with the most recent backup from the original cluster in the preStart phase.
You now understand essential DBaaS elements and core principles, the Day 2 ops framework, and how to build your DBaaS according to the 8 essential operational routines. But, what does the high-level architecture actually look like and what core services are needed to bring it to life?
Bringing Day 2 ops to life: A provisional architecture
As mentioned earlier, your DBaaS should be built around a services architecture that is based on essential operational routines that you will carry out from Day 2 and beyond.
Core services:
API gateway
The front end for API requests, it routes the request to the appropriate backend service responsible for restoration.
Databases
Provides access to database related functionality such as creating, starting, scaling, and deleting databases.
Configurations
Provides configurations, credentials, settings for services, agents and database nodes. Capability to utilize secrets management solutions such as AWS Secrets Manager, Vault, and various others.
Image / service catalog
Provides access to image repository related functionality to manage, store and access virtual machines images on public or private cloud. These images serve as a template to launch new virtual machines when creating and scaling databases.
Infrastructure
Provides access to cloud infrastructure provisioning such as creating, updating and terminating virtual machines and other key resources on public or private clouds.
Storage
Provides access to cloud storage-related functionality for storing, managing, and accessing files stored on both public and private cloud providers. It includes the capability to manage volumes and object storage.
Notifications
Generates and delivers notifications and alerts in various forms like emails, push notifications etc. Capability to utilize incident management solutions such as OpsGenie, PagerDuty, ServiceNow and more.
Backups
Provides access to backup and restore related functionality such as scheduling and restoring backups.
Upgrades
Provides access to software upgrade related functionally for agents and database nodes. Maintains a record of currently installed and newly available versions of agents and database packages.
User IAM (identity and access management)
Provides Authentication and Authorization with Role based access using for example LDAP authentication and OAuth authorization services — generates and manages USER_TOKEN for authentication and authorization.
Users
Provides access to user-related functionality such as creating, updating and deleting user accounts.
Agents
Provides access to agent-related functionality such as creating, updating and deleting agents associated with a User.
Agent IAM / token authentication
Generates and manages AGENT_TOKEN for authentication and authorization.
At this point, you have a detailed blueprint, operational guidelines, and a provisional services architecture that you can use to bring your Sovereign DBaaS to life. Your individual decisions, including whether you want to build everything alone or include off-the-shelf components, will depend on your team’s capabilities and business requirements. Most often, the latter scenario is most practical. To that end, we will show you how using Severalnines solutions as your orchestration layer would look like.
*A note on tool selection
There are a plethora of tools available for every component in your stack. When considering tools and components of your system, it is vital to understand the importance of each component and the plans that may need to be put in place to ensure its usage. When looking at open-source options, you need to consider how robust the project is and plan for license changes. A prime example of the latter is Elasticsearch.
Their license change in 2021 was put in place to limit competing service providers to sell the open-source offering of Elasticsearch. Largely, this did not affect users of Elasticsearch running it in their own environments. But for some users, changes to those tools broke environments or restricted their use; causing costs and, in some cases, forcing migrations to alternatives.
Section III: Abstracting the orchestration layer with Severalnines solutions
By this point in the guide you’ve seen how building a DBaaS solution for your organization can be a complex and time-consuming process. Implementing a Sovereign DBaaS is not a question of yes or no but a question of degree. For instance, it is not feasible or even preferable to build everything on your own; luckily, you don’t have to.
As the heart of the DBaaS, the orchestration layer needs to be efficient, robust and reliable. As such, it is an area where you might want to consider bringing in a purpose-built tool. The caveat? It needs to be easily interchangeable and not tightly coupled to your databases — to highlight what this might look like in practice, we’ll use our own tools to illustrate. After all, we’ve spent the last 12 years building and refining tools to provide the benefits of database ops automation / orchestration and control.
First, we’ll introduce ClusterControl, Severalnines’ original VM-based solutions, and CCX Sovereign, our solution to the next generation of DBaaS; bringing the features of ClusterControl to a cloud-native solution that can be installed on any Kubernetes cluster. Lastly, we’ll give you a rubric for choosing the best tool for your use case.
ClusterControl: DB Ops automated, just add VMs
ClusterControl is downloadable automation software that empowers users to efficiently execute end-to-end database operations with minimal intervention. While ClusterControl is not a DBaaS itself, it can help simplify the process of building your own DBaaS while ensuring that you retain complete control over database infrastructure.
With ClusterControl acting as the control plan, you can seamlessly deploy both open-source and proprietary databases on-premises, in the cloud, or in hybrid settings, and automate their lifecycle operations as a private DBaaS while retaining full control.
ClusterControl operational features
ClusterControl brings together an extensive range of operations, offering a complete DBaaS experience that adapts to any environment.
Hybrid operations
With ClusterControl, you can efficiently operate your databases in any environment, whether on-premises, in the cloud, or both, using a single, unified interface.
Deployment
Easily launch high-availability clusters and load balancers with just one click, streamlining your infrastructure setup and reducing deployment time.
Security
ClusterControl allows you to effortlessly configure database settings, access control, and encryption for data at rest and in transit, ensuring a secure environment for your data.
Backup & restore
Protect your data integrity with ClusterControl’s automated, verified backups and point-in-time recovery, minimizing data loss risks and ensuring business continuity.
Scaling
Adapt your cluster to meet fluctuating demands by scaling up or down as needed with ClusterControl’s flexible scaling options.
Failover
Trust ClusterControl’s automated failover technology to maintain high availability and eliminate downtime, keeping your database operations running smoothly.
Monitoring
Gain insights into your database infrastructure with ClusterControl’s customizable dashboards and real-time alerts, allowing you to proactively address potential issues.
Integration
ClusterControl integrates seamlessly with popular tools and platforms, making it simple to incorporate into your existing workflows and processes.
Upgrades
ClusterControl helps reduce maintenance overhead by automating updates and patches, ensuring your database systems stay current with the latest improvements and security enhancements.
Management
Efficiently manage your database configurations and performance using
ClusterControl’s battle-tested, editable templates and granular monitoring features. This makes it easy to optimize your databases and maintain peak performance.
Reporting
ClusterControl provides comprehensive operational reports on the health and stability of your database operations, giving you valuable insights and enabling data-driven decision-making.
DevOps tools
With CLI, API, and GUI options, ClusterControl offers a versatile interface that caters to your preferred methods of interaction. This flexibility allows you to seamlessly integrate ClusterControl into your DevOps workflows.
Features highlight: Security
ClusterControl provides many advanced features to ensure your data is secure, including database encryption and advanced user management.
Role-based access control
Through its advanced user management system, ClusterControl ensures that only authorized team members have direct access to the database. It restricts access to configuration files exclusively to root-level users, enhancing the security of your database infrastructure.
Single sign-on integration
ClusterControl seamlessly integrates with major single sign-on systems such as LDAP and Active Directory, providing an additional layer of security and control over user access to the database.
Operational security
Ensuring compliance with database Operational Security Processes can be challenging, but ClusterControl offers reporting and auditing tools to help you maintain compliance with industry standards or your organization’s specific requirements.
Change logging / audit logging
ClusterControl logs all user activities performed while administering databases through the platform, allowing you to monitor actions and maintain compliance more effectively.
End-to-end encryption
With ClusterControl, your data remains secure with TLS encryption both in transit and at rest. This end-to-end encryption ensures that sensitive information stays protected from unauthorized access.
ClusterControl architecture
Overview
ClusterControl’s architecture is lightweight, consisting of various components, including an end-user web-based portal, a command-line client, a controller for managing and monitoring database clusters, and several services for integration, alerting / notifications. By leveraging agentless monitoring, it requires no additional software installation on nodes other than SSH connectivity, installation quick and straightforward.
Additionally, the platform offers command-line and RPC (Remote Procedure Call) APIs, which seamlessly integrate with widely-used configuration management software like Ansible and Terraform. These integrations enable users to combine their expertise in these tools with ClusterControl’s “headless” options to create a fully automated private database management service tailored to their organization’s needs.
ClusterControl can be deployed in various production environments, including local data centers, running on the same private subnet as the database nodes, in air-gapped environments, or the cloud. It supports physical servers or virtual machines provisioned using solutions like VMware or Nutanix, ensuring flexible infrastructure management.
ClusterControl is also compatible with Virtual Private Networks (VPNs), allowing it to manage clusters and nodes across local data centers, private or public clouds as if they were all part of the same private network. This ensures all traffic is encrypted and secure, no matter where the nodes are physically located.
Components
| Component | Role |
| ClusterControl Controller (cmon) | The brain of ClusterControl. A backend service performing automation, management, monitoring, and scheduling tasks. All the collected data will be stored directly inside the CMON database. |
| ClusterControl GUI | A web-based graphical user interface (GUI) to visualize and manage the clusters provisioned by ClusterControl. It interacts with the CMON controller via remote procedure calls (RPC). |
| ClusterControl SSH | Optional module for web SSH console via WebSocket. It only works with Apache 2.4+. |
| ClusterControl Notifications | Optional module for integration to third-party messaging, notification and incident management services. |
| ClusterControl Cloud | Optional module for integration with cloud providers. |
| ClusterControl Cloud File Manager | Optional module to interact with storage objects on the cloud, with dependency on clustercontrol-cloud package. Primarily used to store backups in S3-compatible storage |
| ClusterControl CLI | A command-line interface (CLI) to manage and monitor clusters provisioned by ClusterControl. It interacts with the CMON controller via remote procedure calls (RPC). |
Use case highlight: ABSA
Serving 12 countries, ABSA Group Limited is one of Africa’s largest diversified financial service groups. In 2017, they began a digital transformation in an effort to reduce costs and gain greater sovereignty over their data and the infrastructure that supports it.
The core motion of this effort was migrating away from a proprietary stack that included Oracle, SQL Server, and DB2 to open-source one with MySQL, MariaDB, PostgreSQL, MongoDB and Redis — a key question revolved around lifecycle management.
Specifically, they needed a platform that could handle the operational lifecycle of their complex polyglot estate across environments. Thus, they chose the interdependent route and cast about for a ready-made solution to serve their requirements.
That search proved difficult; there are few portable, full-spectrum solutions available. But there is ClusterControl, which they were able to successfully build an internal hybrid DBaaS around to orchestrate the operations of their 3000+ instances.
Their Head of DBaaS, Kevin Naik, is concise, “ClusterControl enabled us to build automation around the platform for self-service provision while being able to determine the patterns of deployments consistently without DBA involvement.”
Read more about ABSA’s story on our website.
CCX Sovereign: Your DBaaS, in your cloud(s)
Built on top of the pressure-tested ClusterControl, CCX is ClusterControl for the cloud native world. CCX runs in any Kubernetes cluster and can be configured to work with your own infrastructure, OpenStack or public cloud providers, giving you true sovereignty over your data stack with a cloud-native experience.
CCX allows you to deploy, manage and monitor database clusters into configured clouds at a very competitive total cost of ownership (TCO). Deploy a database cluster in your configured cloud, then connect to the database cluster via multiple ways like VPC peering or public IP address with advanced traffic control.
Unlike traditional DBaaS solutions, CCX Sovereign lets you retain complete control and sovereignty over your database infrastructure by providing the functionality of a traditional DBaaS within your own infrastructure, a Control Plane that you own using your hardware and saving backups to your storage.
CCX Features
Supports hyperscalers, local clouds and private environments
CCX supports deploying to major hyperscalers like AWS, local cloud providers such as SafeSpring, and your own infrastructure using solutions Openstack.
Set and forget database deployments
Building upon the powerful ClusterControl platform, CCX offers fully managed, highly available SQL and NoSQL deployments that simplify database management.
Granular observability
CCX provides visibility into cluster performance down to the query level, enabling efficient troubleshooting and issue resolution. Metrics and logs for deployed databases, as well as CCX itself, can be pushed to your own Observability stack, as well as end users.
Automated backups
With CCX, full database backups are taken daily, and incremental backups are performed every 5 minutes, ensuring your data is secure and up-to-date.
Scaling and storage management
Scale your databases by adding read-replicas, increase the storage capacity or promote a new Primary.
Granular user management
CCX offers customizable access privileges, enabling you to determine the level of access each user has to your database, thereby ensuring better control and security.
Plug-and-play integrations
Integrate CCX effortlessly into your workflows using integrations with tools such as Terraform workflows. Your developers can use the UI or interface using the OpenAPI, as well as the CLI; CCX works how and where you work.
Security
CCX prioritizes security and offers a comprehensive set of features to ensure the protection and privacy of your data.
Stateful in a stateless world
By providing dedicated virtual machines (VMs) for your database instances, CCX reduces your attack surface by ensuring that deployments are isolated, configured and managed independently. Security updates, configuration and resource changes can be applied in isolation.
Encryption from source to destination
To protect your sensitive data from eavesdropping, CCX employs advanced encryption technology for communications between the client and the server. By using TLS encryption, CCX ensures that your data remains secure as it travels between points in the network.
Default configurations from experts, modifiable by you
CCX sits and runs on your network, interfacing with any resources that your Kubernetes cluster has access to; simplifying hybrid setups that utilize the power of solutions like Wireguard, as well as integrating with cloud provider solutions, like Amazon’s VPC peering or traditional VPNs.
CCX also employs advanced firewall rules by default to safeguard your data from network threats and unauthorized access. You can go a step further and create whitelists, granting specific IP addresses access to your databases, ensuring fine-grained control over who can access your data, further enhancing security.
CCX Cloud: From Severalnines, run by Severalnines
As well as the option to run your own DBaaS, using your own infrastructure, Severalnines offers CCX as a managed service, CCX Cloud. If you want the traditional DBaaS experience, with the expertise from decades of experience and support for regional cloud providers, CCX Cloud is the choice for you.
Choosing the correct solution for your use case
Choosing the optimal Severalnines solution primarily comes down to two differentiating factors, where you want your stack to fall on the control spectrum and your preferred deployment type. To the former, the rubric below can serve as a general rule of thumb:
- If you need “Full” control, choose ClusterControl.
- If you need “Some” control, choose CCX Sovereign.
- If you are okay with “Traditional DBaaS,” choose CCX Cloud.
Otherwise, the table below provides additional parameters, such as management level, to help you decide between implementing ClusterControl or CCX Sovereign or Cloud.
| ClusterControl | CCX Sovereign | CCX Cloud | |
| Deployment Types | On-premise, virtual machines, dedicated hardware | Openstack, on-premise, public cloud providers | Public cloud providers; global and regional |
| Control Level | Full | Some | Traditional DBaaS |
| Management Level | Assisted | Fully managed | Fully managed |
| Observability | Logs, Metrics, Alerts | Logs, Metrics, Alerts | Logs, Metrics, Alerts |
Lastly, never forget that you can always choose the other end of the spectrum, complete control, and exclude external tools. The point is to not prematurely focus on which tool you should choose over another, but to determine the implementation and its particulars according to your current needs while ensuring that you can adjust to future needs.
Wrapping up
Although not a trivial endeavor, creating your own DBaaS offers numerous benefits by allowing you to tailor your infrastructure and operational processes to your use case, weaving in the level of control necessary to determine what your database environment looks like and how it is run.
Whatever the leverage point you want to exploit, be it cost-effectiveness in the
hardware, software, and deployment options you choose, avoiding vendor lock-in, or extensibility to adapt to changing business needs, you will possess the freedom to build a data stack that is fit-for-purose.
What we’ve laid out is not a playbook or architecture to ape, but a helpful guide to help you rethink DBaaS as an implementation model and to understand that you have more choices than ever in determining what and how you want to build the core stack supporting your application. Now get to building!