blog
Migrating MySQL Galera Cluster to a New Data Center Without Downtime

Are you tired and frustrated with your hosting or cloud provider? Have you seen a constant degradation in service levels and responsiveness? Or was the public cloud a bit too expensive after all, and you’re ready to move everything to in-house servers? Welcome to the club. Data migrations are painful and scary. Running a migration with scheduled downtime is hard enough as it is, but for certain applications, a prolonged period of downtime is not acceptable. Without the right strategy, a migration might leave you with inconsistent or lost data, hours of downtime and a negative impact to your business. This is why it is so hard to switch hosting or cloud providers. Once your data is in somebody else’s infrastructure, they’ve got you by the balls.

We’ve had a number of users who moved their clusters between data centers, and we’d bet there are many more out there thinking about it. If you are using Galera Cluster, then a migration might not be that painful after all.
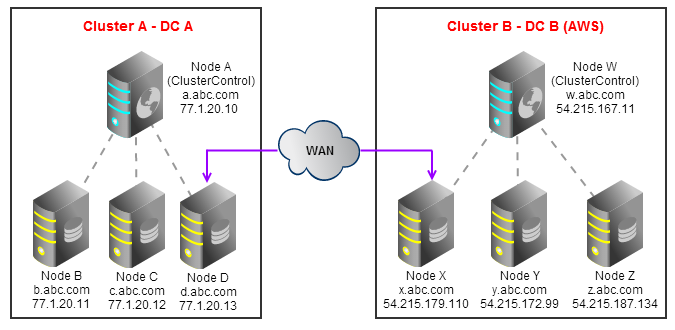
As you probably know by now, Galera allows for synchronous replication between data centers. Transient network connectivity failures are not uncommon in WANs, so you can tune the keepalive timeouts to avoid network partitioning. You can do this by increasing the evs.suspect_timeout, defined in my.cnf under wsrep_provider_options. It is also possible to have a new node sync up with a cluster via SST, so we will use this to move data from our existing cluster to a node in the new data center. The new node can then propagate the data to the rest of the new cluster. The diagram below shows our current Cluster A (in Data Center A) replicating with our new Cluster B (in Data Center B):

Live Migration Process
Here are the recommended steps to perform live migration with ClusterControl:
- Deploy node W, X, Y and Z in DC B.
- Disable auto recovery and restart ClusterControl service in node W.
- Shutdown MySQL Galera Cluster in node X, Y and Z using ClusterControl.
- Manually start MySQL Galera Cluster in node X to refer to node D.
- Manually start MySQL Galera Cluster in node Y and Z to refer to node X.
- Point your applications to Cluster B.
- Gracefully stop node B, C and D in Cluster A.
- Enable auto recovery and restart ClusterControl service in node W.
Step by Step – Migrating from a private data center to Amazon Cloud
Let’s have a closer look at the migration steps.
1. Deploy your Galera Cluster on AWS. For instructions, read this blog post on how to automatically deploy Galera.
2. Disable ClusterControl auto recovery in Cluster B. Log into node W and add following line into /etc/cmon.cnf:
enable_autorecovery=0Restart the cmon service to activate the configuration:
$ /etc/init.d/cmon restart3. Shutdown all the MySQL instances in Cluster B. It may takes a while until the server shuts down. You can monitor this in your ClusterControl UI under Jobs.
4. SSH into node X and start the MySQL service with following parameter:
$ service mysql start --wsrep-cluster-address=gcomm://77.1.20.13At this stage, it will perform SST and 77.1.20.13 will be read-only throughout the process. Once completed, you will notice in Cluster A, WSREP_CLUSTER_SIZE value is equal to 4. It indicates that node X has replicated the data and joined Cluster A.
At this point, data in node X has been overwritten. We need to re-GRANT the ‘cmon’ user. Log into node X and run following command:
mysql> GRANT ALL ON *.* TO 'cmon'@'54.215.167.11' IDENTIFIED BY 'cmon' WITH GRANT OPTION;5. Now we will start nodes Y and Z and specify node X as SST donor:
$ service mysql start --wsrep-cluster-address=gcomm://54.215.179.110 --wsrep-sst-donor=54.215.179.110Take note that in Cluster B, we are using rsync as the SST method. If you use wsrep_sst_method=xtrabackup or wsrep_sst_method=mysqldump, it requires that the new servers are allowed to connect to old servers and vice versa. So, extra GRANTs might be needed.
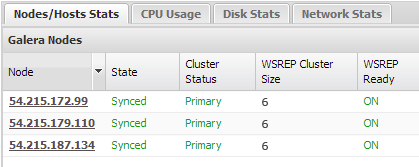
6. You will notice the WSREP Cluster size value is equal to 6. Cluster A and B are connected and any changes are replicated to all nodes. You can now point your applications to Cluster B.
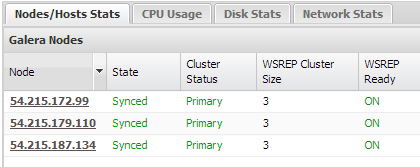
7. Gracefully shut down the CMON Controller and the MySQL nodes in Cluster A and make sure the WSREP Cluster size in Cluster B reported as 3:
8. Enable ClusterControl auto recovery feature for Cluster B. In node W, comment out in /etc/cmon.cnf:
#enable_autorecovery=0Restart the cmon service to activate the configuration:
$ /etc/init.d/cmon restartLive migration is complete! From now on, we will no longer need WAN replication on Cluster B, hence it’s recommended to remove WAN related settings under wsrep_provider_options in my.cnf. Under Manage Configurations, you will find the following:
wsrep_provider_options="gcache.size=128M; evs.keepalive_period=PT3S; evs.inactive_check_period=PT10S; evs.suspect_timeout=PT30S; evs.inactive_timeout=PT1M; evs.consensus_timeout=PT1M; evs.send_window=1024; evs.user_send_window=512;"And change it as follows:
wsrep_provider_options="gcache.size=128M;"Save it and perform a Rolling Restart to apply the changes.
If you still need Cluster A, you can restart ClusterControl on Node A. ClusterControl will then recover the original 3-node cluster. It’s also a good practice to schedule the migration during off-peak hours to speed up the SST synchronization process.
You may also want to check out the Galera Cloning functionality we introduced a few weeks ago.
Hopefully after reading this post, you do not need to put up with low performing or unreliable data centers. You don’t have to take it anymore.