blog
ClusterControl and Galera Cluster on Docker Swarm

Our journey in adopting MySQL and MariaDB in containerized environments continues, with ClusterControl coming into the picture to facilitate deployment and management. We already have our ClusterControl image hosted in Docker Hub, where it can deploy different replication/cluster topologies on multiple containers. With the introduction of Docker Swarm, a native orchestration tools embedded inside Docker Engine, scaling and provisioning containers has become much easier. It also has high availability covered by running services on multiple Docker hosts.
In this blog post, we’ll be experimenting with automatic provisioning of Galera Cluster on Docker Swarm with ClusterControl. ClusterControl would usually deploy database clusters on bare-metal, virtual machines and cloud instances. ClusterControl relies on SSH (through libssh) as core communication module to connect to the managed hosts, so these would not require any agents. The same rule can be applied to containers, and that’s what we are going to show in this blog post.
ClusterControl as Docker Swarm Service
We have built a Docker image with extended logic to handle deployment in container environments in a semi-automatic way. The image is now available on Docker Hub and the code is hosted in our Github repository. Please note that only this image is capable of deploying on containers, and is not available in the standard ClusterControl installation packages.
The extended logic is inside deploy-container.sh, a script that monitors a custom table inside CMON database called “cmon.containers”. The created database container shall report and register itself into this table and this script will look for new entries and perform the necessary action using a ClusterControl CLI. The deployment is automatic, and you can monitor the progress directly from the ClusterControl UI or using “docker logs” command.
Before we go further, take note of some prerequisites for running ClusterControl and Galera Cluster on Docker Swarm:
- Docker Engine version 1.12 and later.
- Docker Swarm Mode is initialized.
- ClusterControl must be connected to the same overlay network as the database containers.
To run ClusterControl as a service using “docker stack”, the following definition should be enough:
 clustercontrol:
    deploy:
      replicas: 1
    image: severalnines/clustercontrol
    ports:
      - 5000:80
    networks:
      - galera_cc
Or, you can use the “docker service” command as per below:
$ docker service create --name cc_clustercontrol -p 5000:80 --replicas 1 severalnines/clustercontrolOr, you can combine the ClusterControl service together with the database container service and form a “stack” in a compose file as shown in the next section.
Base Containers as Docker Swarm Service
The base container’s image called “centos-ssh” is based on CentOS 6 image. It comes with a couple of basic packages like SSH server, clients, curl and mysql client. The entrypoint script will download ClusterControl’s public key for passwordless SSH during startup. It will also register itself to the ClusterControl’s CMON database for automatic deployment.
Running this container requires a couple of environment variables to be set:
- CC_HOST – Mandatory. By default it will try to connect to “cc_clustercontrol” service name. Otherwise, define its value in IP address, hostname or service name format. This container will download the SSH public key from ClusterControl node automatically for passwordless SSH.
- CLUSTER_TYPE – Mandatory. Default to “galera”.
- CLUSTER_NAME – Mandatory. This name distinguishes the cluster with others from ClusterControl perspective. No space allowed and it must be unique.
- VENDOR – Default is “percona”. Other supported values are “mariadb”, “codership”.
- DB_ROOT_PASSWORD – Mandatory. The database root password for the database server. In this case, it should be MySQL root password.
- PROVIDER_VERSION – Default is 5.6. The database version by the chosen vendor.
- INITIAL_CLUSTER_SIZE – Default is 3. This indicates how ClusterControl should treat newly registered containers, whether they are for new deployments or for scaling out. For example, if the value is 3, ClusterControl will wait for 3 containers to be running and registered into the CMON database before starting the cluster deployment job. Otherwise, it waits 30 seconds for the next cycle and retries. The next containers (4th, 5th and Nth) will fall under the “Add Node” job instead.
To run the container, simply use the following stack definition in a compose file:
  galera:
    deploy:
      replicas: 3
    image: severalnines/centos-ssh
    ports:
      - 3306:3306
    environment:
      CLUSTER_TYPE: "galera"
      CLUSTER_NAME: "PXC_Docker"
      INITIAL_CLUSTER_SIZE: 3
      DB_ROOT_PASSWORD: "mypassword123"
    networks:
      - galera_cc
By combining them both (ClusterControl and database base containers), we can just deploy them under a single stack as per below:
version: '3'

services:

  galera:
    deploy:
      replicas: 3
      restart_policy:
        condition: on-failure
        delay: 10s
    image: severalnines/centos-ssh
    ports:
      - 3306:3306
    environment:
      CLUSTER_TYPE: "galera"
      CLUSTER_NAME: "Galera_Docker"
      INITIAL_CLUSTER_SIZE: 3
      DB_ROOT_PASSWORD: "mypassword123"
    networks:
      - galera_cc

  clustercontrol:
    deploy:
      replicas: 1
    image: severalnines/clustercontrol
    ports:
      - 5000:80
    networks:
      - galera_cc

networks:
  galera_cc:
    driver: overlay
Save the above lines into a file, for example docker-compose.yml in the current directory. Then, start the deployment:
$ docker stack deploy --compose-file=docker-compose.yml cc
Creating network cc_galera_cc
Creating service cc_clustercontrol
Creating service cc_galera
Docker Swarm will deploy one container for ClusterControl (replicas:1) and another 3 containers for the database cluster containers (replicas:3). The database container will then register itself into the CMON database for deployment.
Wait for a Galera Cluster to be ready
The deployment will be automatically picked up by the ClusterControl CLI. So you basically don’t have to do anything but wait. The deployment usually takes around 10 to 20 minutes depending on the network connection.
Open the ClusterControl UI at http://{any_Docker_host}:5000/clustercontrol, fill in the default administrator user details and log in. Monitor the deployment progress under Activity -> Jobs, as shown in the following screenshot:
Or, you can look at the progress directly from the docker logs command of the ClusterControl container:
$ docker logs -f $(docker ps | grep clustercontrol | awk {'print $1'})
>> Found the following cluster(s) is yet to deploy:
Galera_Docker
>> Number of containers for Galera_Docker is lower than its initial size (3).
>> Nothing to do. Will check again on the next loop.
>> Found the following cluster(s) is yet to deploy:
Galera_Docker
>> Found a new set of containers awaiting for deployment. Sending deployment command to CMON.
>> Cluster name : Galera_Docker
>> Cluster type : galera
>> Vendor : percona
>> Provider version : 5.7
>> Nodes discovered : 10.0.0.6 10.0.0.7 10.0.0.5
>> Initial cluster size : 3
>> Nodes to deploy : 10.0.0.6;10.0.0.7;10.0.0.5
>> Deploying Galera_Docker.. It's gonna take some time..
>> You shall see a progress bar in a moment. You can also monitor
>> the progress under Activity (top menu) on ClusterControl UI.
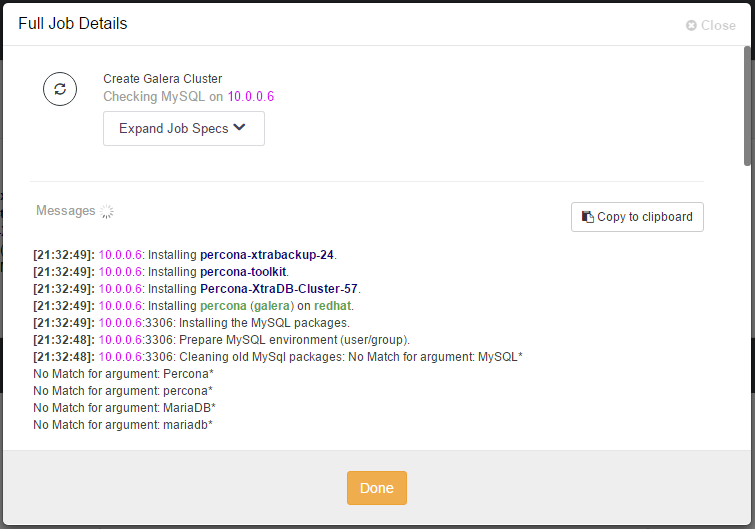
Create Galera Cluster
- Job 1 RUNNING [██▊ ] 26% Installing MySQL on 10.0.0.6That’s it. Wait until the deployment completes and you will then be all set with a three-node Galera Cluster running on Docker Swarm, as shown in the following screenshot:

In ClusterControl, it has the same look and feel as what you have seen with Galera running on standard hosts (non-container) environment.
Management
Managing database containers is a bit different with Docker Swarm. This section provides an overview of how the database containers should be managed through ClusterControl.
Connecting to the Cluster
To verify the status of the replicas and service name, run the following command:
$ docker service ls
ID            NAME               MODE        REPLICAS  IMAGE
eb1izph5stt5  cc_clustercontrol  replicated  1/1       severalnines/clustercontrol:latest
ref1gbgne6my  cc_galera          replicated  3/3       severalnines/centos-ssh:latest
If the application/client is running on the same Swarm network space, you can connect to it directly via the service name endpoint. If not, use the routing mesh by connecting to the published port (3306) on any of the Docker Swarm nodes. The connection to these endpoints will be load balanced automatically by Docker Swarm in a round-robin fashion.
Scale up/down
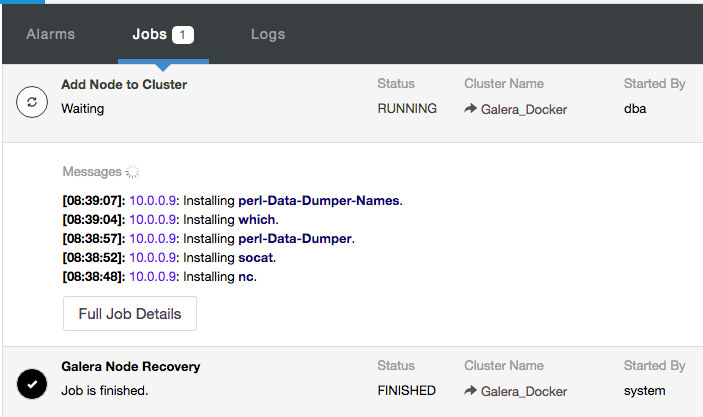
Typically, when adding a new database, we need to prepare a new host with base operating system together with passwordless SSH. In Docker Swarm, you just need to scale out the service using the following command to the number of replicas that you desire:
$ docker service scale cc_galera=5
cc_galera scaled to 5
ClusterControl will then pick up the new containers registered inside cmon.containers table and trigger add node jobs, for one container at a time. You can look at the progress under Activity -> Jobs:
Scaling down is similar, by using the “service scale” command. However, ClusterControl doesn’t know whether the containers that have been removed by Docker Swarm were part of the auto-scheduling or just a scale down (which indicates that we deliberately wanted the containers to be removed). Thus, to scale down from 5 nodes to 3 nodes, one would:
$ docker service scale cc_galera=3
cc_galera scaled to 3
Then, remove the stopped hosts from the ClusterControl UI by going to Nodes -> rollover the removed container -> click on the ‘X’ icon on the top right -> Confirm & Remove Node:
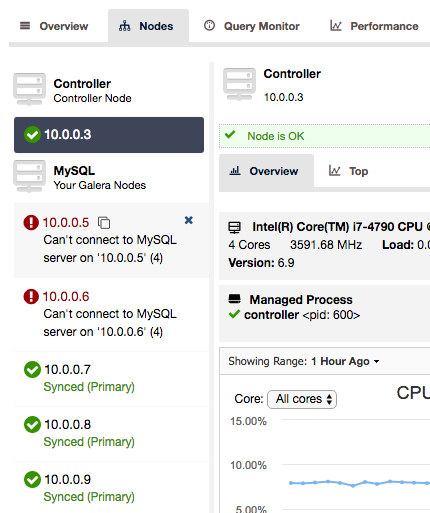
ClusterControl will then execute a remove node job and bring back the cluster to the expected size.
Failover
In case of container failure, Docker Swarm automatic rescheduling will kick in and there will be a new replacement container with the same IP address as the old one (with different container ID). ClusterControl will then start to provision this node from scratch, by performing the installation process, configuration and getting it to rejoin the cluster. The old container will be removed automatically from ClusterControl before the deployment starts.
Go ahead and try to kill one of the database containers:
$ docker kill [container ID]You’ll see the new containers that Swarm created will be provisioned automatically by ClusterControl.
Creating a new cluster
To create a new cluster, just create another service or stack with a different CLUSTER_NAME and service name. The following is an example that we want to create another Galera Cluster running on MariaDB 10.1 (some extra environment variables are required for MariaDB 10.1):
version: '3'
services:
  galera2:
    deploy:
      replicas: 3
    image: severalnines/centos-ssh
    ports:
      - 3306
    environment:
      CLUSTER_TYPE: "galera"
      CLUSTER_NAME: "MariaDB_Galera"
      VENDOR: "mariadb"
      PROVIDER_VERSION: "10.1"
      INITIAL_CLUSTER_SIZE: 3
      DB_ROOT_PASSWORD: "mypassword123"
    networks:
      - cc_galera_cc

networks:
  cc_galera_cc:
    external: true
Then, create the service:
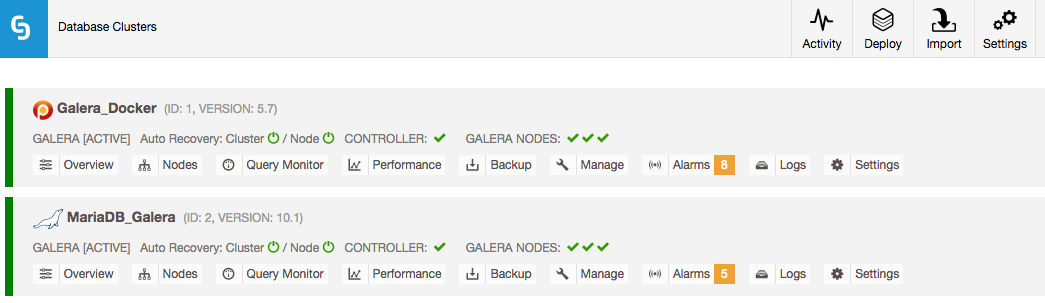
$ docker stack deploy --compose-file=docker-compose.yml db2Go back to ClusterControl UI -> Activity -> Jobs and you should see a new deployment has started. After a couple of minutes, you will see the new cluster will be listed inside ClusterControl dashboard:
Destroying Everything
To remove everything (including the ClusterControl container), you just need to remove the stack created by Docker Swarm:
$ docker stack rm cc
Removing service cc_clustercontrol
Removing service cc_galera
Removing network cc_galera_cc
That’s it, the whole stack has been removed. Pretty neat huh? You can start all over again by running the “docker stack deploy” command and everything will be ready after a couple of minutes.
Summary
The flexibility you get by running a single command to deploy or destroy a whole environment can be useful in different types of use cases such as backup verification, DDL procedure testing, query performance tweaking, experimenting for proof-of-concepts and also for staging temporary data. These use cases are closer to developer environment. With this approach, you can now treat a stateful service “statelessly”.
Would you like to see ClusterControl manage the whole database container stack through the UI via point and click? Let us know your thoughts in the comments section below. In the next blog post, we are going to look at how to perform automatic backup verification on Galera Cluster using containers.