blog
Load Balanced MySQL Galera Setup: Manual Deployment vs ClusterControl

If you have deployed databases with high availability before, you will know that a deployment does not always go your way, even though you’ve done it a zillion times. You could spend a full day setting everything up and may still end up with a non-functioning cluster. It is not uncommon to start over, as it’s really hard to figure out what went wrong.
So, deploying a MySQL Galera Cluster with redundant load balancing takes a bit of time. This blog looks at how long time it would take to do it manually vs using ClusterControl to perform the task. For those who have not used it before, ClusterControl is an agentless management and automation software for databases. It supports MySQL (Oracle and Percona server), MariaDB, MongoDB (MongoDB inc. and Percona), and PostgreSQL.
For manual deployment, we’ll be using the popular “Google university” to search for how-to’s and blogs that provide deployment steps.
Database Deployment
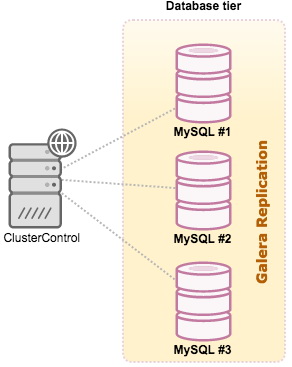
Deployment of a database consists of several parts. These include getting the hardware ready, software installation, configuration tweaking and a bit of tuning and testing. Now, let’s assume the hardware is ready, the OS is installed and it is up to you to do the rest. We are going to deploy a three-node Galera cluster as shown in the following diagram:
Manual
Googling on “install mysql galera cluster” led us to this page. By following the steps explained plus some additional dependencies, the following is what we should run on every DB node:
$ semanage permissive -a mysqld_t
$ systemctl stop firewalld
$ systemctl disable firewalld
$ vim /etc/yum.repos.d/galera.repo # setting up Galera repository
$ yum install http://www.percona.com/downloads/percona-release/redhat/0.1-3/percona-release-0.1-3.noarch.rpm
$ yum install mysql-wsrep-5.6 galera3 percona-xtrabackup
$ vim /etc/my.cnf # setting up wsrep_* variables
$ systemctl start mysql --wsrep-new-cluster # ‘systemctl start mysql’ on the remaining nodes
$ mysql_secure_installation
The above commands took around 18 minutes to finish on each DB node. Total deployment time was 54 minutes.
ClusterControl
Using ClusterControl, here are the steps we took to first install ClusterControl (5 minutes):
$ wget https://severalnines.com/downloads/cmon/install-cc
$ chmod 755 install-cc
$ ./install-cc
Login to the ClusterControl UI and create the default admin user.
Setup passwordless SSH to all DB nodes on ClusterControl node (1 minute):
$ ssh-keygen -t rsa
$ ssh-copy-id 10.0.0.217
$ ssh-copy-id 10.0.0.218
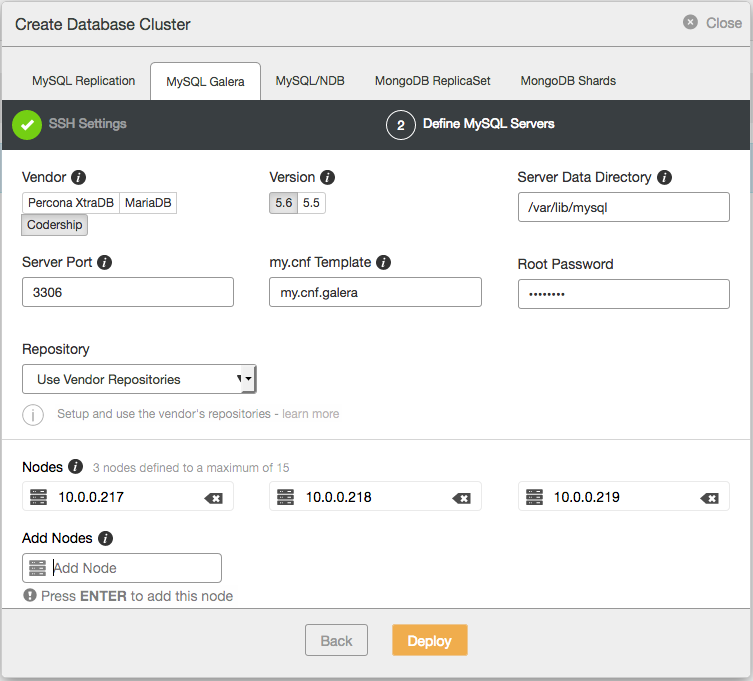
$ ssh-copy-id 10.0.0.219In the ClusterControl UI, go to Create Database Cluster -> MySQL Galera and enter the following details (4 minutes):
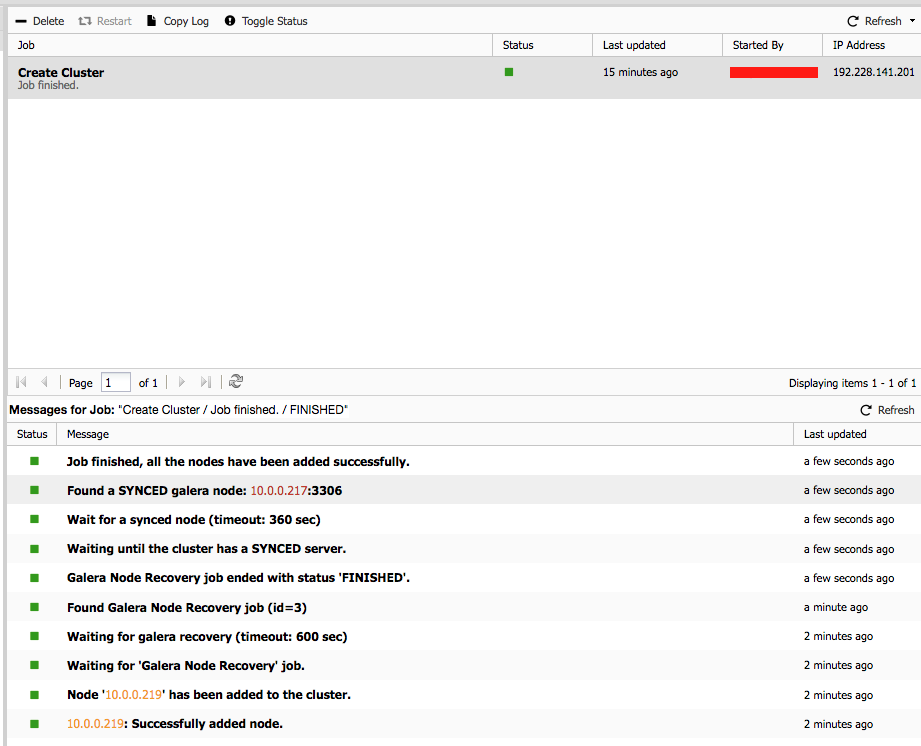
Click Deploy and wait until the deployment finishes. You can monitor the deployment progress under ClusterControl -> Settings -> Cluster Jobs and once deployed, you will notice it took around 15 minutes:
To sum it up, the total deployment time including installing ClusterControl is 15 + 4 + 1 + 5 = 25 minutes.
Following table summarizes the above deployment actions:
| Area | Manual | ClusterControl |
|---|---|---|
| Total steps | 8 steps x 3 servers + 1 = 25 | 8 |
| Duration | 18 x 3 = 54 minutes | 25 minutes |
To summarize, we needed less steps and less time with ClusterControl to achieve the same result. 3 node is sort of a minimum cluster size, and the difference would get bigger with clusters with more nodes.
Load Balancer and Virtual IP Deployment
Now that we have our Galera cluster running, the next thing is to add a load balancer in front. This provides one single endpoint to the cluster, thus reducing the complexity for applications to connect to a multi-node system. Applications would not need to have knowledge of the topology and any changes caused by failures or admin maintenance would be masked. For fault tolerance, we would need at least 2 load balancers with a virtual IP address.
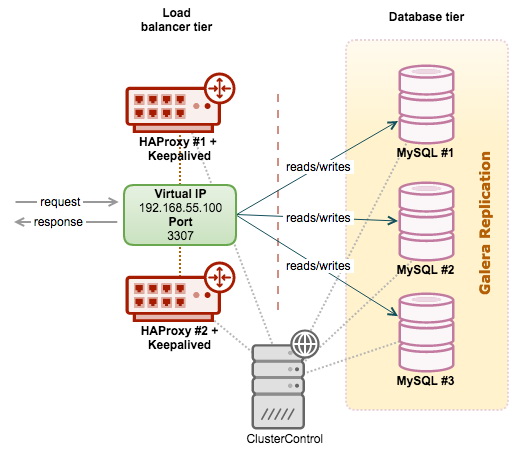
By adding a load balancer tier, our architecture will look something like this:
Manual Deployment
Googling on “install haproxy virtual ip galera cluster” led us to this page. We followed the steps:
On each HAproxy node (2 times):
$ yum install epel-release
$ yum install haproxy keepalived
$ systemctl enable haproxy
$ systemctl enable keepalived
$ vi /etc/haproxy/haproxy.cfg # configure haproxy
$ systemctl start haproxy
$ vi /etc/keepalived/keepalived.conf # configure keepalived
$ systemctl start keepalived
On each DB node (3 times):
$ wget https://raw.githubusercontent.com/olafz/percona-clustercheck/master/clustercheck
$ chmod +x clustercheck
$ mv clustercheck /usr/bin/
$ vi /etc/xinetd.d/mysqlchk # configure mysql check user
$ vi /etc/services # setup xinetd port
$ systemctl start xinetd
$ mysql -uroot -p
mysql> GRANT PROCESS ON *.* TO 'clustercheckuser'@'localhost' IDENTIFIED BY 'clustercheckpassword!'
The total deployment time for this was around 42 minutes.
ClusterControl
For the ClusterControl host, here are the steps taken (1 minute) :
$ ssh-copy-id 10.0.0.229
$ ssh-copy-id 10.0.0.230
Then, go to ClusterControl -> select the database cluster -> Add Load Balancer and enter the IP address of the HAproxy hosts, one at a time:
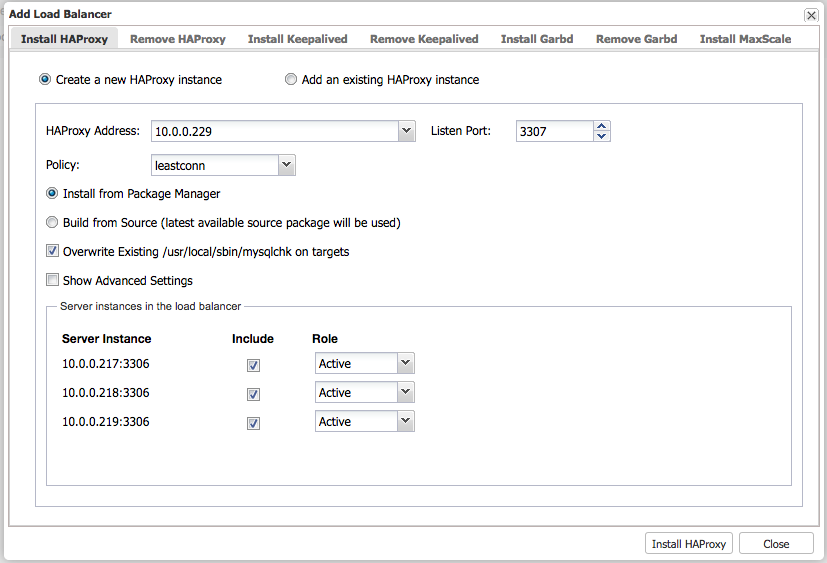
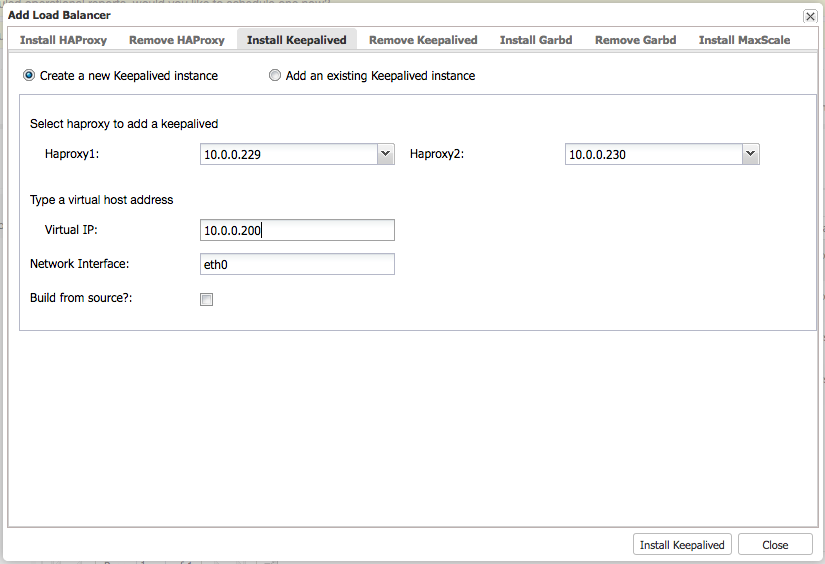
Once both HAProxy are deployed, we can add Keepalived to provide a floating IP address and perform failover:
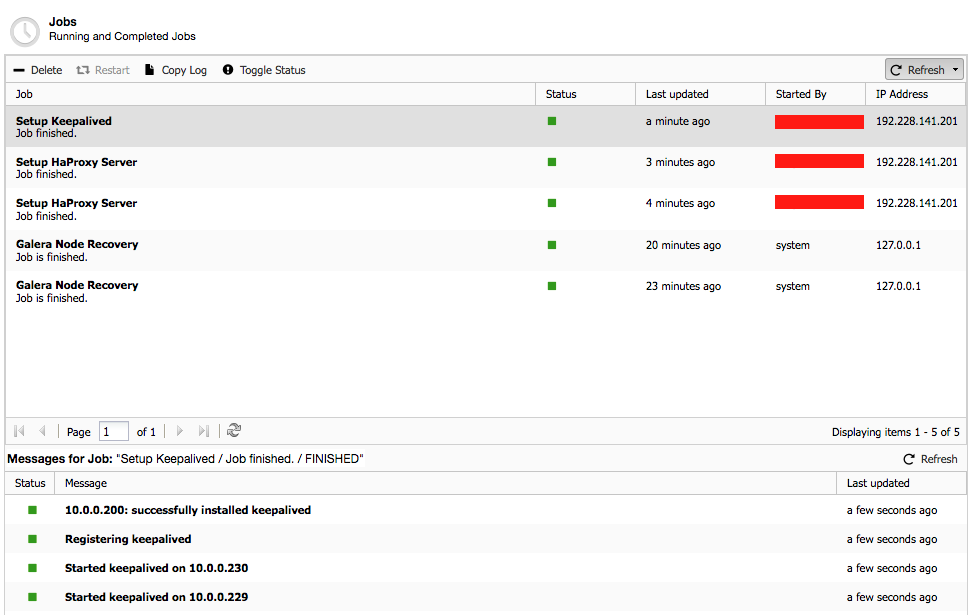
Go to ClusterControl -> select the database cluster -> Logs -> Jobs. The total deployment took about 5 minutes, as shown in the screenshot below:
Thus, total deployment for load balancers plus virtual IP address and redundancy is 1 + 5 = 6 minutes.
Following table summarized the above deployment actions:
| Area | Manual | ClusterControl |
|---|---|---|
| Total steps | (8 x 2 haproxy nodes) + (8 x 3 DB nodes) = 40 | 6 |
| Duration | 42 minutes | 6 minutes |
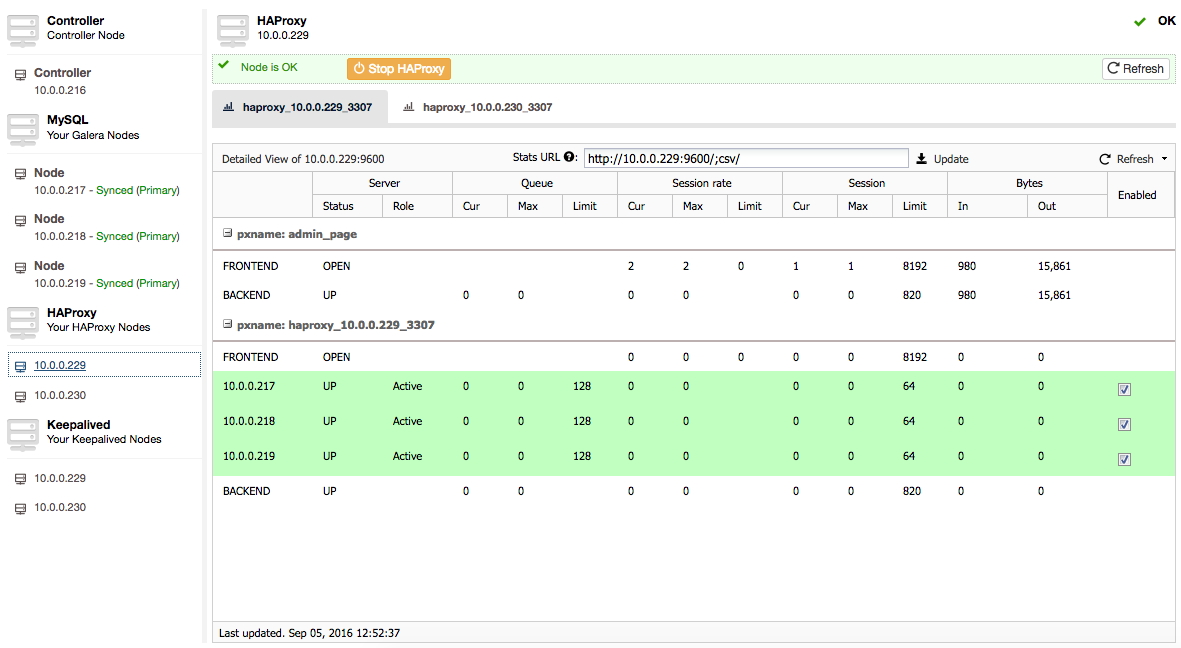
ClusterControl also manages and monitors the load balancers:
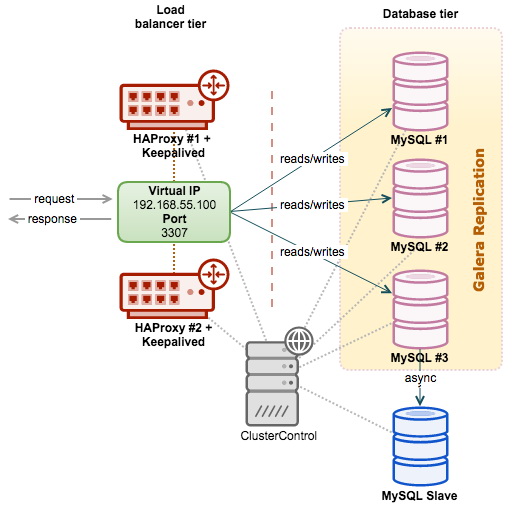
Adding a Read Replica
Our setup is now looking pretty decent, and the next step is to add a read replica to Galera. What is a read replica, and why do we need it? A read replica is an asynchronous slave, replicating from one of the Galera nodes using standard MySQL replication. There are a few good reasons to have this. Long-running reporting/OLAP type queries on a Galera node might slow down an entire cluster, if the reporting load is so intensive that the node has to spend considerable effort coping with it. So reporting queries can be sent to a standalone server, effectively isolating Galera from the reporting load. An asynchronous slave can also serve as a remote live backup of our cluster in a DR site, especially if the link is not good enough to stretch one cluster across 2 sites.
Our architecture is now looking like this:
Manual Deployment
Googling on “mysql galera with slave” brought us to this page. We followed the steps:
On master node:
$ vim /etc/my.cnf # setting up binary log and gtid
$ systemctl restart mysql
$ mysqldump --single-transaction --skip-add-locks --triggers --routines --events > dump.sql
$ mysql -uroot -p
mysql> GRANT REPLICATION SLAVE ON .. ;
On slave node (we used Percona Server):
$ yum install http://www.percona.com/downloads/percona-release/redhat/0.1-3/percona-release-0.1-3.noarch.rpm
$ yum install Percona-Server-server-56
$ vim /etc/my.cnf # setting up server id, gtid and stuff
$ systemctl start mysql
$ mysql_secure_installation
$ scp root@master:~/dump.sql /root
$ mysql -uroot -p < /root/dump.sql
$ mysql -uroot -p
mysql> CHANGE MASTER ... MASTER_AUTO_POSITION=1;
mysql> START SLAVE;
The total time spent for this manual deployment was around 40 minutes (with 1GB database in size).
ClusterControl
With ClusterControl, here is what we should do. Firstly, configure passwordless SSH to the target slave (0.5 minute):
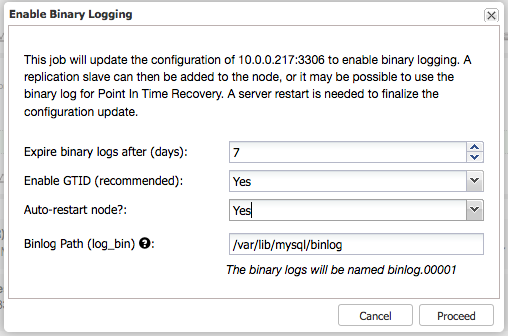
$ ssh-copy-id 10.0.0.231 # setup passwordless sshThen, on one of the MySQL Galera nodes, we have to enable binary logging to become a master (2 minutes):
Click Proceed to start enabling binary log for this node. Once completed, we can add the replication slave by going to ClusterControl -> choose the Galera cluster -> Add Replication Slave and specify as per below (6 minutes including streaming 1GB of database to slave):
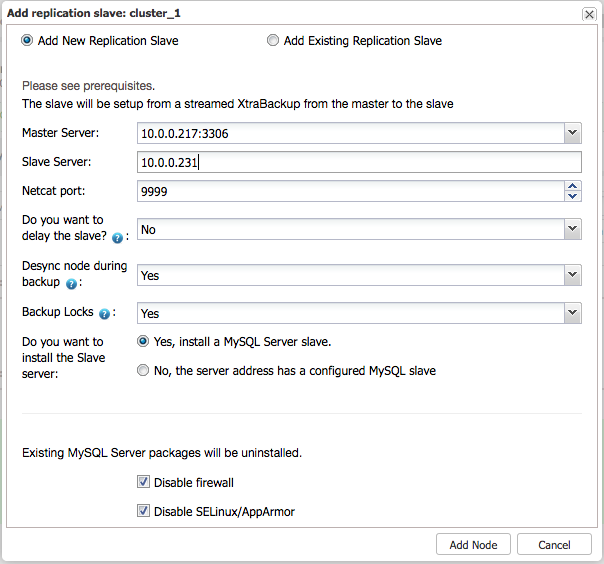
Click “Add node” and you are set. Total deployment time for adding a read replica complete with data is 6 + 2 + 0.5 = 8.5 minutes.
Following table summarized the above deployment actions:
| Area | Manual | ClusterControl |
|---|---|---|
| Total steps | 15 | 3 |
| Duration | 40 minutes | 8.5 minutes |
We can see that ClusterControl automates a number of time consuming tasks, including slave installation, backup streaming and slaving from master. Note that ClusterControl will also handle things like master failover so that replication does not break if the galera master fails..
Conclusion
A good deployment is important, as it is the foundation of an upcoming database workload. Speed matters too, especially in agile environments where a team frequently deploys entire systems and tears them down after a short time. You’re welcome to try ClusterControl to automate your database deployments, it comes with a free 30-day trial of the full enterprise features. Once the trial ends, it will default to the community edition (free forever).