blog
MongoDB Sharding Ins & Outs: Part Two

In previous posts of our “Become a MongoDB DBA” series, we covered Deployment, Configuration, Monitoring (part 1), Monitoring (part 2), backup, restore, read scaling and sharding (part 1).
In the previous post we did a primer on sharding with MongoDB. We covered not only how to enable sharding on a database, and define the shard key on a collection, but also explained the theory behind it.
Once enabled on a database and collection, the data stored will keep growing and more and more chunks will be in use. Just like any database requires management, also shards need to be looked after. Some of the monitoring and management aspects of sharding, like backups, are different than with ordinary MongoDB replicaSets. Also operations may lead to scaling or rebalancing the cluster. In this second part we will focus on the monitoring and management aspects of sharding.
Monitoring Shards
The most important aspect of sharding, is monitoring its performance. As the write throughput of a sharded cluster is much higher than before, you might encounter other scaling issues. So it is key to find your next bottleneck.
Connections
The most obvious one would be the number of connections going to each primary in the shard. Any range query not using the shard key, will result in multiplication of queries going to every shard. If these queries are not covered by any (usable) index, you might see a large increase in connections going from the shard router to the primary of each shard. Luckily a connection pool is used between the shard router and the primary, so unused connections will be reused.
You can keep an eye on the connection pool via the connPoolStats command:
mongos> db.runCommand( { "connPoolStats" : 1 } )
{
    "numClientConnections" : 10,
    "numAScopedConnections" : 0,
    "totalInUse" : 4,
    "totalAvailable" : 8,
    "totalCreated" : 23,
    "hosts" : {
        "10.10.34.11:27019" : {
            "inUse" : 1,
            "available" : 1,
            "created" : 1
        },
        "10.10.34.12:27018" : {
            "inUse" : 3,
            "available" : 1,
            "created" : 2
        },
        "10.10.34.15:27018" : {
            "inUse" : 0,
            "available" : 1,
            "created" : 1
        }
    },
    "replicaSets" : {
        "sh1" : {
            "hosts" : [
                {
                    "addr" : "10.10.34.12:27002",
                    "ok" : true,
                    "ismaster" : true,
                    "hidden" : false,
                    "secondary" : false,
                    "pingTimeMillis" : 0
                }
            ]
        },
...


    "ok" : 1
}
The output of this command will give you both a combined stats and a per-host stats, and additionally per replicaSet in the cluster which host is the primary. Unfortunately this means you will have to figure out yourself which host is part of which component.
Capacity Planning
Another important set of metrics to watch is the total number of chunks, the chunks per node and the available diskspace on your shards. Combined together, this should give a fairly good indication how soon it is time to scale out with another shard.
You can fetch the chunks per shard from the shard status command:
mongos> sh.status()
--- Sharding Status ---
…
databases:
{  "_id" : "shardtest",  "primary" : "sh1",  "partitioned" : true }
    shardtest.collection
        shard key: { "_id" : 1 }
        unique: false
        balancing: true
        chunks:
            sh1    1
            sh2    2
            sh3    1
Caution has to be taken here: the shard status command does not contain valid JSON output. It can rather be explained as inconsistent formatted readable text. Alternatively you can fetch the very same information from the config database on the shard router. (it actually resides on the Configserver replicaSet)
mongos> use config
switched to db config
mongos> db.config.runCommand({aggregate: "chunks", pipeline: [{$group: {"_id": {"ns": "$ns", "shard": "$shard"}, "total_chunks": {$sum: 1}}}]})
{ "_id" : { "ns" : "test.usertable", "shard" : "mongo_replica_1" }, "total_chunks" : 330 }
{ "_id" : { "ns" : "test.usertable", "shard" : "mongo_replica_0" }, "total_chunks" : 328 }
{ "_id" : { "ns" : "test.usertable", "shard" : "mongo_replica_2" }, "total_chunks" : 335 }
This aggregate query is covered by a default index placed on the chunks collection, so this will not pose a big risk in querying it occasionally.
Non-sharded databases and collections
As we described in the previous post, non-sharded databases and collections will be assigned to a default primary shard. This means the database or collection is limited to the size of this primary shard, and if written to in large volumes, could use up all remaining disk space of a shard. Once this happens the shard will obviously no longer function. Therefore it is important to watch over all existing databases and collections, and scan the config database to validate that they have been enabled for sharding.
This short script will show you the non-sharded collections on the MongoDB command line client:
use config;
var shard_collections = db.collections.find();
var sharded_names = {};
while (shard_collections.hasNext()) {
    shard = shard_collections.next();
    sharded_names[shard._id] = 1;
}


var admin_db = db.getSiblingDB("admin");
dbs = admin_db.runCommand({ "listDatabases": 1 }).databases;
dbs.forEach(function(database) {
    if (database.name != "config") {
        db = db.getSiblingDB(database.name);
        cols = db.getCollectionNames();
        cols.forEach(function(col) {
            if( col != "system.indexes" ) {
                if( shard_names[database.name + "." + col] != 1) {
                   print (database.name + "." + col);
                }
            }
        });
    }
});
It first retrieves a list of all sharded collections and saves this for later usage. Then it loops over all databases and collections, and checks if they have been sharded or not.
Maintaining Shards
Once you have a sharded environment, you also need to maintain it. Basic operations, like adding shards, removing shards, rebalancing shards and making backups ensure you keep your cluster healthy and prepared for disaster. Once a shard is full, you can no longer perform write operations on it, so it essential to scale add new shards before that happens.
Adding a Shard
Adding a shard is really simple: create a new replicaSet, and once it is up and running just simply add it with the following command on one of the shard routers:
mongos> sh.addShard("/:") It suffices to add one host of the replicaSet, as this will seed the shard router with a host it can connect to and detect the remaining hosts.
After this it will add the shard to the cluster, and immediately make it available for all sharded collections. This also means that after adding a shard, the MongoDB shard balancer will start balancing all chunks over all shards. Since the capacity has increased and an empty shard has appeared, this means the balancer will cause an additional read and write load on all shards in the cluster. You may want to disable the balancer, if you are adding the extra shard during peak hours. Read more in the MongoDB Balancer section further down on why this happens and how to disable the balancer in these cases.
Removing a shard will not be done often, as most people scale out their clusters. But just in case you ever need it, this section will describe how to remove a shard.
It is a bit harder to remove a shard than to add a shard, as this involves removing the data as well. To remove a shard, you need to find the name of the shard first.
mongos> db.adminCommand( { listShards: 1 } )
{
    "shards" : [
{ "_id" : "sh1", "host" : "sh1/10.10.34.12:27018" },
{ "_id" : "sh2", "host" : "sh2/10.10.34.15:27018" }
    ],
    "ok" : 1
}
Now we can request MongoDB to remove it, using the adminCommand:
mongos> db.adminCommand( { removeShard: "sh2" } )
{
    "msg" : "draining started successfully",
    "state" : "started",
    "shard" : "sh2",
    "note" : "you need to drop or movePrimary these databases",
    "dbsToMove" : [ ],
    "ok" : 1
}
This will start a balancing process that will migrate all data from this shard to the remaining shards. Depending on your dataset, this could take somewhere between minutes to hours to finish. Also keep in mind that you must have enough disk space available on the remaining shards, to be able to migrate the data. If not, the balancer will stop after one of the shards is full.
To watch the progress you can run the removeShard command once more:
mongos> db.adminCommand( { removeShard: "sh2" } )
{
    "msg" : "draining ongoing",
    "state" : "ongoing",
    "remaining" : {
        "chunks" : NumberLong(2),
        "dbs" : NumberLong(0)
    },
    "note" : "you need to drop or movePrimary these databases",
    "dbsToMove" : [ notsharded ],
    "ok" : 1
}
In the output from this command you can see the attribute “dbsToMove” is an array containing the database notsharded. If the array contains databases, this means this shard is the primary shard for these databases. Before removing the shard successfully, we need to drop or move the databases first. Moving is performed with the movePrimary command:
mongos> db.runCommand( { movePrimary : "notsharded", to : "sh1" } )Once there are no more primary databases on the shard and the balancer is done with migrating data, it will wait for you to run the removeShard command once more. It will then output the state completed and finally remove the shard:
mongos> db.adminCommand( { removeShard: "sh2" } )
{
    "msg" : "removeshard completed successfully",
    "state" : "completed",
    "shard" : "sh2",
    "ok" : 1
}
MongoDB Balancer
We have mentioned the MongoDB balancer a couple of times before. The balancer is a very basic process, that has no other task than to keep the number of chunks per collection equal on every shard. So in reality it does nothing else than move around chunks of data between shards, until it is satisfied with the balance of chunks. This means it can also work against you in some cases.
The most obvious case where it can go wrong, is if you add a new shard with a larger storage capacity than the other shards. Having a shard with more capacity than the others, means the shard router will most likely add all new chunks on the shard with the largest capacity available. This means once a new chunk has been created on the new shard, another chunk will be moved to another shard to keep the number of chunks in balance. Therefore it is advisable to give equal storage space to all shards.
Another case where it can go wrong, is if your shard router splits chunks when you insert your data randomly. If these splits happen more often on one shard than the others, this means some of the existing chunks may be moved to other shards, and range queries on these chunks work less effectively as more shards need to be touched.
There are a couple of ways to influence the balancer. The balancer could create an additional IO workload on your data nodes, so you may wish to schedule the balancer to run only in off hours:
mongos> db.settings.update(
   { _id: "balancer" },
   { $set: { activeWindow : { start : "22:00", stop : "08:00" } } },
   { upsert: true }
)
If necessary you can also disable the balancer for a single collection. This would be good to do to solve the unnecessary moving of chunks, as we described earlier. Also for collections containing archived documents, you may want to enable this. To disable the balancer on a single collection, just run the following command:
mongos> sh.disableBalancing("mydata.hugearchive")
WriteResult({ "nMatched" : 1, "nUpserted" : 0, "nModified" : 1 })
Also during backups you need to disable the balancer to make a reliable backup, as otherwise chunks of data will be moved between shards. To disable the balancer, just run the following command:
mongos> sh.setBalancerState(false);
WriteResult({ "nMatched" : 0, "nUpserted" : 1, "nModified" : 0, "_id" : "balancer" })
Don’t forget to enable the balancer again after the backup has finished. It may also be better to use a backup tool that takes a consistent backup across all shards, instead of using mongodump. More in the next section.
Backups
We have covered MongoDB backups in one of the previous posts. Everything in that blog post applies to replicaSets. Using the ordinary backup tools will allow you to make a backup of each replicaSet in the sharded cluster. With a bit of orchestration you could have them start at the same time, however this does not give you a consistent backup of the entire sharded cluster.
The problem lies in the size of each shard and the Configserver. The bigger the shard, the longer it would take to make a backup. This means if you make a backup, the backup of the Configserver probably finishes first, and the largest shard a very long time after. There may be data missing inside the configserver backup with respect to all new entries written in the meantime to the shards, and the same applies between shards. So using conventional tools to make a consistent backup is almost impossible, unless you can orchestrate every backup to finish at the same time.
That’s exactly what the Percona MongoDB consistent backup tool solves. It will orchestrate that every backup starts at the exact same time, and once it finishes backing up one of the replicaSets, it will continue to stream the oplog of that replicaSet until the last shard has finished. Restoring such a backup requires the additional oplog entries to be replayed against the replicaSets.
Managing and monitoring MongoDB shards with ClusterControl
Adding shards
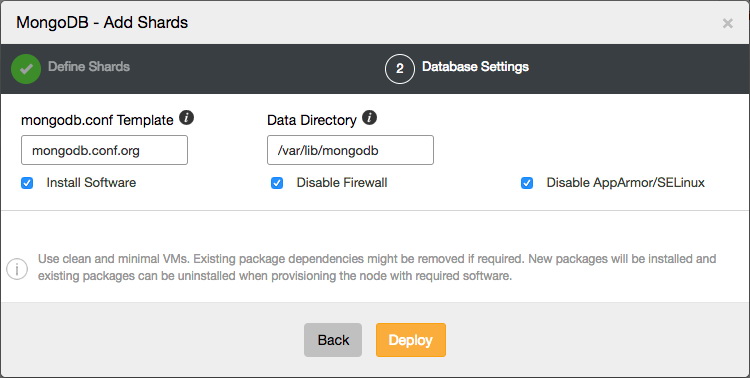
Within ClusterControl you can easily add new shards with a two step wizard, opened from the actions drop down:

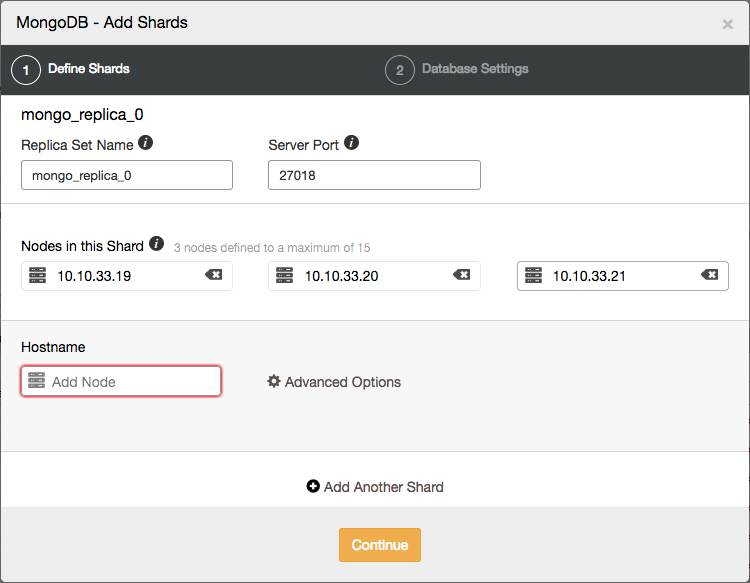
Here you can define the topology of the new shard.
Once the new shard has been added to the cluster, the MongoDB shard router will use it to assign new chunks to, and the balancer will automatically balance all chunks over all the shards.
Removing shards
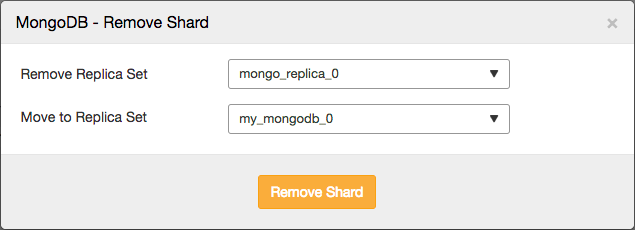
In case you need to remove shards, you can simply remove them via the actions drop down:

This will allow you to select the shard that you wish to remove, and the shard you wish to migrate any primary databases to:
The job that removes the shard will then perform similar actions as described earlier: it will move any primary databases to the designated shard, enable the balancer and then wait for it to move all data from the shard.
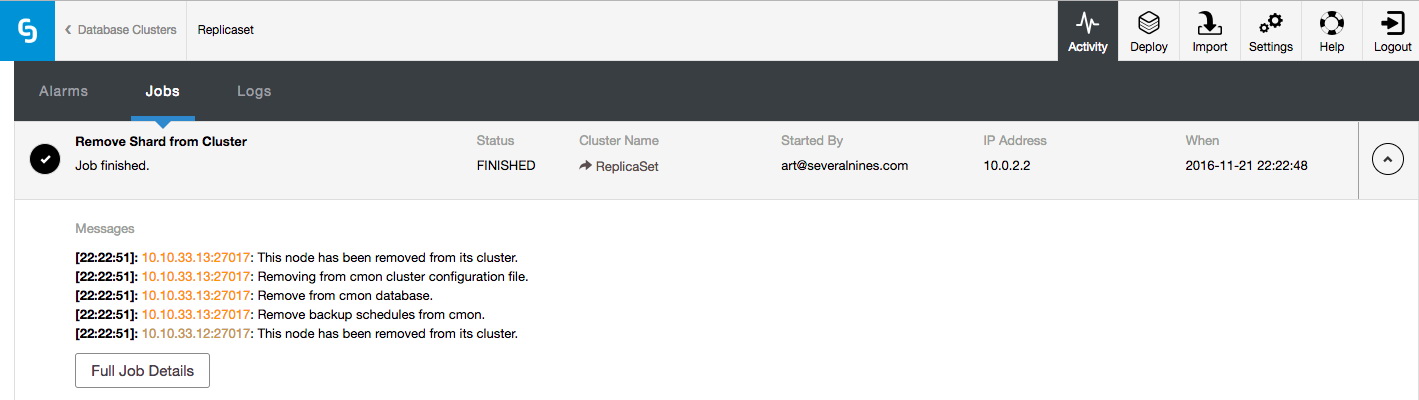
Once all the data has been removed, it will remove the shard from the UI.
Consistent backups
In ClusterControl we have enabled the support for the Percona MongoDB Consistent backup tool:
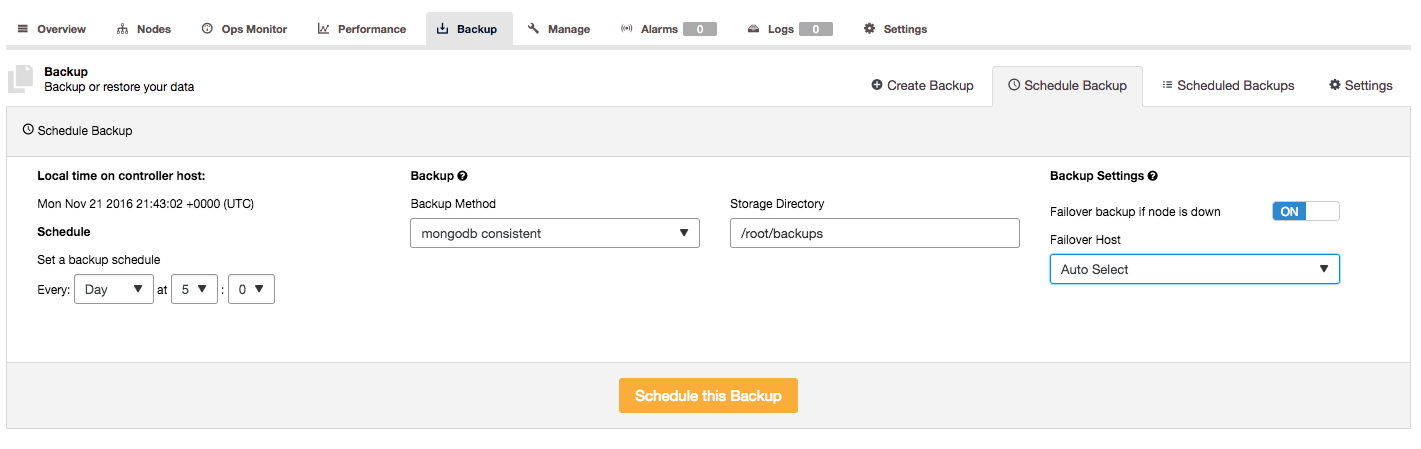
To allow ClusterControl to backup with this tool, you need to install it on the ClusterControl node. ClusterControl will then use it to orchestrate a consistent backup of the MongoDB sharded cluster. This will create a backup for each replicaSet in the cluster, including the Configserver.
Conclusion
In this second blog on MongoDB sharding, we have shown how to monitor your shards, how to add or remove shards, how to rebalance them, and how to ensure you are prepared for disaster. We also have demonstrated how these operations can be performed or scheduled from ClusterControl.
In our next blog, we will dive into a couple of good sharding practices, recommended topologies and how to choose an effective sharding strategy.