blog
MongoDB Sharding Ins & Outs: Part One

So far in the “Become a MongoDB DBA” series, we covered Deployment, Configuration, Monitoring (part 1), Monitoring (part 2), backup, restore and read scaling.
In our latest post we showed how to offload read requests from the primary to secondaries. But what if your workload consists mostly out of write requests? Vertical scaling would only be a temporary solution, and with growth larger than Moore’s law, an alternative has to be found.
Read scaling is basically offloading requests to many secondary nodes in the same replicaSet, so write scaling should naturally be offloading requests to many primary nodes. MongoDB does not support multiple primary nodes in one replicaSet. However if we would shard our data, we could spread our data among multiple replicaSets. Each of these replicaSets would then handle a slice of the workload.
MongoDB supports sharding out of the box and it is relatively easy to set up, though there are a couple of considerations you need to take before sharding your data.
With that in mind, we’re starting a three part miniseries about MongoDB and sharding.
In this first part, we will cover the basics of sharding with MongoDB by setting up a sharded environment. If you wish to know more about sharding in general, please read our whitepaper on sharding with MySQL Fabric.
MongoDB Sharding Primer
The MongoDB sharding solution is similar to existing sharding frameworks for other major database solutions. It makes use of a typical lookup solution, where the sharding is defined in a shard-key and the ranges are stored inside a configuration database. MongoDB works with three components to find the correct shard for your data.
A typical sharded MongoDB environment looks like this:
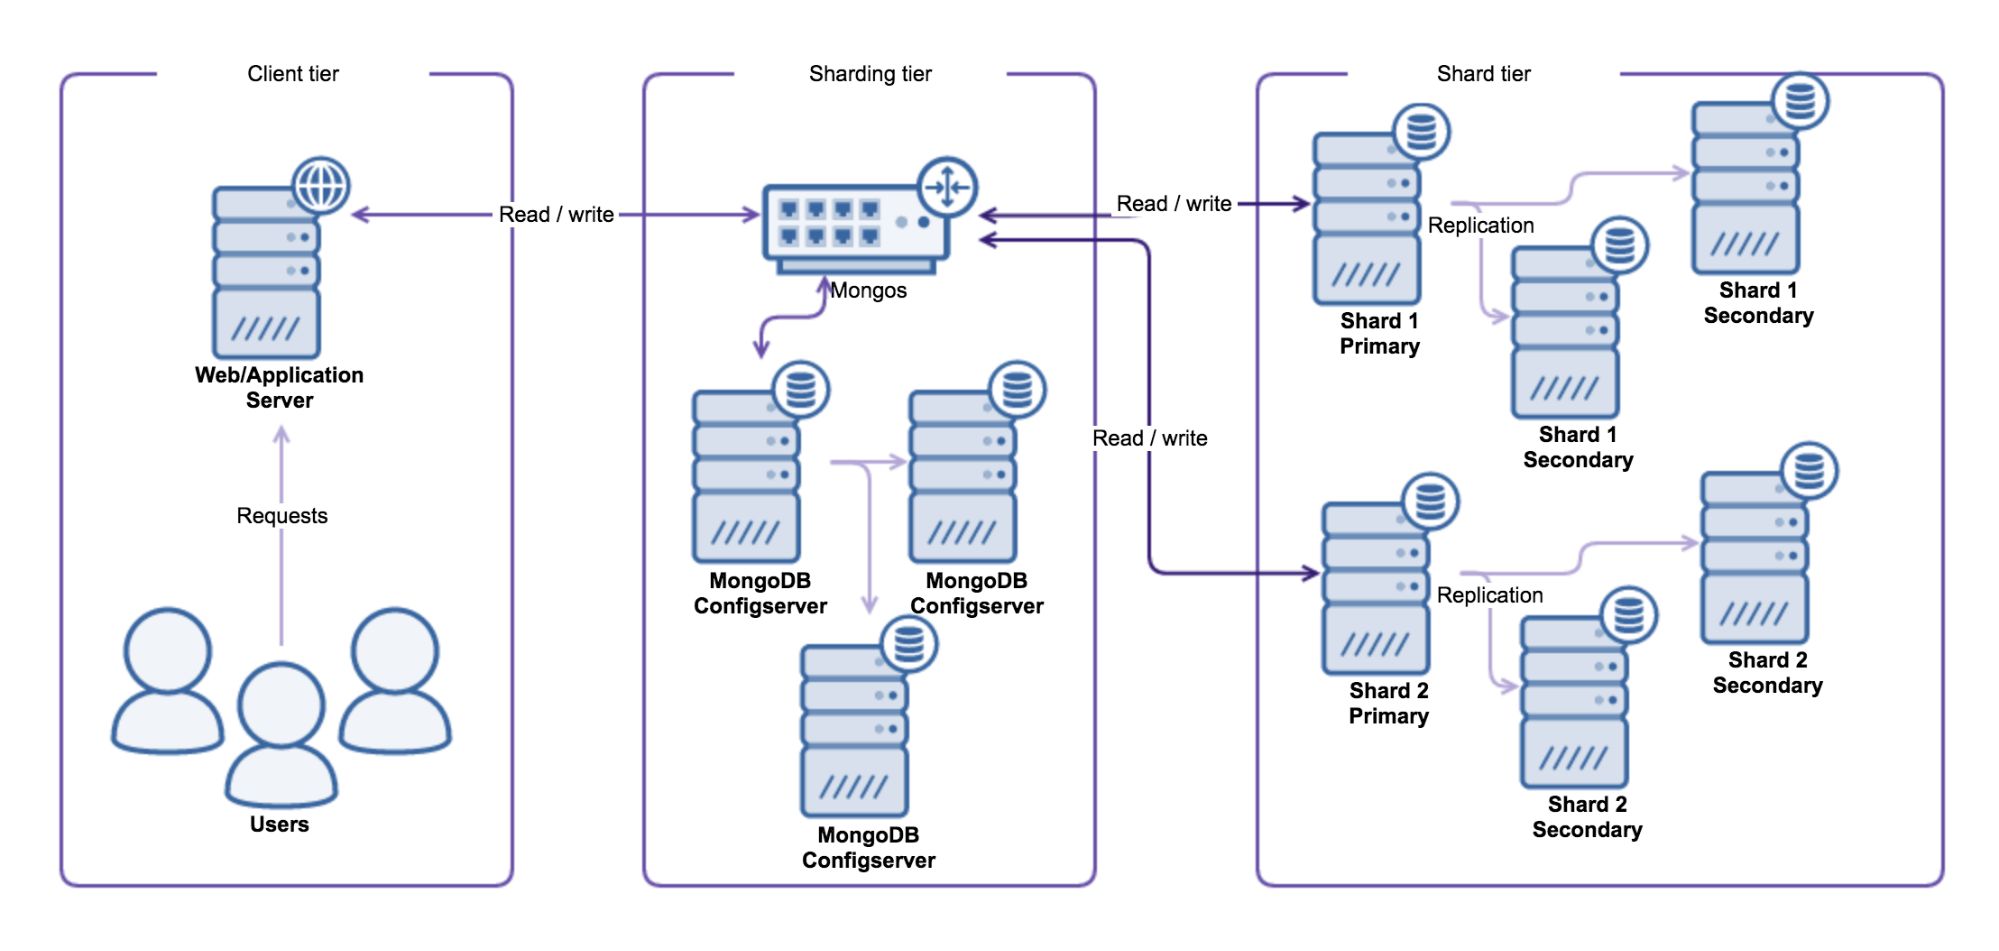
Sharding Tier
The first component used is the shard router called mongos. All read and write operations must be sent to the shard router, making all shards act as a single database for the client application. The shard router will route the queries to the appropriate shards by consulting the Configserver.
The Configserver is a special replicaSet that keeps the configuration of all shards in the cluster. The Configserver contains information about shards, databases, collections, shard keys and the distribution of chunks of data. Data gets partitioned by slicing the total dataset into smaller chunks of data, where these chunks are defined by the shard key. The shard key can be either a range or hash defined. These chunks are then distributed evenly over the total number of shards.
The router will know on which shard to place the data by finding the correct chunk in the Configserver. If the router thinks the chunk is becoming too large, it will automatically create a new chunk in the Configserver. The sharding metadata is stored in the config database, and this database is accessible via the shard router as well.
Prior to MongoDB 3.2 the Configserver used to be a total of three individual MongoDB nodes that were used to write the sharding metadata. In this setup the metadata is written and read thrice, and differences in data between nodes means inconsistent writes happened and will require manual intervention. If this happened, the balancer would no longer perform shard migrations and the shard router was no longer able to create new chunks.
Shard Tier
Each replicaSet in a MongoDB sharded cluster is treated as an individual shard. Adding a shard will increase the write capacity, but also increase the sharding complexity. Each shard is an individual component in the cluster and there is no direct communication between them. Shards don’t know anything about other shards in the cluster.
MongoDB distributes its data evenly by balancing the total number of chunks on each shard. If the number of chunks is not spread evenly, a balancing process can be run to migrate chunks from one shard to another.

This balancing process typically gets started from a shard router (mongos), that thinks the data is unbalanced. The shard router will acquire and set a lock on the balancing process in the config database on the Configserver
Setting up a Simple Sharded Cluster
We will give an example of how to setup a simple sharded cluster, on a single machine. In our test example we will only use the bare minimum of a single node per replicaSet and a single node for the configserver. In production you should always use at least two nodes per replicaSet (and an arbiter) and three nodes for the Configserver.
First we create the paths for each instance to run:
mkdir /var/lib/mongodb/cfg /var/lib/mongodb/sh1 /var/lib/mongodb/sh2 /var/lib/mongodb/sh3The first component to start is Configserver:
mongod --fork --dbpath /var/lib/mongodb/cfg --logpath cfg.log --replSet cfg --configsvrOnce it has started up properly, we need to initialize the Configserver, as it is in reality a replicaSet:
mongo --eval 'rs.initiate({"_id":"cfg", "members":[{"_id":1, "host":"127.0.0.1:27019"}]});' --port 27019Now we can start the shard router (mongos) and connect to the Configserver:
mongos --fork --configdb cfg/127.0.0.1:27019 --logpath mongos.logAs you may notice in the lines above, we are using a different port number for connecting to the Configserver. In a sharded cluster, by default, the Configserver binds to the 27019 port and the shard router to 27017. It is also considered bad practice to configure the shard nodes to bind to the default 27017 MongoDB port. This is done deliberately to prevent confusion around the port to connect to and then the default port will only apply to the shard router.
Next we start up three individual replicaSets that will become shards later on:
mongod --fork --dbpath /var/lib/mongodb/sh1 --logpath sh1.log --port 27001 --replSet sh1
mongod --fork --dbpath /var/lib/mongodb/sh2 --logpath sh2.log --port 27002 --replSet sh2
mongod --fork --dbpath /var/lib/mongodb/sh3 --logpath sh3.log --port 27003 --replSet sh3
And, just like the configserver, we need to initialize these replicaSets as well:
mongo --eval 'rs.initiate({"_id":"sh1", "members":[{"_id":1, "host":"127.0.0.1:27001"}]});' --port 27001
mongo --eval 'rs.initiate({"_id":"sh2", "members":[{"_id":1, "host":"127.0.0.1:27002"}]});' --port 27002
mongo --eval 'rs.initiate({"_id":"sh3", "members":[{"_id":1, "host":"127.0.0.1:27003"}]});' --port 27003
Now we can add these replicaSets as shards via mongos:
mongo --eval 'sh.addShard("sh1/127.0.0.1:27001");'
mongo --eval 'sh.addShard("sh2/127.0.0.1:27002");'
mongo --eval 'sh.addShard("sh3/127.0.0.1:27003");'
In the addShard command you have to specify the full MongoDB connect string to add the shard. In our case we only have one host per replicaSet, but had we had a real production shard, it could have looked something like this:
mongo --eval 'sh.addShard("sh1/node1.domain.com:27018,node2.domain.com:27018,node3.domain.com:27018");'Even though we now have a fully functioning sharded cluster, writing any data via the shard routers will only store the data on the shard with the least amount of data. This is because we have not enabled the database for sharding and defined a shard key for the collection we like to shard.
Setting up a Sharded Cluster Using ClusterControl
We have just demonstrated how to set up a very simple test cluster, and it would be quitecomplex to show how to set up a full production cluster. So instead and for greater ease,we will show how to set up a MongoDB sharded cluster using ClusterControl with its four step wizard.
The first step is to allow ClusterControl to ssh to the hosts that we are going to deploy upon.
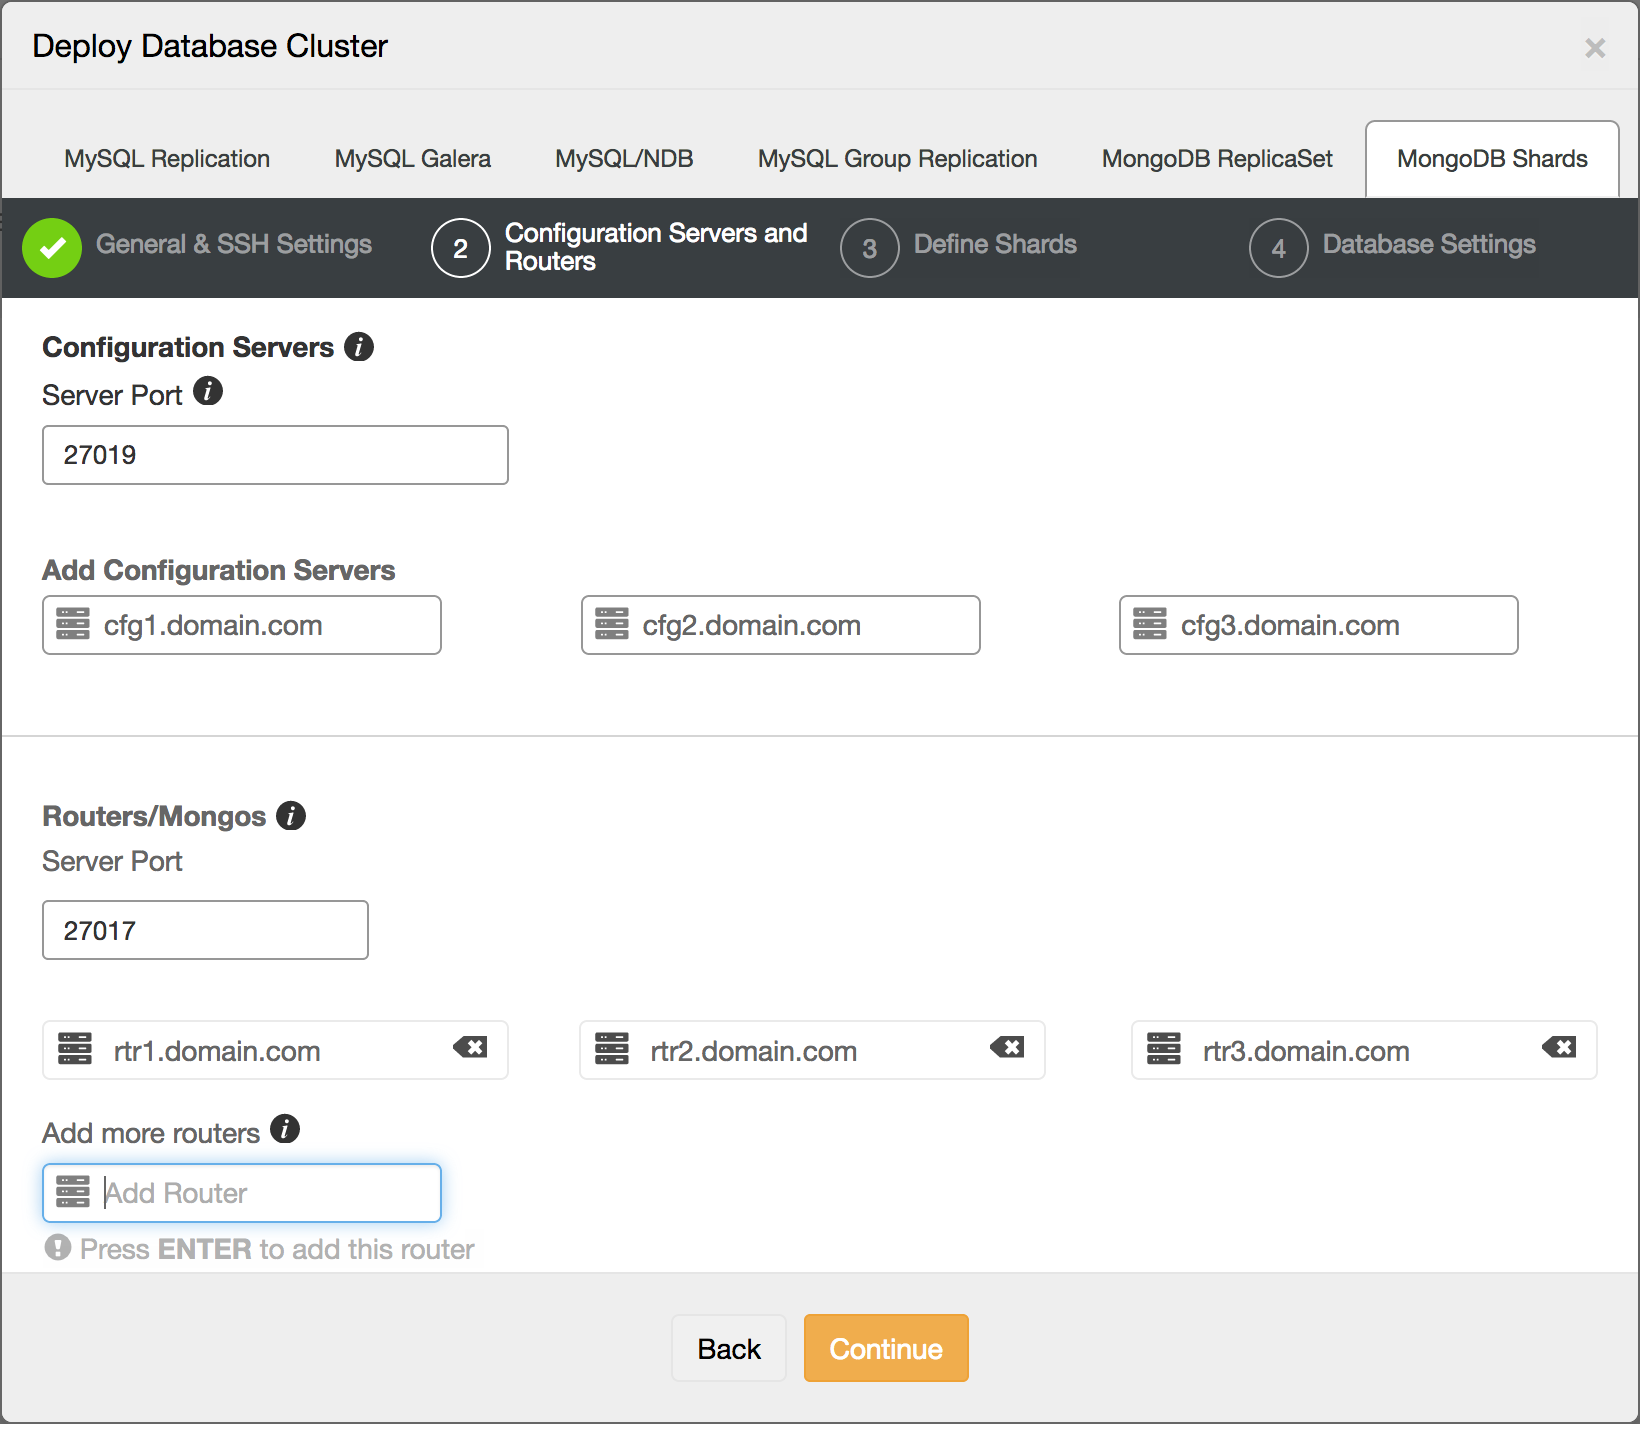
The second step is the definition of shard routers and configservers:
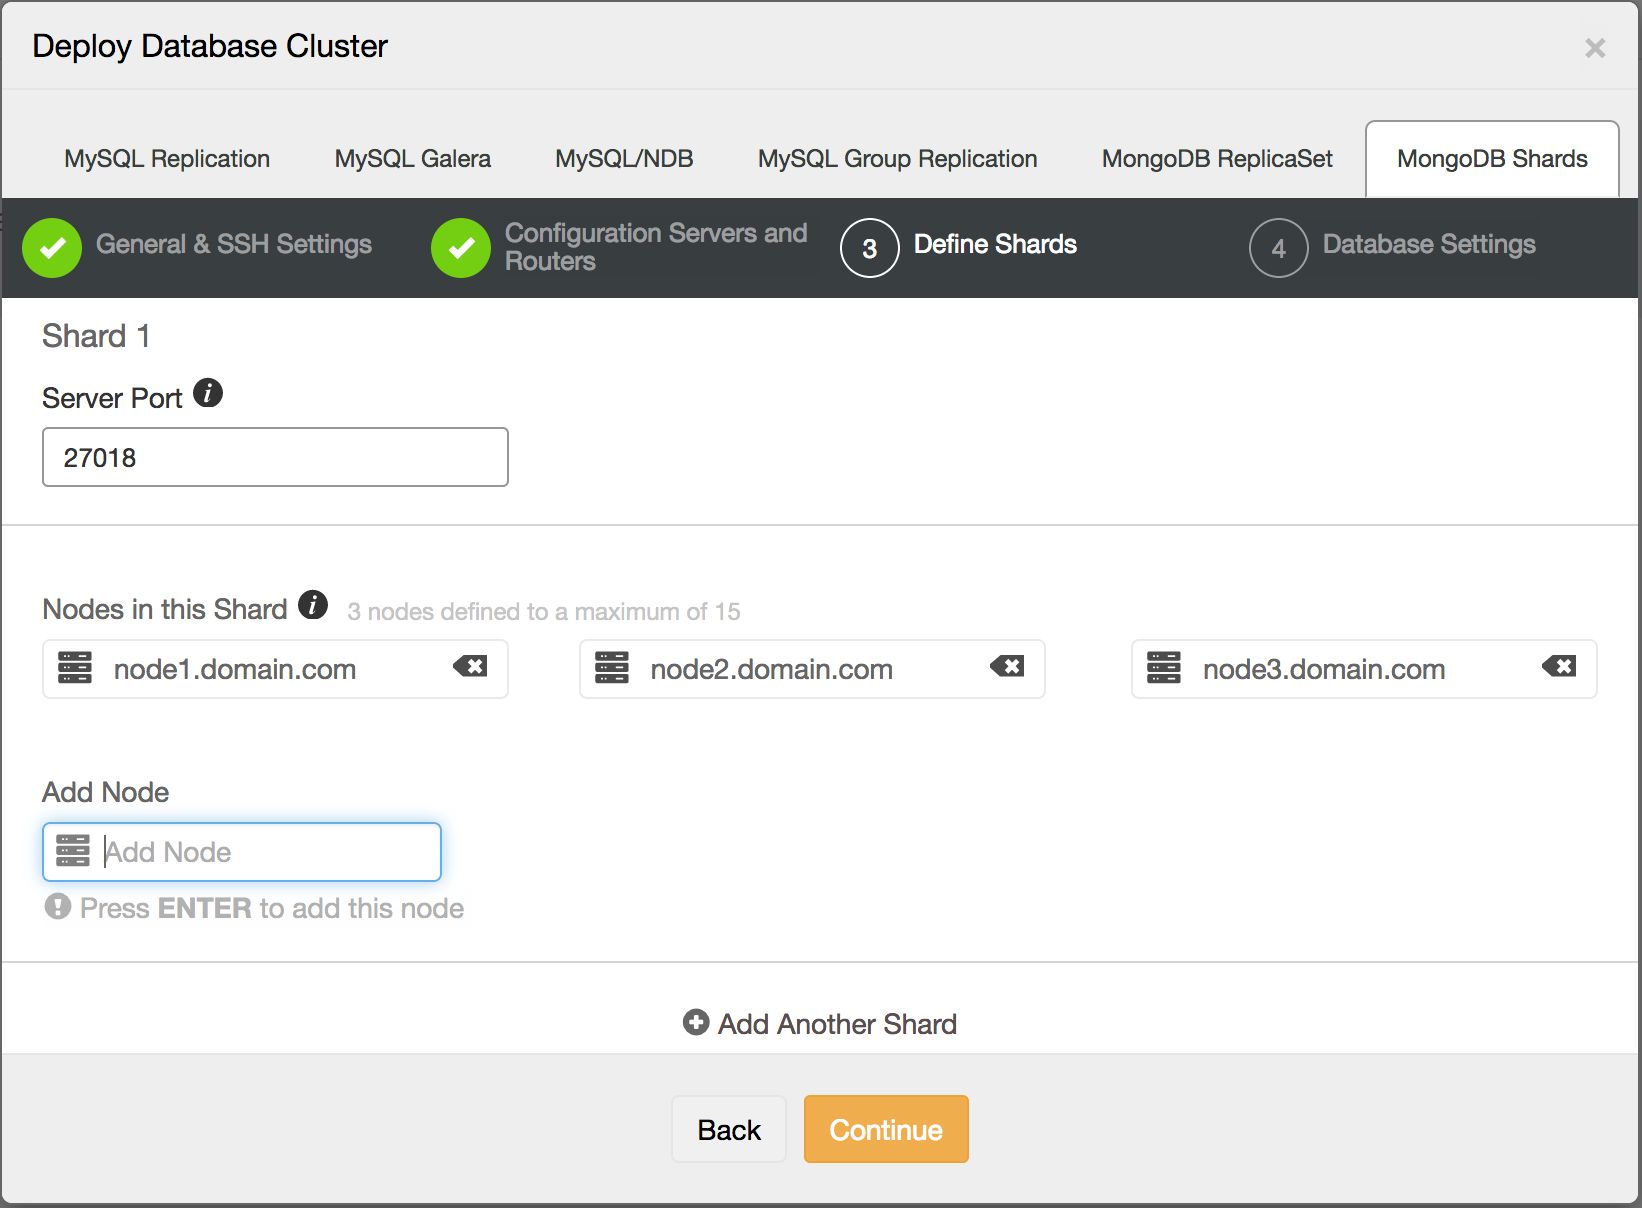
Third step is defining the shards:
And in the last step we define the database specific settings, such as which version of MongoDB we will deploy:
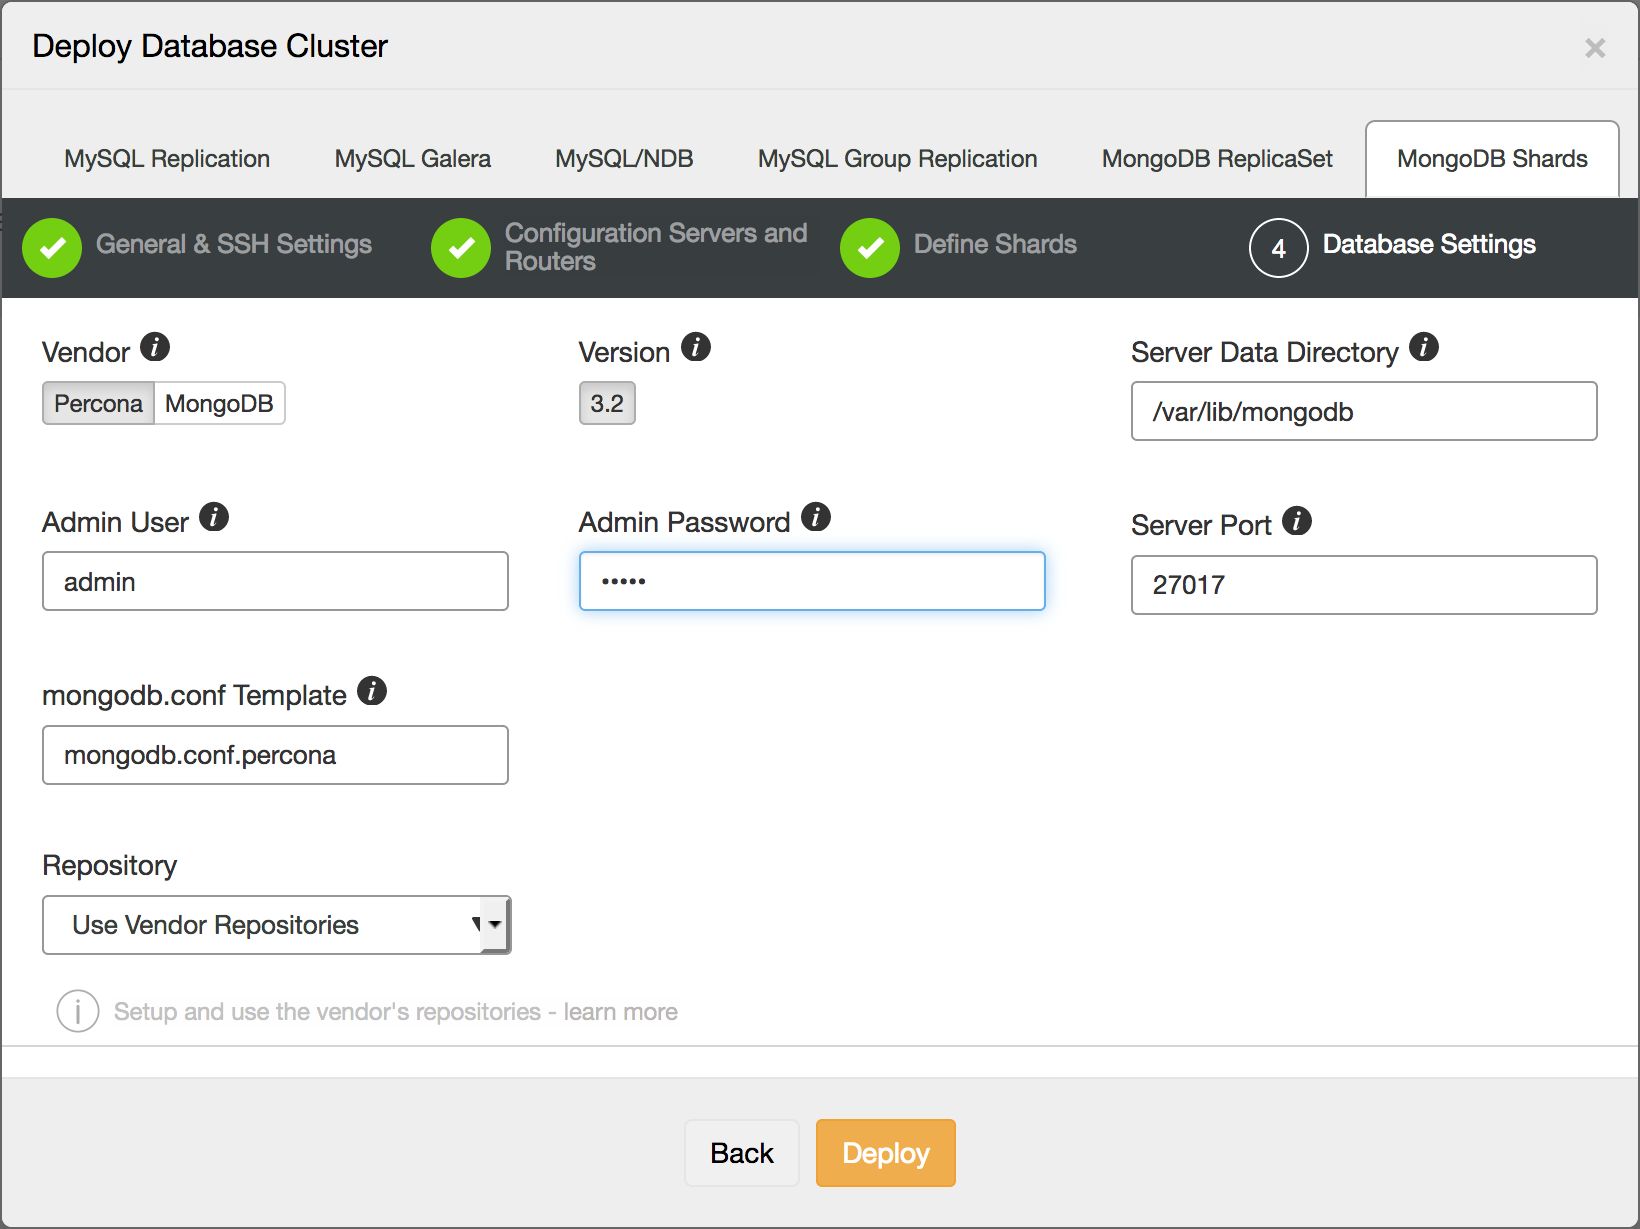
The total time taken to fill in this wizard should be around 1 minute, and after pressing the Deploy button, ClusterControl will automatically create a newly sharded cluster.
This is a quick and easy way to get started with a MongoDB sharded cluster.
Shard Key
As described in the MongoDB sharding primer paragraph, the shard key is one of the most important factors in the sharding of MongoDB. By defining the shard key, you also influence the effectiveness of the shards. The shard key is either an indexed field or part of an indexed compound field that is present in every document in your collection.
Based upon this field, the shard key defines a range of shard key values that get associated with a chunk. As we described earlier, the chunks are distributed evenly over the shards in the cluster, so this directly influences the effectiveness of the sharding.
An example of a shard key and its distribution can be seen below:
mongos> sh.status()
--- Sharding Status ---
…
databases:
{  "_id" : "shardtest",  "primary" : "sh1",  "partitioned" : true }
    shardtest.collection
        shard key: { "_id" : 1 }
        unique: false
        balancing: true
        chunks:
            sh1    1
            sh2    2
            sh3    1
        { "_id" : { "$minKey" : 1 } } -->> { "_id" : 2 } on : sh3 Timestamp(6, 1)
        { "_id" : 2 } -->> { "_id" : 24 } on : sh1 Timestamp(5, 1)
        { "_id" : 24 } -->> { "_id" : 1516 } on : sh2 Timestamp(4, 1)
        { "_id" : 1516 } -->> { "_id" : { "$maxKey" : 1 } } on : sh2 Timestamp(6, 4)
As you can see, we defined a shard key on the identifier of the document and distributed this over three shards in total. The overview of the chunks per shard seems to be quite balanced and the ranges of the identifiers show on which shard the data resides.
Limitations of the shard key
Keep in mind that once you start sharding a collection, you can no longer change the shard key and update the values of the shard key fields.
Also, unique indexes are limited within sharding: only the _id index and the index (or compound index) on the shard key can be unique. This means you can’t shard a collection that doesn’t meet these requirements, nor place unique indexes on other fields after sharding the collection.
Influence of the shard key
As we mentioned earlier, the shard key influences the performance of the sharding. This means you can optimize your shard keys for read and/or writing data. The most determining factors for this are the cardinality, frequency and rate of change of your shard key. We will illustrate this with some examples.
Sequential writes
Assume you have an application that writes a lot of sequential data only once, for instance a click-tracking application, with the following document:
{
"_id" : ObjectId("5813bbaae9e36caf3e4eab5a"),
"uuid" : "098f253e-6310-45a0-a6c3-940be6ed8eb4",
"clicks" : 4,
"pageurl" : "/blog/category/how-to",
"ts" : Timestamp(1477688235, 1)
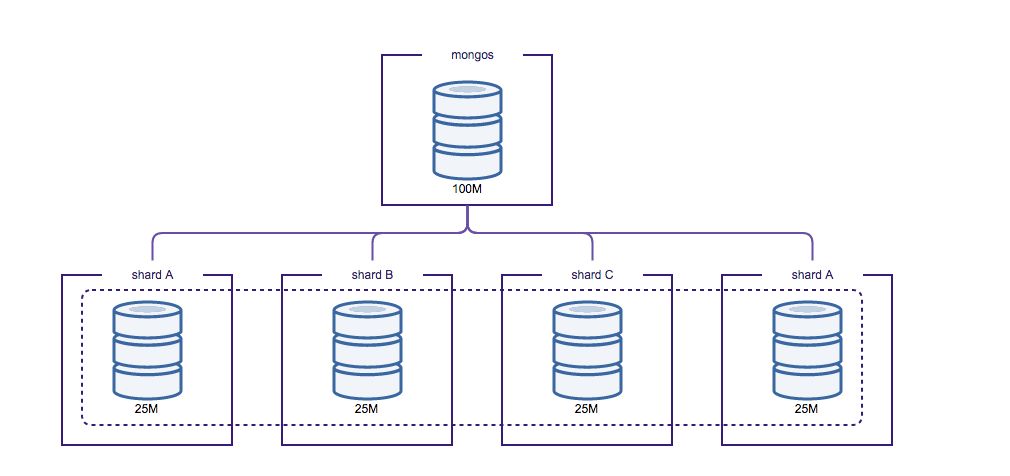
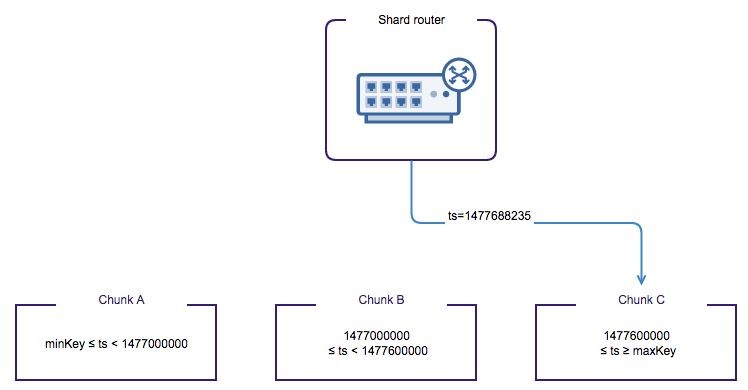
}You can distribute your data in many ways with this document. Using the timestamp of the document would mean the data gets sharded on time-intervals. So your data gets routed sequentially to one shard until the chunk is full, then the router will point to the next shard until that chunk is full. As you can already conclude: this will not scale your writes. Only one single shard is performing all write operations, while the other shards are doing next to nothing in terms of write operations. This is illustrated in the picture below.
If scaling your write capacity is your concern, you could choose the UUID field as your shard key. This means data for each unique person will be sharded, so ranges of UUIDs will be created for each chunk of data. Data will naturally be written in a more distributed manner among shards than with the timestamp shard-key. There could still be unevenness if the UUIDs are not generated in a random way.
As the shard key on the UUID field scales your write operations a lot better, it may not be the desired shard key for analyzing your full dataset within a specific time range. As the shard router is unaware of the secondary index on the timestamp, each and every shard will then be consulted to retrieve the required data. Each and every shard will return the data that they have for this query, and the shard router will combine this into a single record set that can be returned to the client. Also the UUID field may suffer from a large cardinality of documents for some of the UUIDs, so data still gets distributed unevenly.
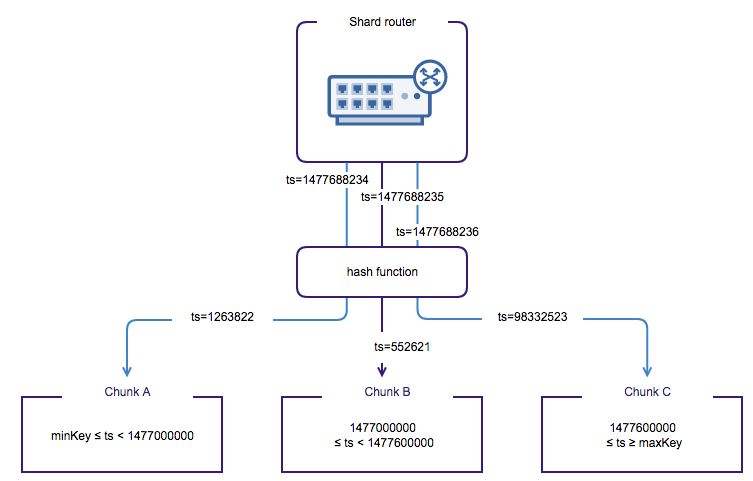
An alternative would be using the MongoDB hashed sharding strategy. A hash function will be applied on the values of a shard key, where the hash function will make the distribution among shards pseudo-random. This means two near values of the shard key are unlikely to end up in the same chunk.
Consulting one single shard, and returning a sequential part of the chunk is always more desirable than receiving data back from many shards. Also combining many result sets on the shard router into a single result set is always slower than returning the result set directly from a single shard.
Random writes
If your application writes data in a more uniform way, for instance a user on a social network, this would mean you would get both inserts and updates on your data. Suppose we have the following document:
{
    "_id" : ObjectId("5813c5a9e9e36caf3e4eab5b"),
    "uuid" : "098f253e-6310-45a0-a6c3-940be6ed8eb4",
    "firstname" : "John",
    "lastname" : "Doe",
    "email" : "[email protected]",
    "registration_time" : Timestamp(1477690793, 1)
}
Even though the write operations of new users (inserts) are happening sequentially, users who freshen up their profile with new details will also cause writes. This means the writing of data can be a bit more evenly distributed than the sequential writes example we gave earlier. We can anticipate this and choose our shard key accordingly. Choosing the timestamp field would not make sense in this case, as updates on a user document would require a write operation to all shards to find the correct record. A better candidate would be the UUID generated for the user. This would distribute the users evenly over the shards. If your UUID is generated randomly, the inserts of new users will also be distributed evenly.
As long as you use the UUID to access the data, reading back user data is also very efficient. But similar to the click-tracking example, selecting a range of users that registered in a certain timeframe would require consulting each and every shard again. This can’t be overcome easily.
The shard key paradigm
As you can see, the shard key influences the way you read and write your data. Choosing it wrongly could make data retrieval and updating data very slow. That’s why it is so important to choose the right shard key up front.
To ease the pain, you could also store certain data multiple times in different collections, and shard your data in various ways. For instance: the ranges of users that registered in a certain timeframe could be stored in a secondary collection. This collection only contains the references to the documents in the other collection including the timestamp. This collection will then be sharded on the timestamp field. The downside is naturally that there is a double administration this way.
Enabling sharding on our cluster
Now that we have covered the theory behind the shard keys, we can enable sharding on the database in our example cluster:
mongo --eval 'sh.enableSharding("shardtest");'Without enabling sharding on this database, we will not be able to shard the collections inside it. Once enabled, any collection within that database will end up on the primary shard. The primary shard is the shard with the least amount of data upon enabling the database for sharding. You can change the primary shard assignment afterwards with the movePrimary command.
We need to configure the shard key separately by sharding the collection:
mongo --eval 'sh.shardCollection("shardtest.collection", {"_id":});'Our shard key is set on the identifier field of the collection. Now if we would insert many large documents of data, this would give us a nicely sharded collection:
mongo shardtest --eval 'data="a";for (i=1; i < 10000; i++) { data=data+"a"; db.collection.insert({"_id": i, "data": data}); }; 'And this is what the shard distribution looks like after inserting all 10000 documents:
mongos> sh.status()
--- Sharding Status ---
...
  databases:
    {  "_id" : "shardtest",  "primary" : "sh1",  "partitioned" : true }
        shardtest.collection
            shard key: { "_id" : 1 }
            unique: false
            balancing: true
            chunks:
                sh1    4
                sh2    4
                sh3    3
            { "_id" : { "$minKey" : 1 } } -->> { "_id" : 2 } on : sh1 Timestamp(5, 1)
            { "_id" : 2 } -->> { "_id" : 3 } on : sh1 Timestamp(1, 2)
            { "_id" : 3 } -->> { "_id" : 839 } on : sh2 Timestamp(6, 1)
            { "_id" : 839 } -->> { "_id" : 1816 } on : sh2 Timestamp(2, 3)
            { "_id" : 1816 } -->> { "_id" : 2652 } on : sh3 Timestamp(4, 1)
            { "_id" : 2652 } -->> { "_id" : 3629 } on : sh3 Timestamp(3, 3)
            { "_id" : 3629 } -->> { "_id" : 4465 } on : sh1 Timestamp(4, 2)
            { "_id" : 4465 } -->> { "_id" : 5442 } on : sh1 Timestamp(4, 3)
            { "_id" : 5442 } -->> { "_id" : 6278 } on : sh2 Timestamp(5, 2)
            { "_id" : 6278 } -->> { "_id" : 7255 } on : sh2 Timestamp(5, 3)
            { "_id" : 7255 } -->> { "_id" : { "$maxKey" : 1 } } on : sh3 Timestamp(6, 0)
You can see our collection consists of several ascending series, each on a single shard. This is due to our linear iteration of inserting documents, while the inserts only happened on a single shard for the duration of the entire range.
As we described in the theory earlier, we can enable a hashing algorithm in the shard key definition to prevent this:
mongo --eval 'sh.shardCollection("shardtest.collection", {"_id":"hashed"});'If we now re-insert the same data, and look at the sharding distribution, we see it created very different ranges of values for the shard key:
mongos> sh.status()
--- Sharding Status ---
…
  databases:
    {  "_id" : "shardtest",  "primary" : "sh1",  "partitioned" : true }
        shardtest.collection
            shard key: { "_id" : "hashed" }
            unique: false
            balancing: true
            chunks:
                sh1    3
                sh2    4
                sh3    3
            { "_id" : { "$minKey" : 1 } } -->> { "_id" : NumberLong("-6148914691236517204") } on : sh3 Timestamp(4, 0)
            { "_id" : NumberLong("-6148914691236517204") } -->> { "_id" : NumberLong("-4643409133248828314") } on : sh1 Timestamp(4, 1)
            { "_id" : NumberLong("-4643409133248828314") } -->> { "_id" : NumberLong("-3078933977000923388") } on : sh1 Timestamp(3, 12)
            { "_id" : NumberLong("-3078933977000923388") } -->> { "_id" : NumberLong("-3074457345618258602") } on : sh1 Timestamp(3, 13)
            { "_id" : NumberLong("-3074457345618258602") } -->> { "_id" : NumberLong(0) } on : sh2 Timestamp(3, 4)
            { "_id" : NumberLong(0) } -->> { "_id" : NumberLong("1545352804953253256") } on : sh2 Timestamp(3, 8)
            { "_id" : NumberLong("1545352804953253256") } -->> { "_id" : NumberLong("3067091117957092580") } on : sh2 Timestamp(3, 9)
            { "_id" : NumberLong("3067091117957092580") } -->> { "_id" : NumberLong("3074457345618258602") } on : sh2 Timestamp(3, 10)
            { "_id" : NumberLong("3074457345618258602") } -->> { "_id" : NumberLong("6148914691236517204") } on : sh3 Timestamp(3, 6)
            { "_id" : NumberLong("6148914691236517204") } -->> { "_id" : { "$maxKey" : 1 } } on : sh3 Timestamp(3, 7)
As shown in the status above, the shards have the same number of chunks assigned to them. As the hashing algorithm ensures the hashed values are nonlinear, our linear inserts have now been inserted across all shards. In our test case, inserts were performed by a single thread; but in a production environment with high concurrency, the difference in write performance has improved greatly.
Conclusion
In this first part we have shown how MongoDB sharding works, and how to set up your own sharded environment. Making the choice for a shard key should not be taken lightly: it determines the effectiveness of your sharded cluster and can’t be altered afterwards.
In the next part of the sharding series we will focus on what you need to know about monitoring and maintaining shards.