blog
The Basics of MongoDB Configuration

After covering the deployment of MongoDB in our previous blogpost, we now move on to configuration basics. MongoDB is configured through both the config file (/etc/mongod.conf) and runtime. In the previous blogpost, we mentioned some of the configurables. We will go more in depth on each of them in this post.
MongoDB Topologies
To understand some of the configurables, we need to clarify the topologies of MongoDB.
We can simply start with the single standalone MongoDB instance. This is comparable to the MySQL single instance and naturally this topology will not have any data replicated from one host to another.
Once we replicate data between nodes, this is called a ReplicaSet in MongoDB. In our previous post we described briefly how the ReplicaSet works, but here is a condensed version: MongoDB will ensure transactions will be written to the oplog (comparable with the MySQL binlog) in more than just the primary (master): also to secondary nodes (slaves). You can configure it to confirm the transaction after either writing to the primary, a set of secondaries, the majority of the secondaries or all members.

For a ReplicaSet we need at least two instances to confirm a write, but it is advisable to use at least three. Confirmation can come from secondary nodes or an arbiter. A MongoDB ReplicaSet can best be compared to a hybrid between traditional MySQL replication and Galera synchronous replication.
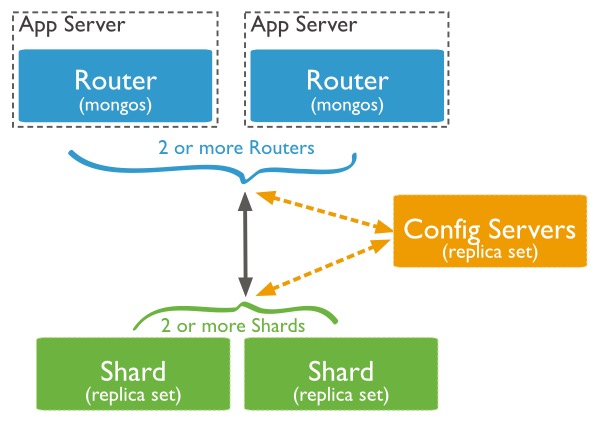
The other topology to mention is MongoDB Sharding. MongoDB will be able to shard based upon the data stored in the Config Servers, and route the queries to the correct shards. In the picture below, the Config Servers and Shards are all independent ReplicaSets.
In this blog post, we will skip the configuration of sharding and save that for a future blog post.
MongoDB ReplicaSet Configuration
The most important configuration for the MongoDB ReplicaSet is the name of the ReplicaSet. We have to provide this name in every configuration file of MongoDB to ensure they are all part of the same ReplicaSet.
replication:
   replSetName: "ourreplicaset"
The remaining configuration for the MongoDB ReplicaSet has to be done at runtime. This runtime configuration will be stored in the so-called local database. This local database contains not only the data used for the replication process, but also information about the (other) instances in the ReplicaSet.
You can access most of this information via the rs object, using the various methods to write the replication configuration and retrieve its status. For instance, to show the current ReplicaSet configuration, you simply call rs.conf(). Since we haven’t set up our ReplicaSet yet, it will output an error similar to this:
Error: Could not retrieve replica set config: {
    "info" : "run rs.initiate(...) if not yet done for the set",
    "ok" : 0,
    "errmsg" : "no replset config has been received",
    "code" : 94
}
So what we need to do first is to initiate the ReplicaSet:
> rs.initiate()Now we can define our hosts in the ReplicaSet:
> rs.add("host1.ourcompany.com")
> rs.add("host2.ourcompany.com")
And then we can check the status of our ReplicaSet:
> rs.status()This is all that is necessary to set up a MongoDB ReplicaSet.
Now if we would want to add an arbiter, we simply install MongoDB on a host and run the following command:
mongod --port 30000 --dbpath /data/arb --replSet ourreplicasetThis will launch a mongod process that uses /data/arb to store configuration data (local database). Now all we have to do is add the arbiter to the ReplicaSet:
rs.addArb("host3.ourcompany.com:30000")Now this host will only confirm writes in the ReplicaSet and not write any data to its own data directory.
Securing MongoDB
As we described in the previous post, MongoDB comes with very little security out of the box: for instance, authorization is disabled by default. In other words: anyone has root rights over any database. One of the changes MongoDB applied to mitigate risks was to change its default binding to 127.0.0.1. This prevents it being bound to the external ip address, but naturally this will be reverted by most people who install it.
Lately thousands of misconfigured and wide open MongoDB instances have been found, where even one of these instances contained personal information of 93 million Mexican voters. Securing your MongoDB instance is just as vital as securing any other database! We will explain in depth how to enable authorization and SSL.
Authorization
Enabling authorization is done by adding one line in the security section of your configuration:
security:
  authorization: "enabled"
Since no users have been defined yet, we can’t restart MongoDB after making this change. So what we need to do is to first create an account that can grant privileges:
> use admin
> db.createUser(
    {
        user: "myadmin",
        pwd: "verysecurepassword",
        roles: [ { role: "userAdminAnyDatabase", db: "admin" } ]
    }
)
Now restart MongoDB. After the restart, you need to pass the authenticationDatabase parameter as well if you log in with the newly created admin account:
$ mongo -u "myadmin" -p "verysecurepassword" --authenticationDatabase "admin"You will be able to perform admin tasks only after authenticating against the admin database, e.g., creating new users. So suppose you wish to create new users, you have to provide the authenticationDatabase first and then create the new users.
$ mongo -u "myadmin" -p "verysecurepassword" --authenticationDatabase "admin"
> use mytest
> db.createUser(
    {
        user: "mytestuser",
        pwd: "test1234",
        roles: [ { role: "readWrite", db: "mytest" } ]
    }
)
In our case, the mytest database did not exist before. Even though it does not exist yet, we can already grant other users access to it. Naturally, as a MySQL DBA, I would be tempted to create the first collection (like a table) in this database. But I would not be able to do so:
> db.createCollection("mycollection")
{
    "ok" : 0,
    "errmsg" : "not authorized on mytest to execute command { create: "mycollection" }",
    "code" : 13
}
We can explain this simply by comparing it to MySQL. In MySQL, the grantee needs to have the same rights as what it is granting to another user. But in MongoDB, the userAdmin role is only able to administrate users. If you wish to have similar functionality as what you are used to in MySQL, you can additionally grant readWriteAnyDatabase and/or root roles. The latter will open up all admin functionality for this user.
So now we will be able to login to this database with the test user:
$ mongo -u "mytestuser" -p "test1234" mytestAnd create the collection:
> use mytest
> db.createCollection("mycollection")
{ "ok" : 1 }
You can find more information on the MongoDB built in authentication roles here.
SSL
Enabling encryption on database communication has become a necessity in the past few years, especially when databases are deployed in the cloud. This accounts for both internal and external traffic. MongoDB supports encryption of both client-server connection and intra-cluster communication.
Once you enable Transport Encryption in MongoDB, all of the network traffic of MongoDB will be encrypted using TLS/SSL (Transport Layer Security/Secure Sockets Layer). When enabled, both internal and external communication will be encrypted. There is no possibility to do only one of them.
To enable encryption, we need to generate our certificate and private key first.
$ cd /etc/ssl/
$ openssl req -newkey rsa:2048 -new -x509 -days 365 -nodes -out mongodb-cert.crt -keyout mongodb-cert.key
This will create a self-signed certificate without password, that is valid for one year. We need to concatenate the private key and the certificate to create a PEM file:
$ cat mongodb-cert.key mongodb-cert.crt > mongodb.pemAnd then we can configure MongoDB to use the PEM file:
net:
   ssl:
      mode: requireSSL
      PEMKeyFile: /etc/ssl/mongodb.pem
After we have restarted MongoDB, we will no longer be able to use unencrypted connections to MongoDB:
$ mongo -u "mytestuser" -p "test1234" mytest
MongoDB shell version: 3.2.6
connecting to: mytest
2016-05-24T16:39:41.950+0000 E QUERY    [thread1] Error: network error while attempting to run command 'isMaster' on host '127.0.0.1:27017'  :
connect@src/mongo/shell/mongo.js:229:14
@(connect):1:6
Connecting to MongoDB providing the –ssl option will result in the following error:
$ mongo -u "mytestuser" -p "test1234" mytest --ssl
MongoDB shell version: 3.2.6
connecting to: mytest
2016-05-24T16:39:52.988+0000 E NETWORK  [thread1] SSL peer certificate validation failed: self signed certificate
2016-05-24T16:39:52.988+0000 E QUERY    [thread1] Error: socket exception [CONNECT_ERROR] for SSL peer certificate validation failed: self signed certificate :
connect@src/mongo/shell/mongo.js:229:14
@(connect):1:6
As we have created a self-signed certificate, MongoDB client will try to validate our certificate. Of course if you do own a valid certificate and configured this certificate, MongoDB wouldn’t complain about this. To overcome the certificate validation, we have to provide the –sslAllowInvalidCertificates parameter:
$ mongo -u "mytestuser" -p "test1234" mytest --ssl --sslAllowInvalidCertificates
MongoDB shell version: 3.2.6
connecting to: mytest
2016-05-24T17:09:15.752+0000 W NETWORK  [thread1] SSL peer certificate validation failed: self signed certificate
2016-05-24T17:09:15.752+0000 W NETWORK  [thread1] The server certificate does not match the host name 127.0.0.1
>
If you wish to validate the client with CA-signed certificate, you have to configure MongoDB with the CAFile configurable:
net:
  ssl:
    CAFile: /etc/ssl/ca.pem
This will force the client to use both a PEM and CA file for establishing the connection.
HTTP and REST
Up until MongoDB 3.2, there used to be an HTTP status page on port 28017, but as of 3.2 this status page has been deprecated. This status page was very useful for gaining insights into what is happening in your MongoDB instance. When exposed to the outside world, it would give a little too much information. However, enabling authorization in MongoDB would enforce anyone to authenticate against the HTTP status page, but Kerberos and the new SCRAM-SHA1 are not supported.
So if you choose to install a version prior to 3.2 and not enable authorization: it is recommended to disable the HTTP interface or at least shield it from the outside.
To disable, simply add the following configuration:
net:
  http:
    enabled: false
Next to the HTTP interface, there is also the simple REST api. It uses the same port number as the HTTP status page, with a REST path built up using the structure /databasename/collectionname?option=value. Naturally the REST api outputs JSON formatted data. This makes it ideal to extract information from MongoDB in web frameworks using this API.
However, just as with the HTTP status page, when authorization has been enabled MongoDB requires client authentication, while Kerberos and the new SCRAM-SHA1 are not supported. So it will be better to disable both the HTTP status page and the REST api.
net:
  http:
    enabled: false
    RESTInterfaceEnabled: false
If you are in need of a REST api, there are better alternatives around that do support Kerberos and SCRAM-SHA1 authentication. You can find an overview in the MongoDB documentation.
Conclusion
We have gone more in depth on the configuration specifics of the MongoDB topologies and security. We hope you have a good insight in how to set up a replica set, SSL and disable the HTTP and REST interface. In the next blog post we will focus more on the monitoring and trending in MongoDB.